Yes, each Alexa device needs to be set up individually to ensure it connects to your Wi-Fi network and operates correctly.
The post How to Fix RemoBell S Not Connecting to WiFi appeared first on Appuals.
]]>
Here are some common reasons why these connectivity issues occur:
- Weak WiFi signal: If the WiFi signal at your doorbell’s location isn’t strong enough, it might not maintain a stable connection.
- Router issues: Sometimes, the problem lies with the router itself, possibly due to outdated firmware or specific settings that limit the device’s ability to connect.
Now that we understand the causes, let’s move on to the solutions.
Basic Troubleshooting
Before diving into more detailed steps to fix your RemoBell S’s WiFi problems, starting with some simple checks can help identify or even resolve the issue quickly:
- Check WiFi network: Start by verifying that your WiFi network is functioning correctly. You can connect other devices to the same network to ensure they can access the internet without issues. This step helps confirm whether the problem is with your RemoBell S or if it’s a broader network issue.
- Power cycle RemoBell S: Simply restarting your RemoBell S can resolve connectivity issues. To power cycle the device, disconnect it from its power source for about 30 seconds and then reconnect it. This process can refresh the device’s connection to your WiFi network.
- Check WiFi strength: The strength of your WiFi signal at your RemoBell S’s location is crucial for maintaining a stable connection. Use a WiFi signal strength testing app to check the signal quality right at your doorbell’s location. If the signal is weak, it might be causing the issue, and you may need to move your router closer or use a WiFi extender.
- Restart your WiFi router: Restarting your router or modem can clear up any temporary network issues or glitches that might be preventing your RemoBell S from connecting. It’s a quick way to refresh your home network, potentially resolving issues without more complex solutions.
1. Update RemoBell Firmware
Firmware updates usually fix issues, including connectivity problems, so updating your device could resolve the issue of your RemoBell S not connecting to WiFi.
- Launch the Remo+ app on your smartphone (available for both iOS and Android).
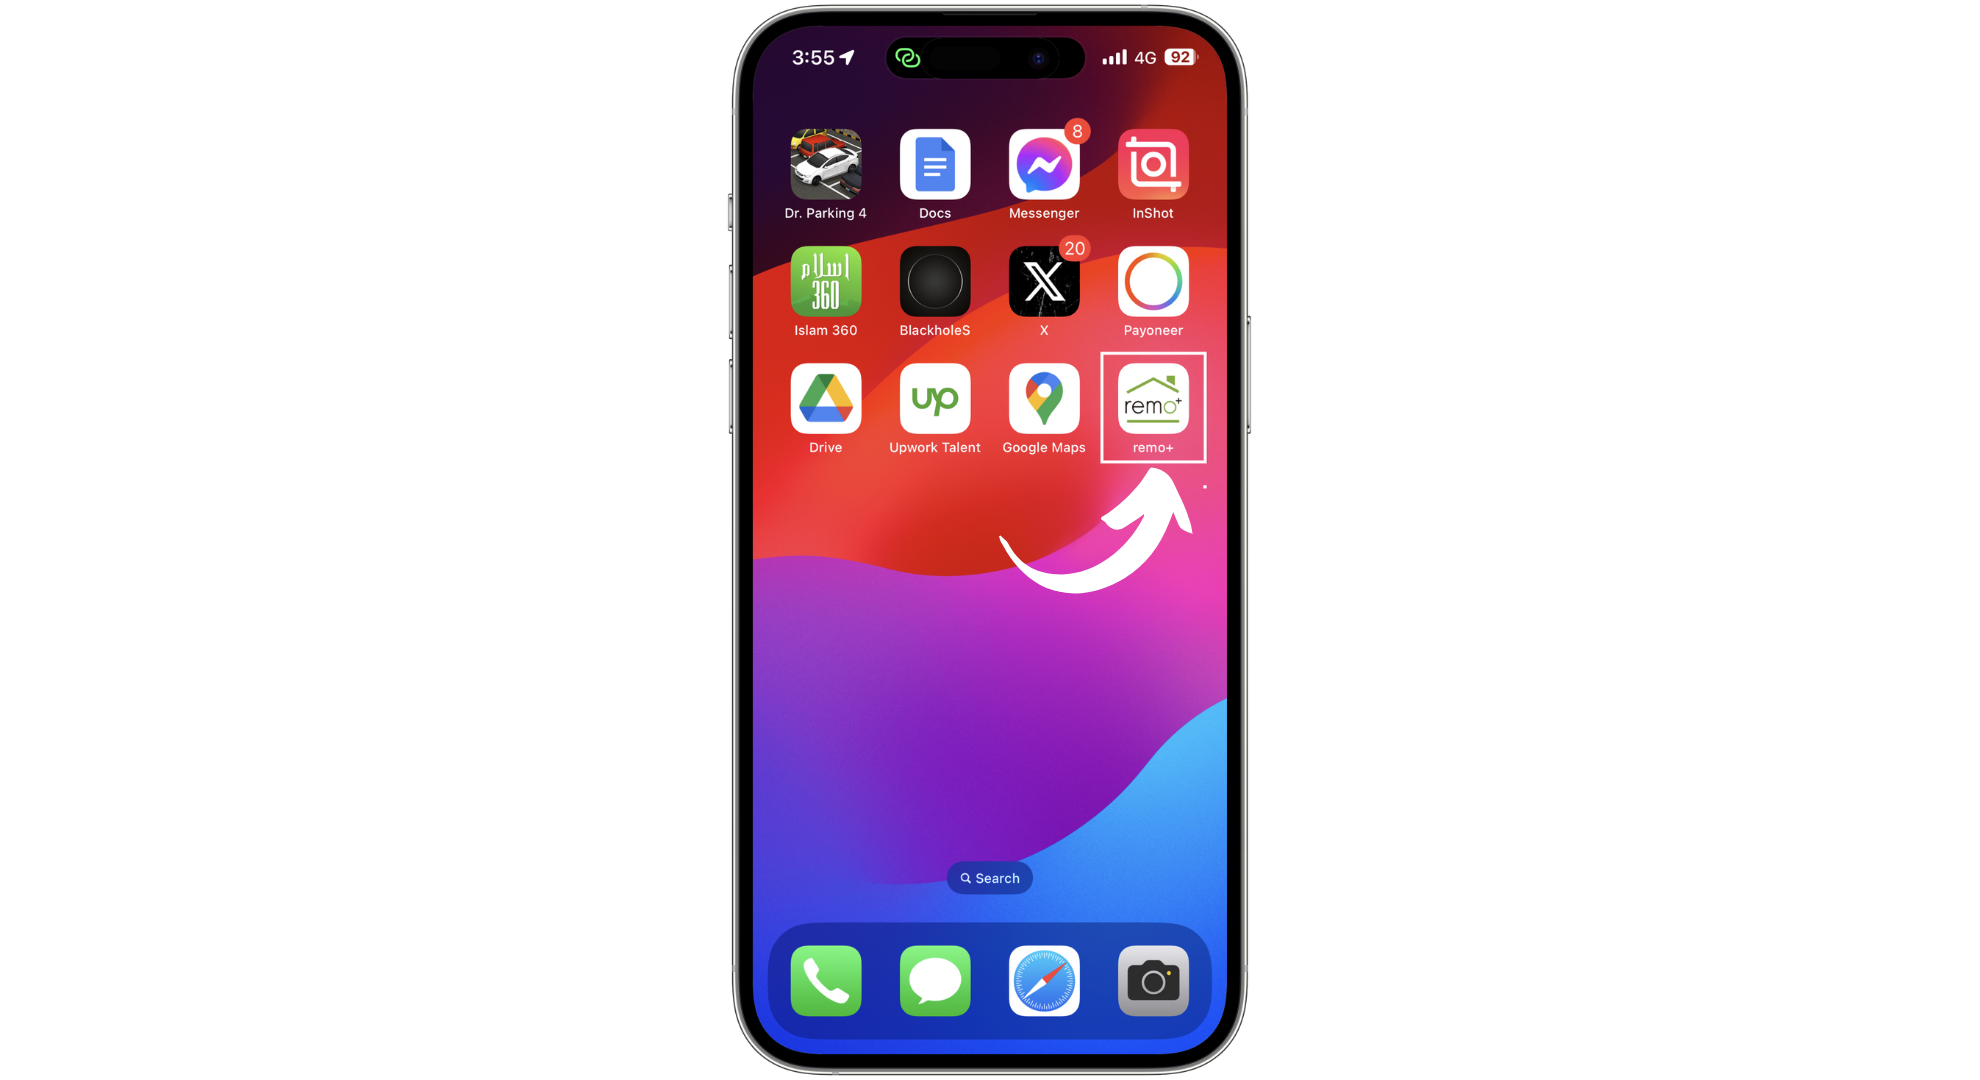
- Tap on the “info” icon at the bottom of the screen.
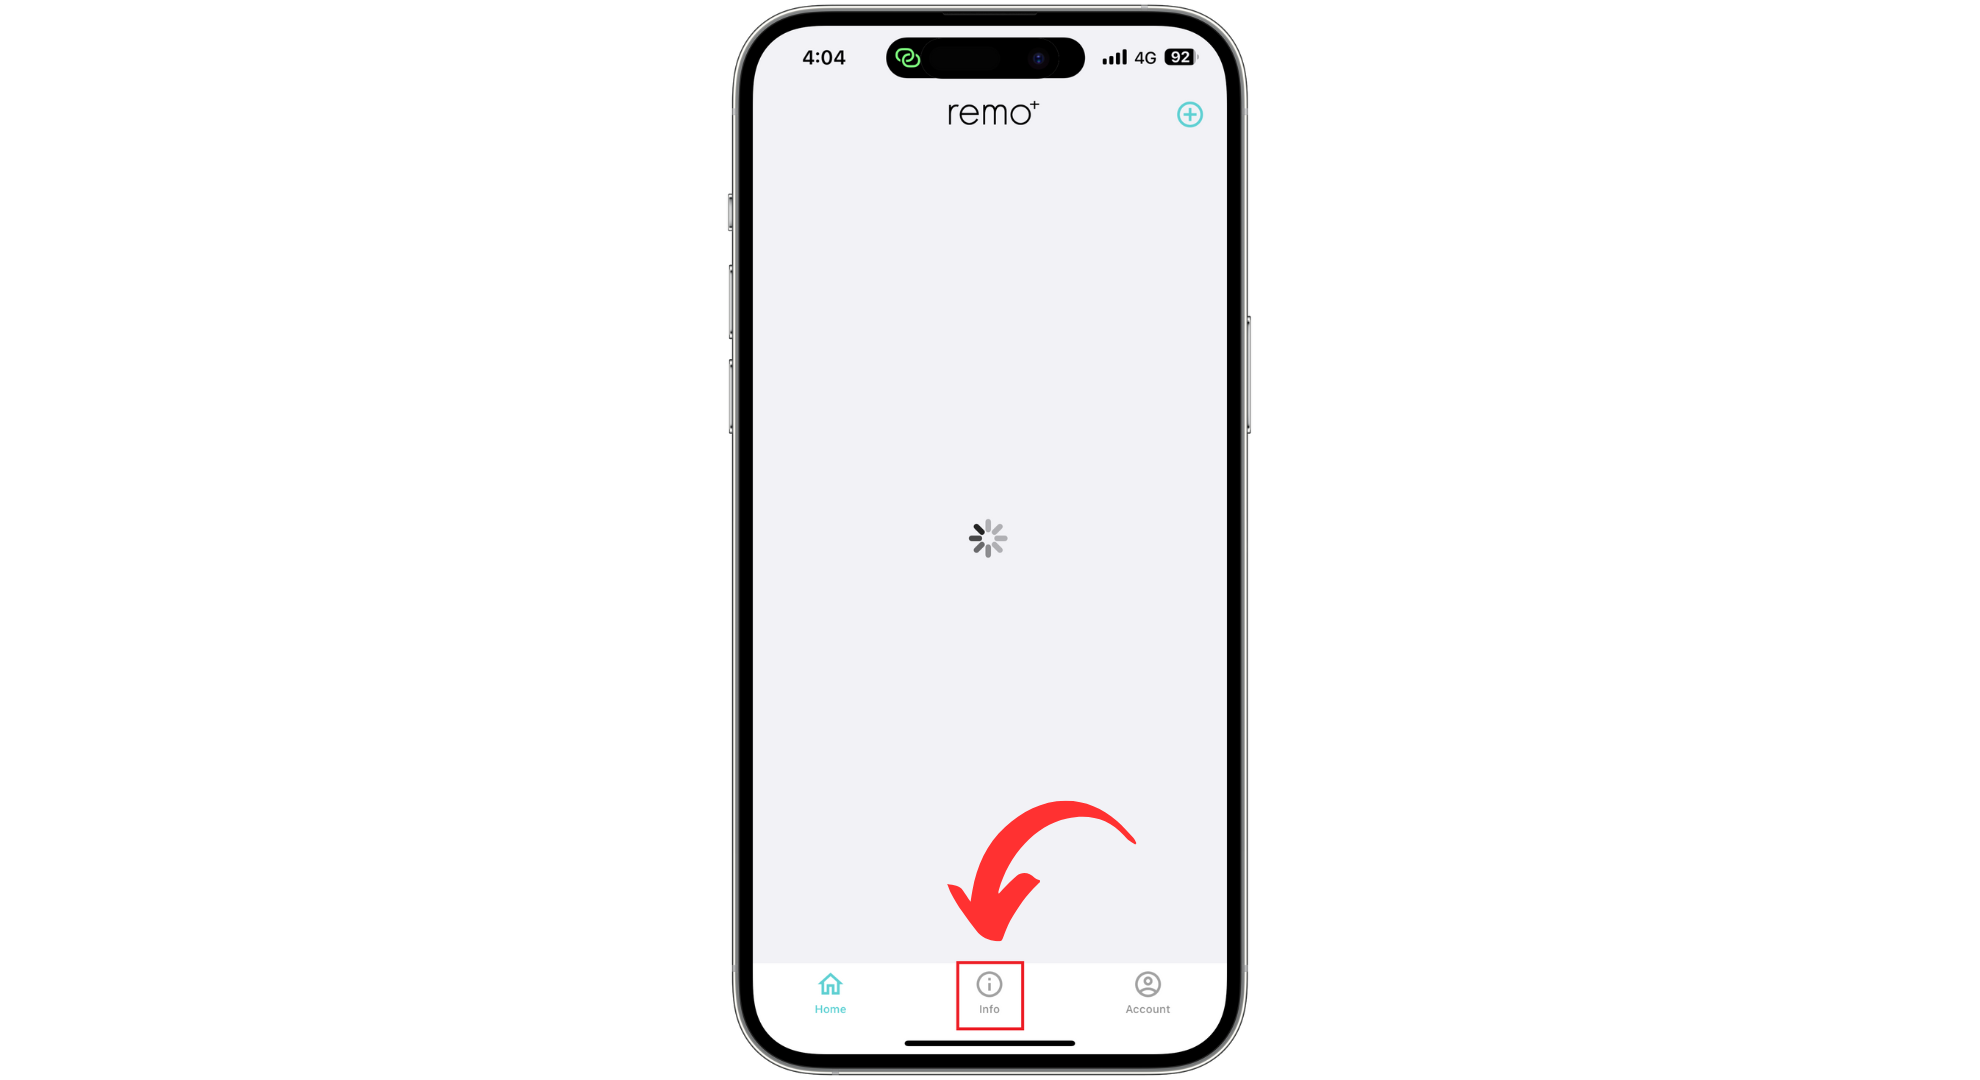
- Check for available firmware updates. If an update exists, select it and allow the process to complete uninterrupted.

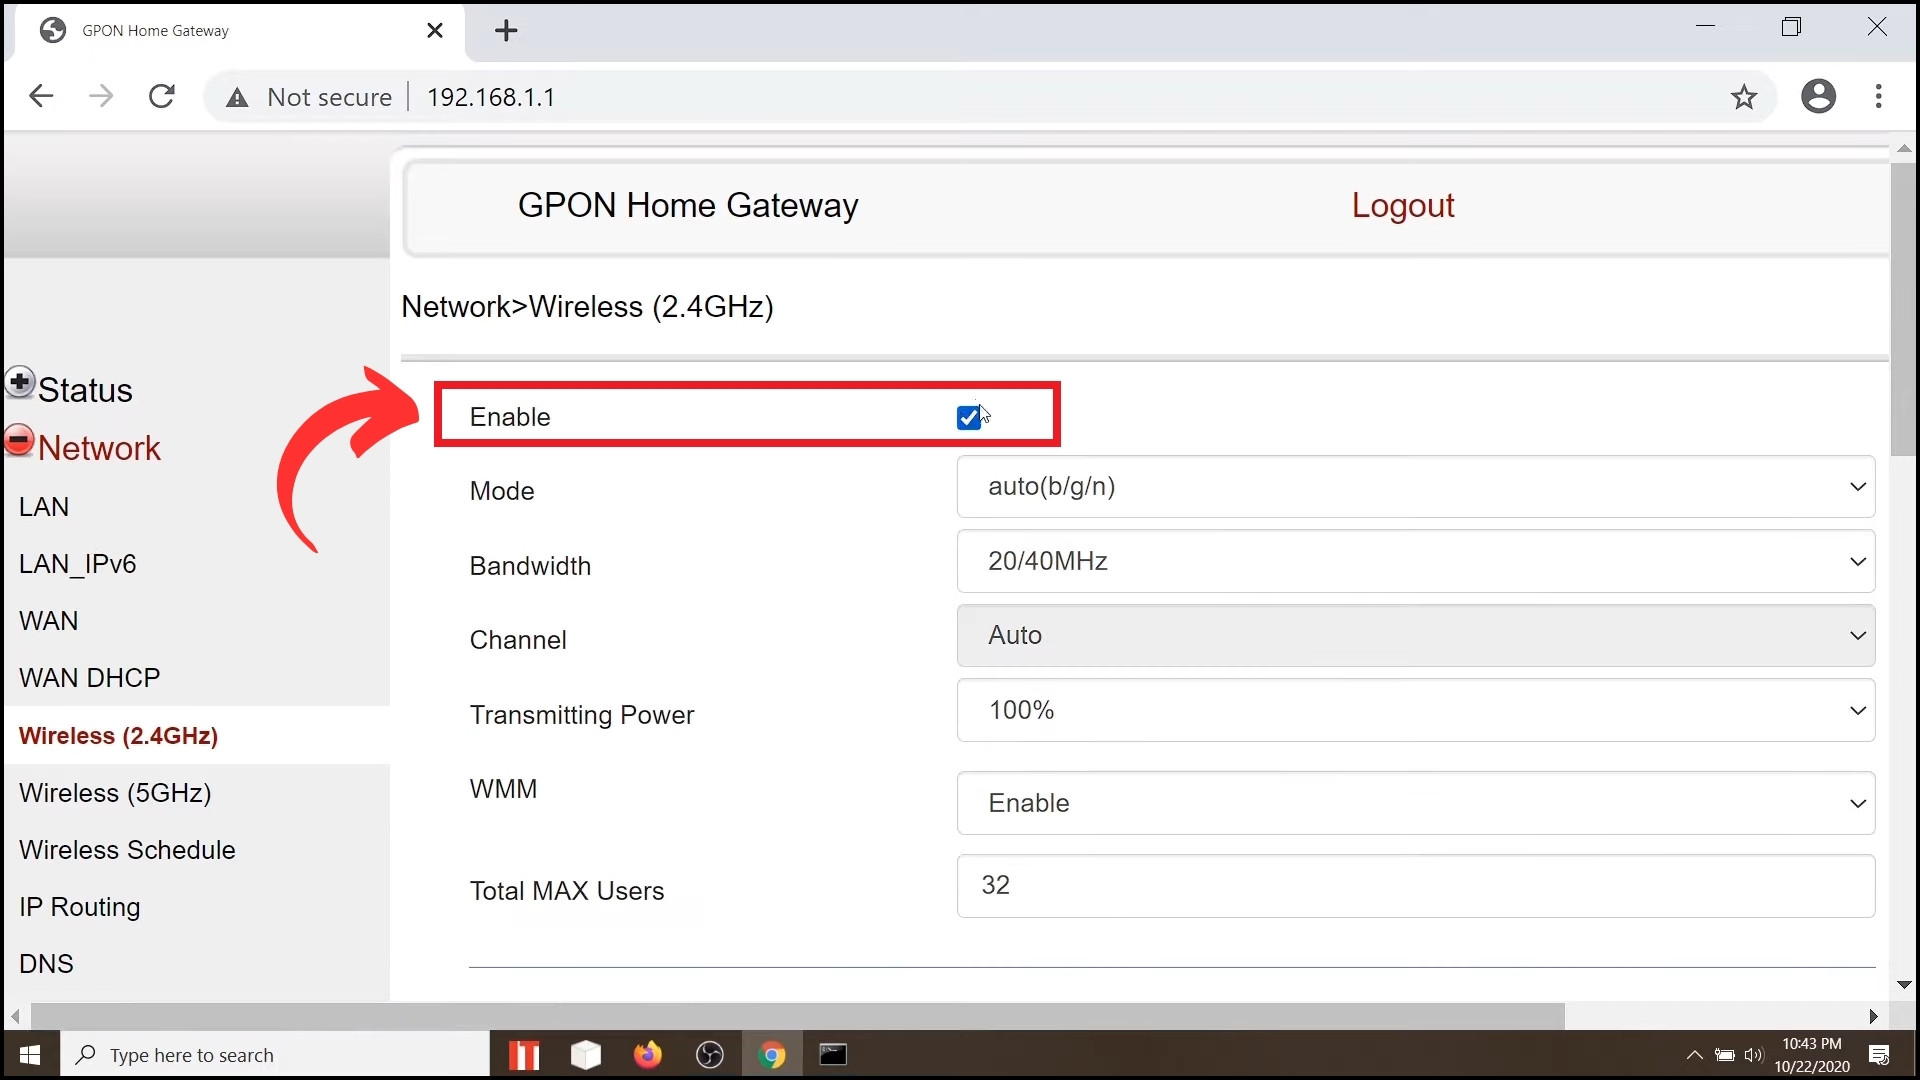
2. Check WiFi Settings
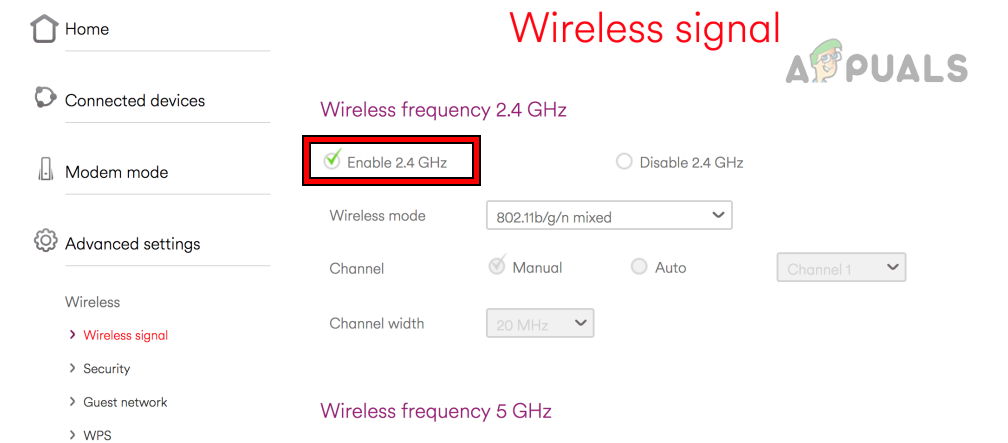
The RemoBell S requires a 2.4GHz WiFi network to connect properly. If your WiFi is set to 5GHz, it might cause connection issues, preventing the device from syncing up with your network. To resolve this, ensure your router is broadcasting a 2.4GHz signal.
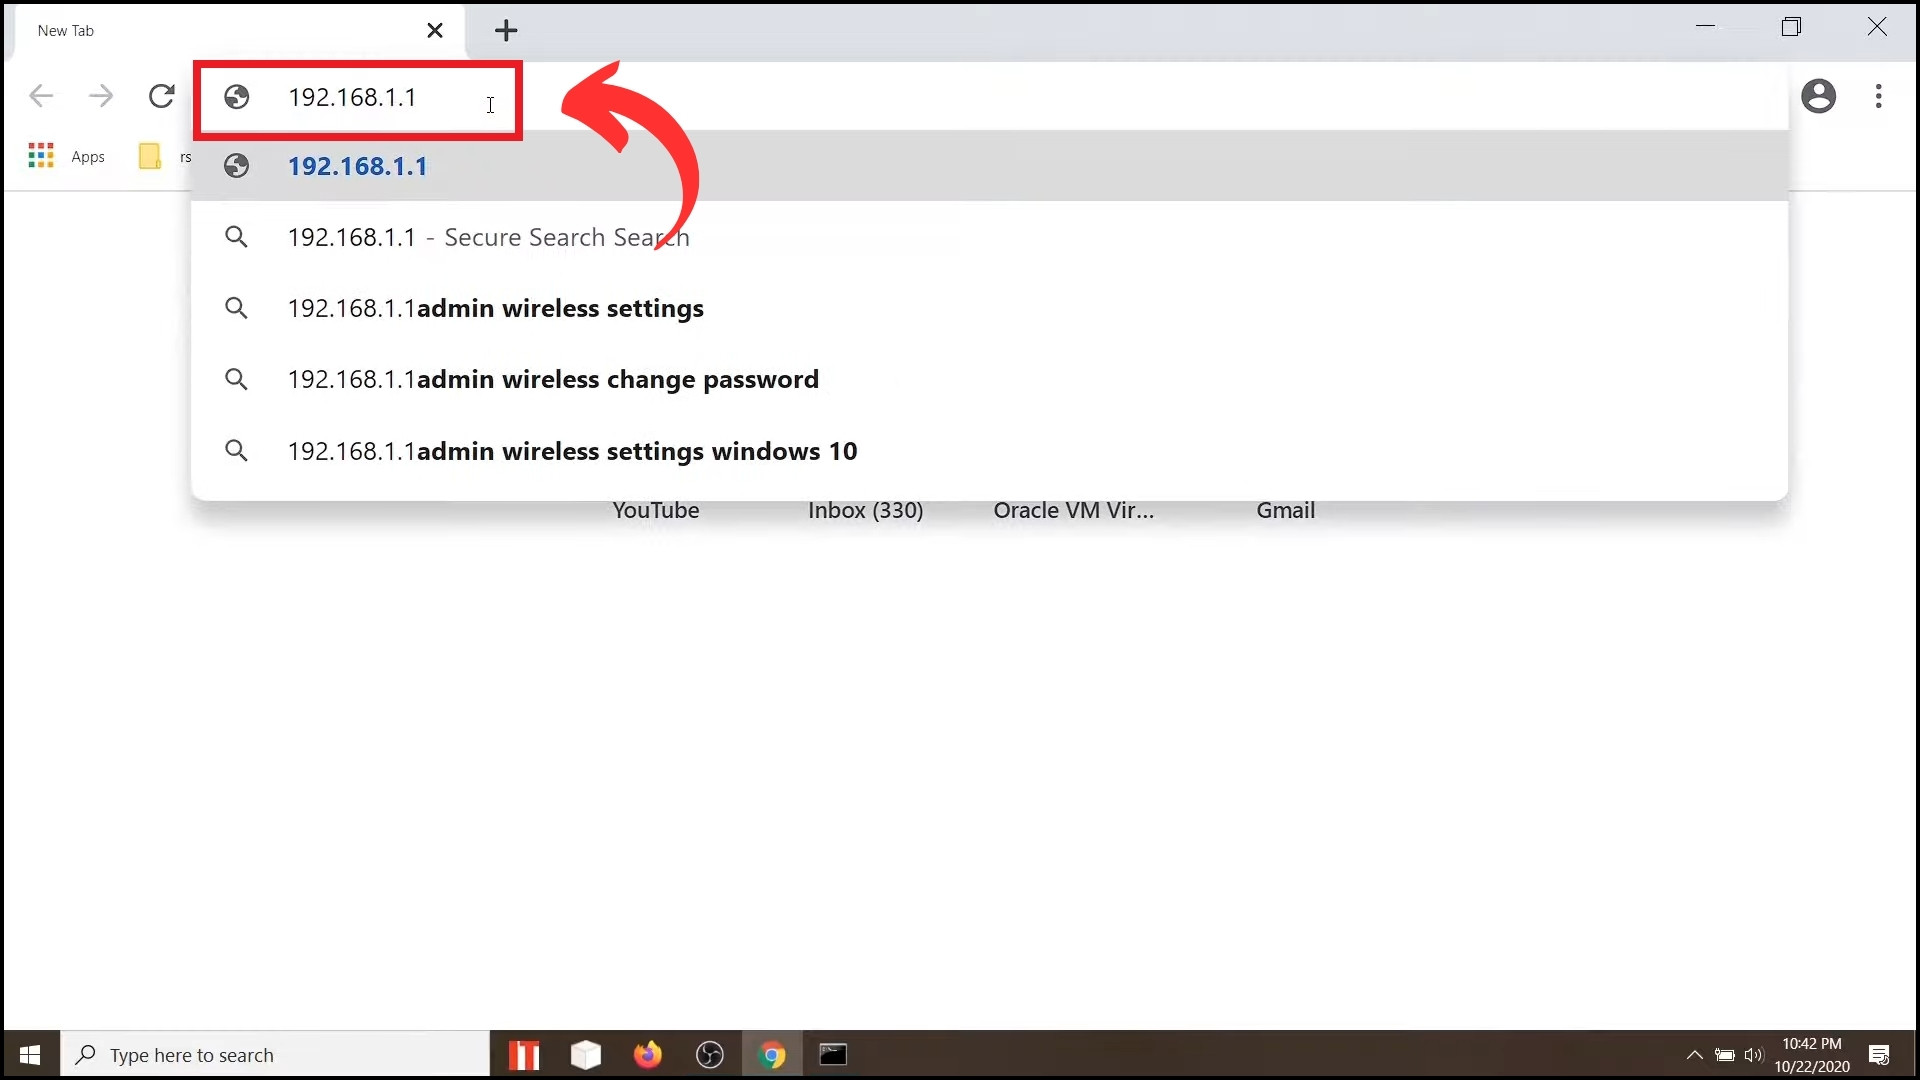
Note: IP address varies from router to router; you can check our article to determine what IP address your router is operating on.
- Open a web browser or app to access your router’s settings using the router’s IP address.
- Navigate to the “Network” section.
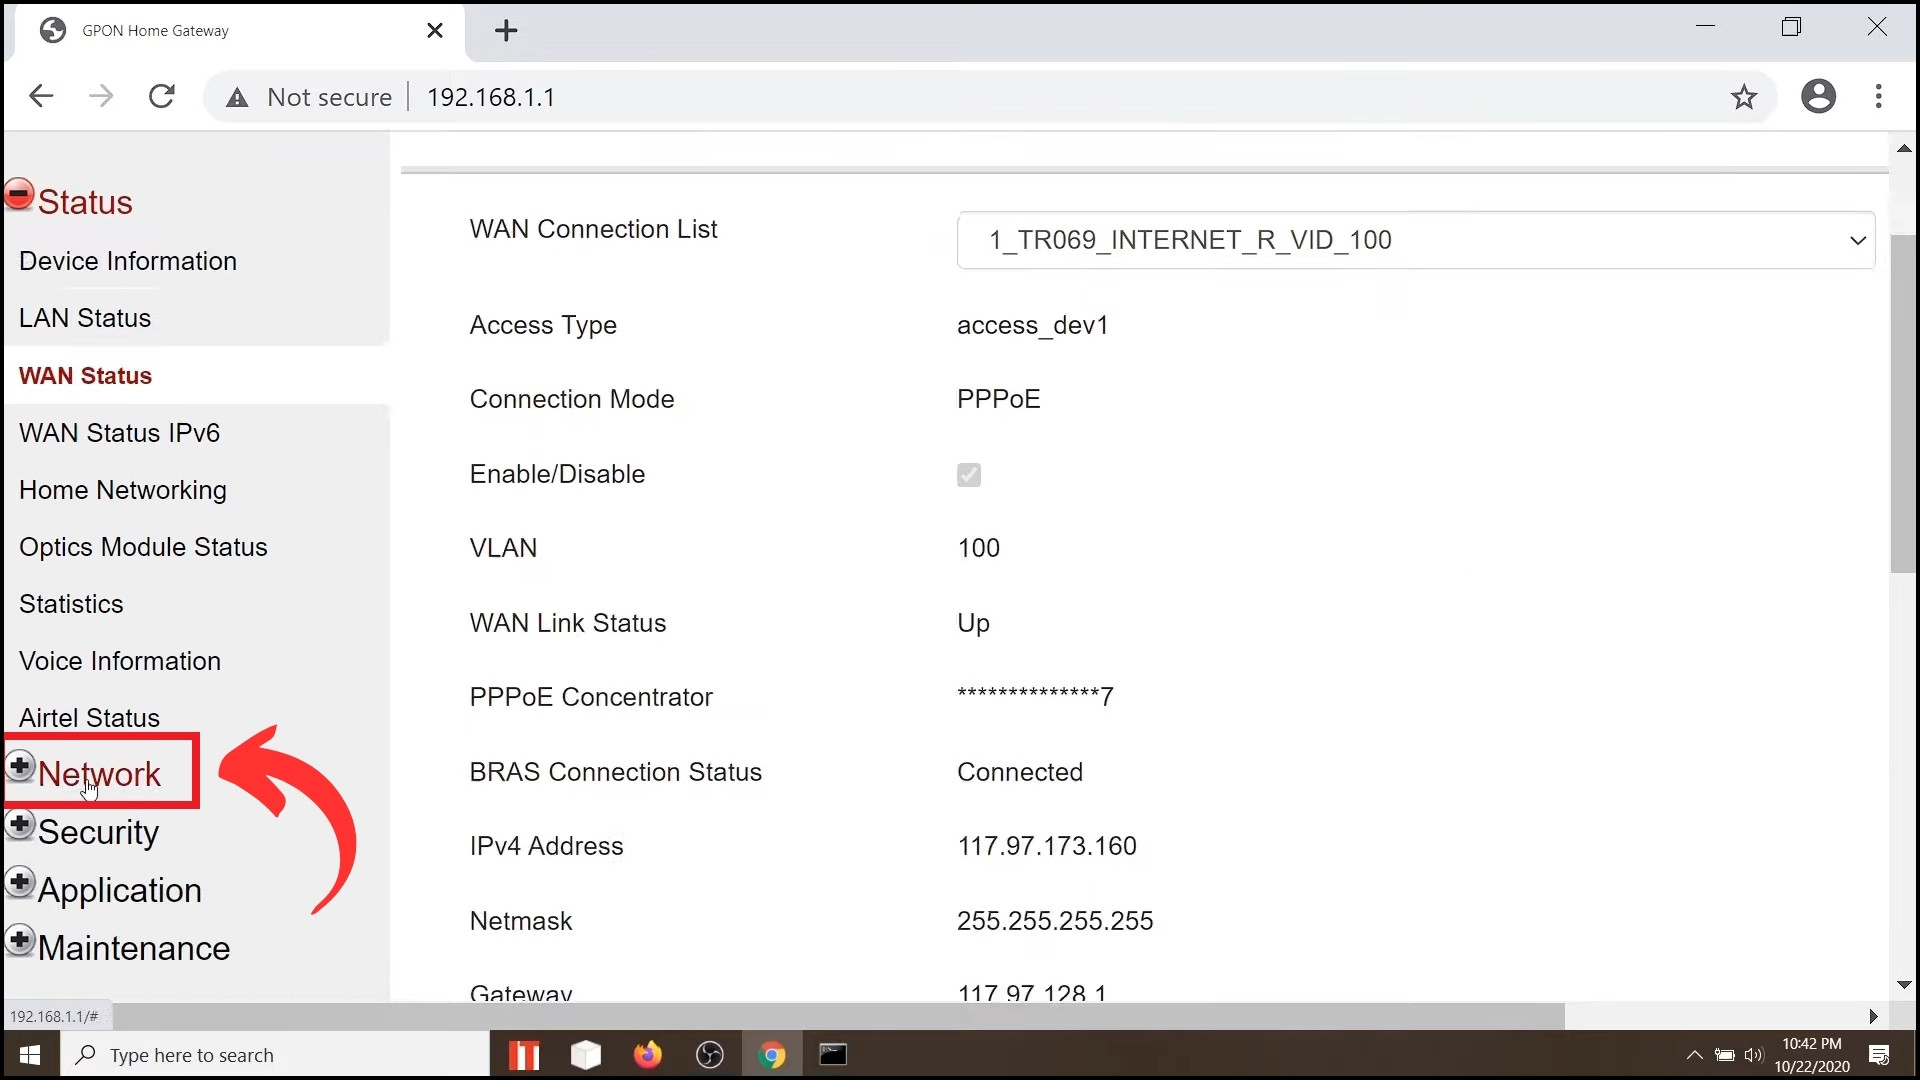
- Ensure your WiFi is set to the 2.4GHz frequency band.
3. Reset RemoBell S
Resetting your RemoBell S can often solve connectivity issues by returning the device to its original factory settings, giving you a fresh start. This method is particularly helpful if you believe the problem is with the device rather than your network.
Warning: Doing this will remove all your data and reset the device to factory settings.
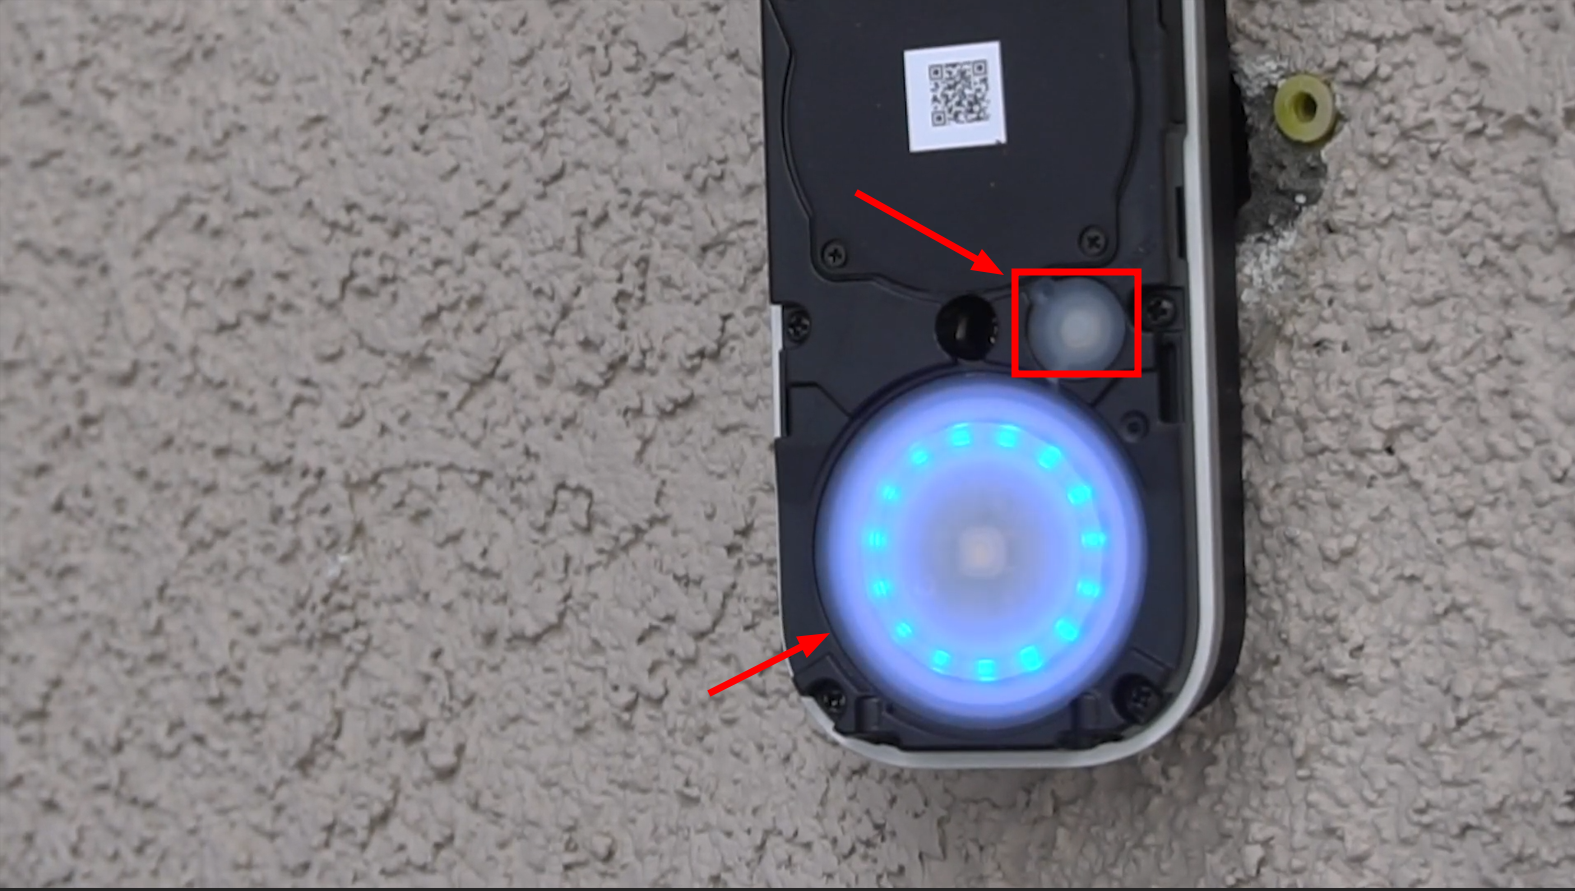
- Press and hold the “Reset button” on your RemoBell S for about five seconds until the LED lights turn red and then flash blue, indicating the reset process has started.
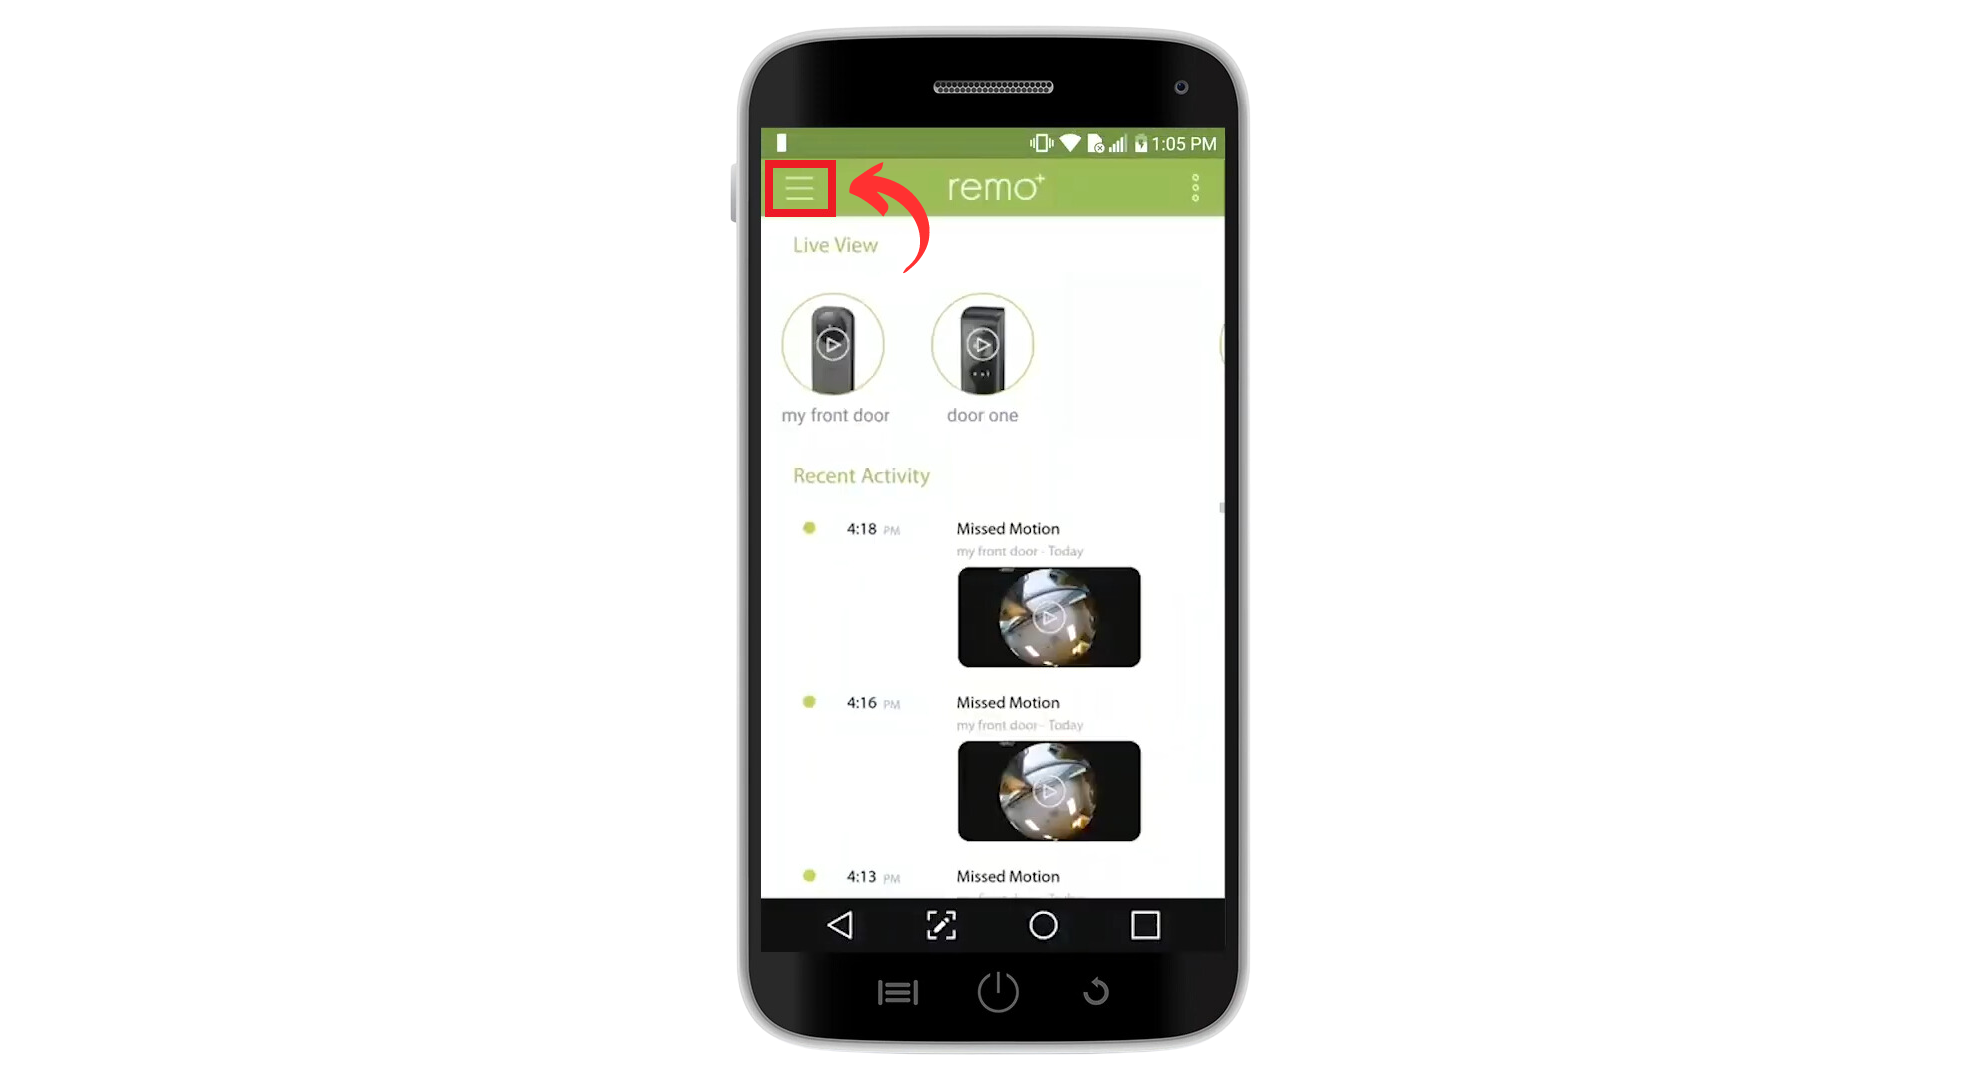
- Open the Remo+ app on your smartphone. Tap the menu icon (three horizontal lines) to go to the “Devices” section. Select your RemoBell S, tap the “Trash” icon, and confirm by tapping “Yes” to delete it.
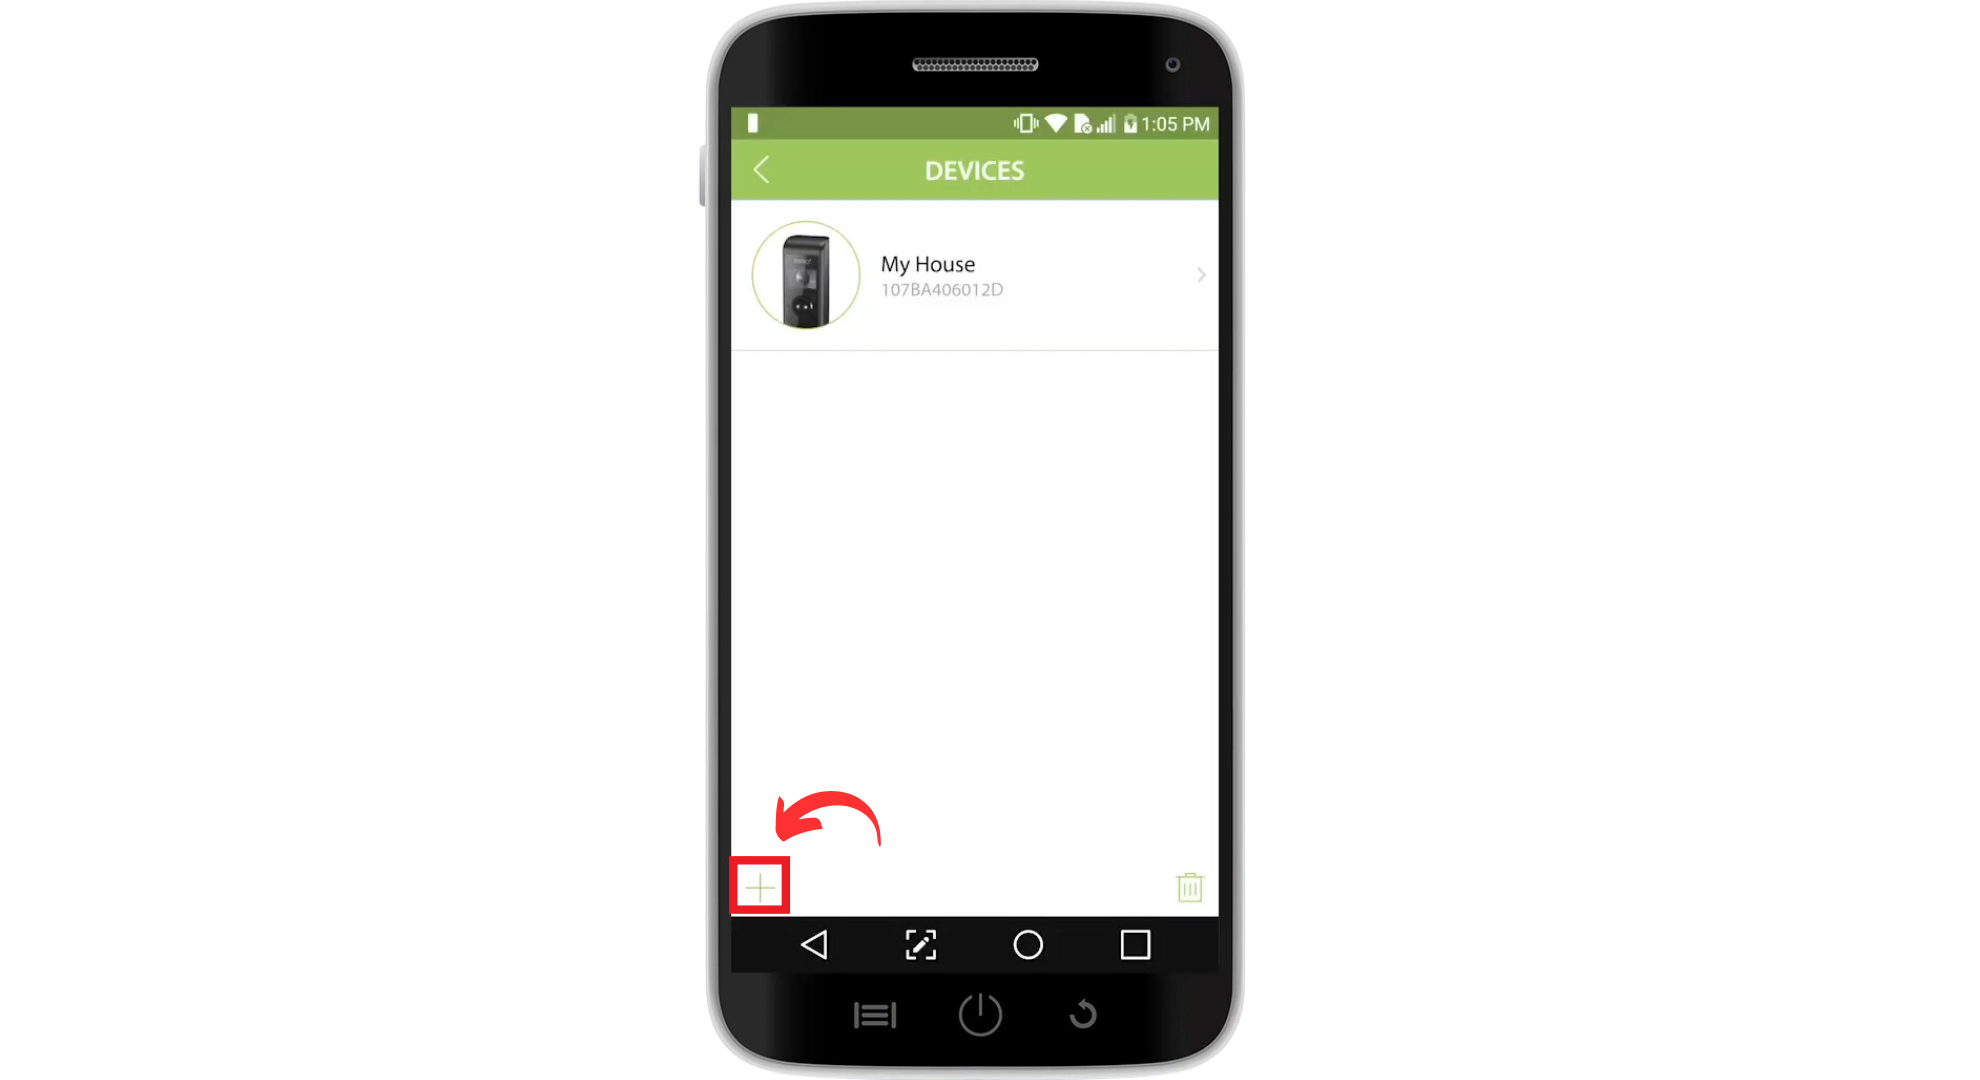
- Tap the “Plus” icon to re-add your RemoBell S. Follow the prompts to choose your device type, select your time zone, and enter your “Network password.”
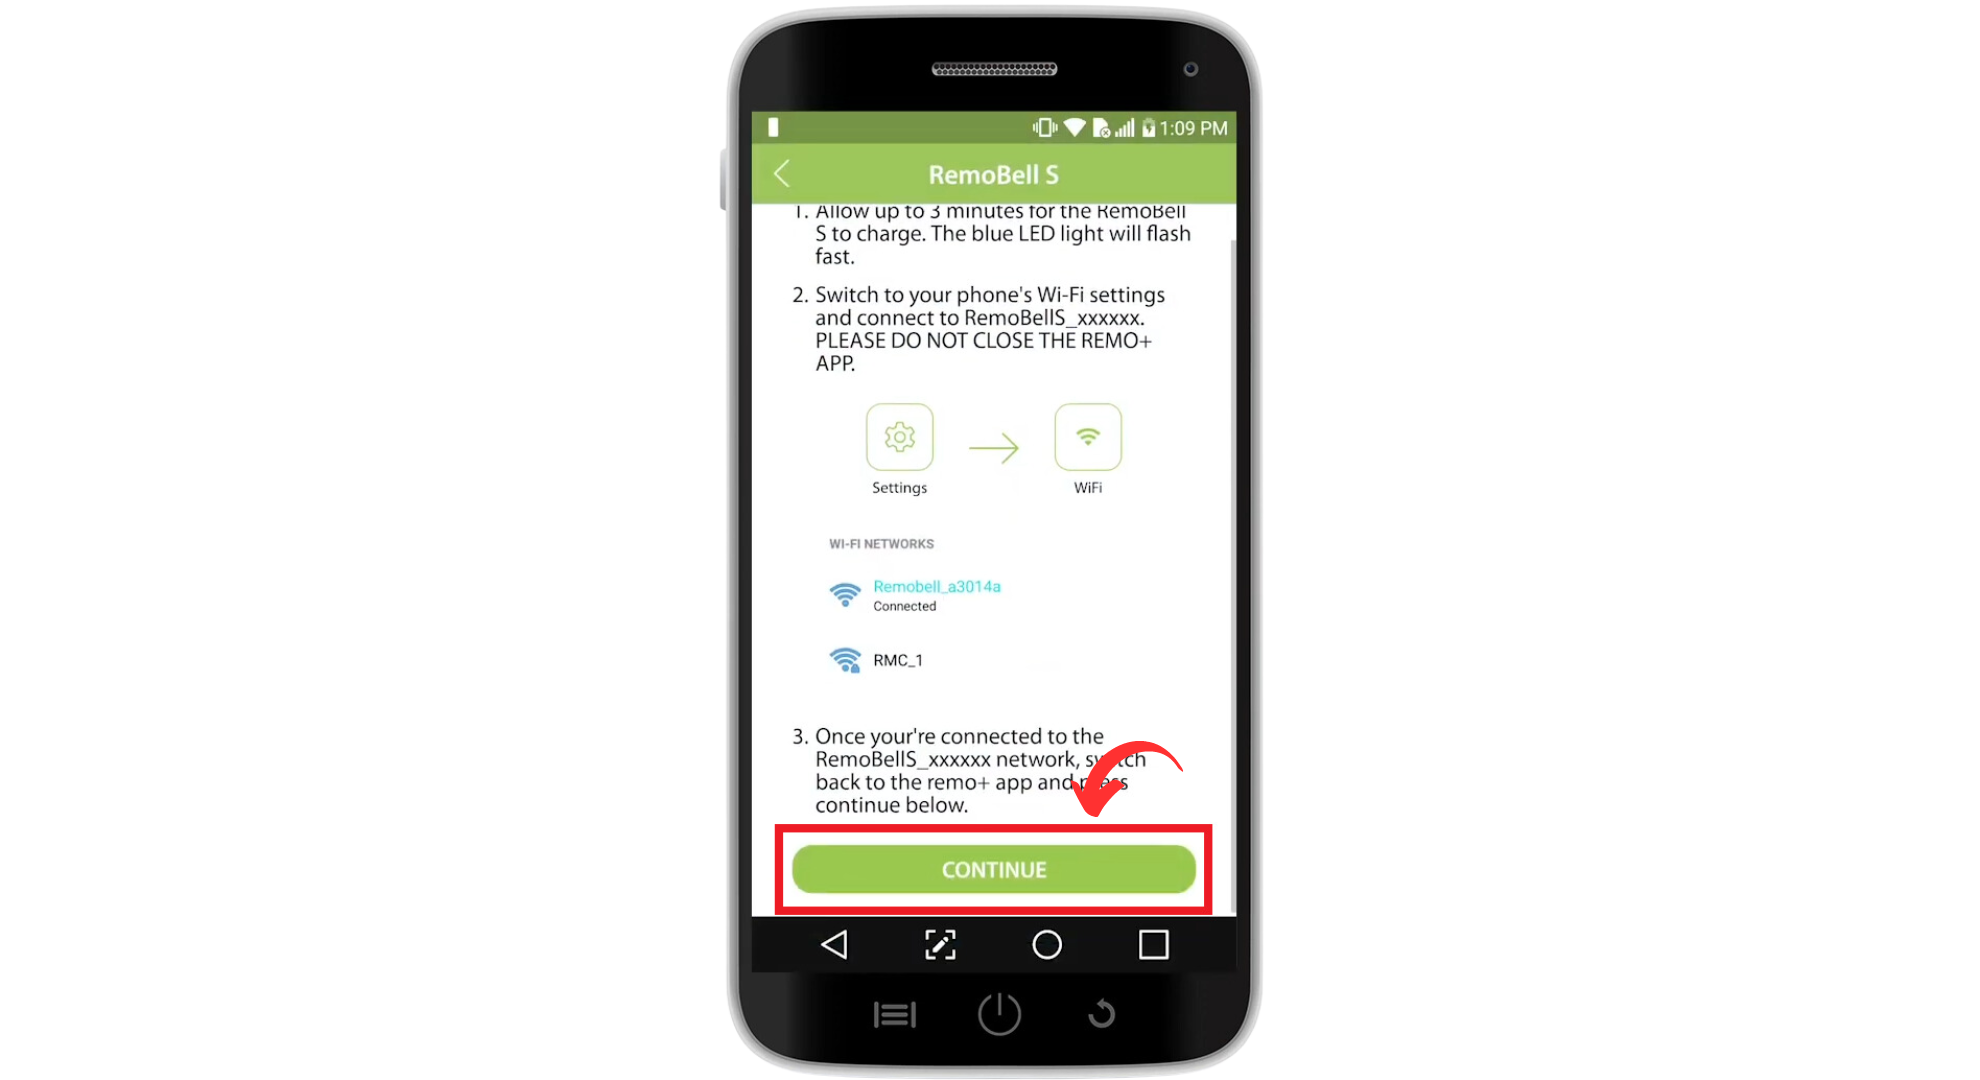
- Scan the QR code found on your RemoBell S or in the accompanying Quick Start Guide.
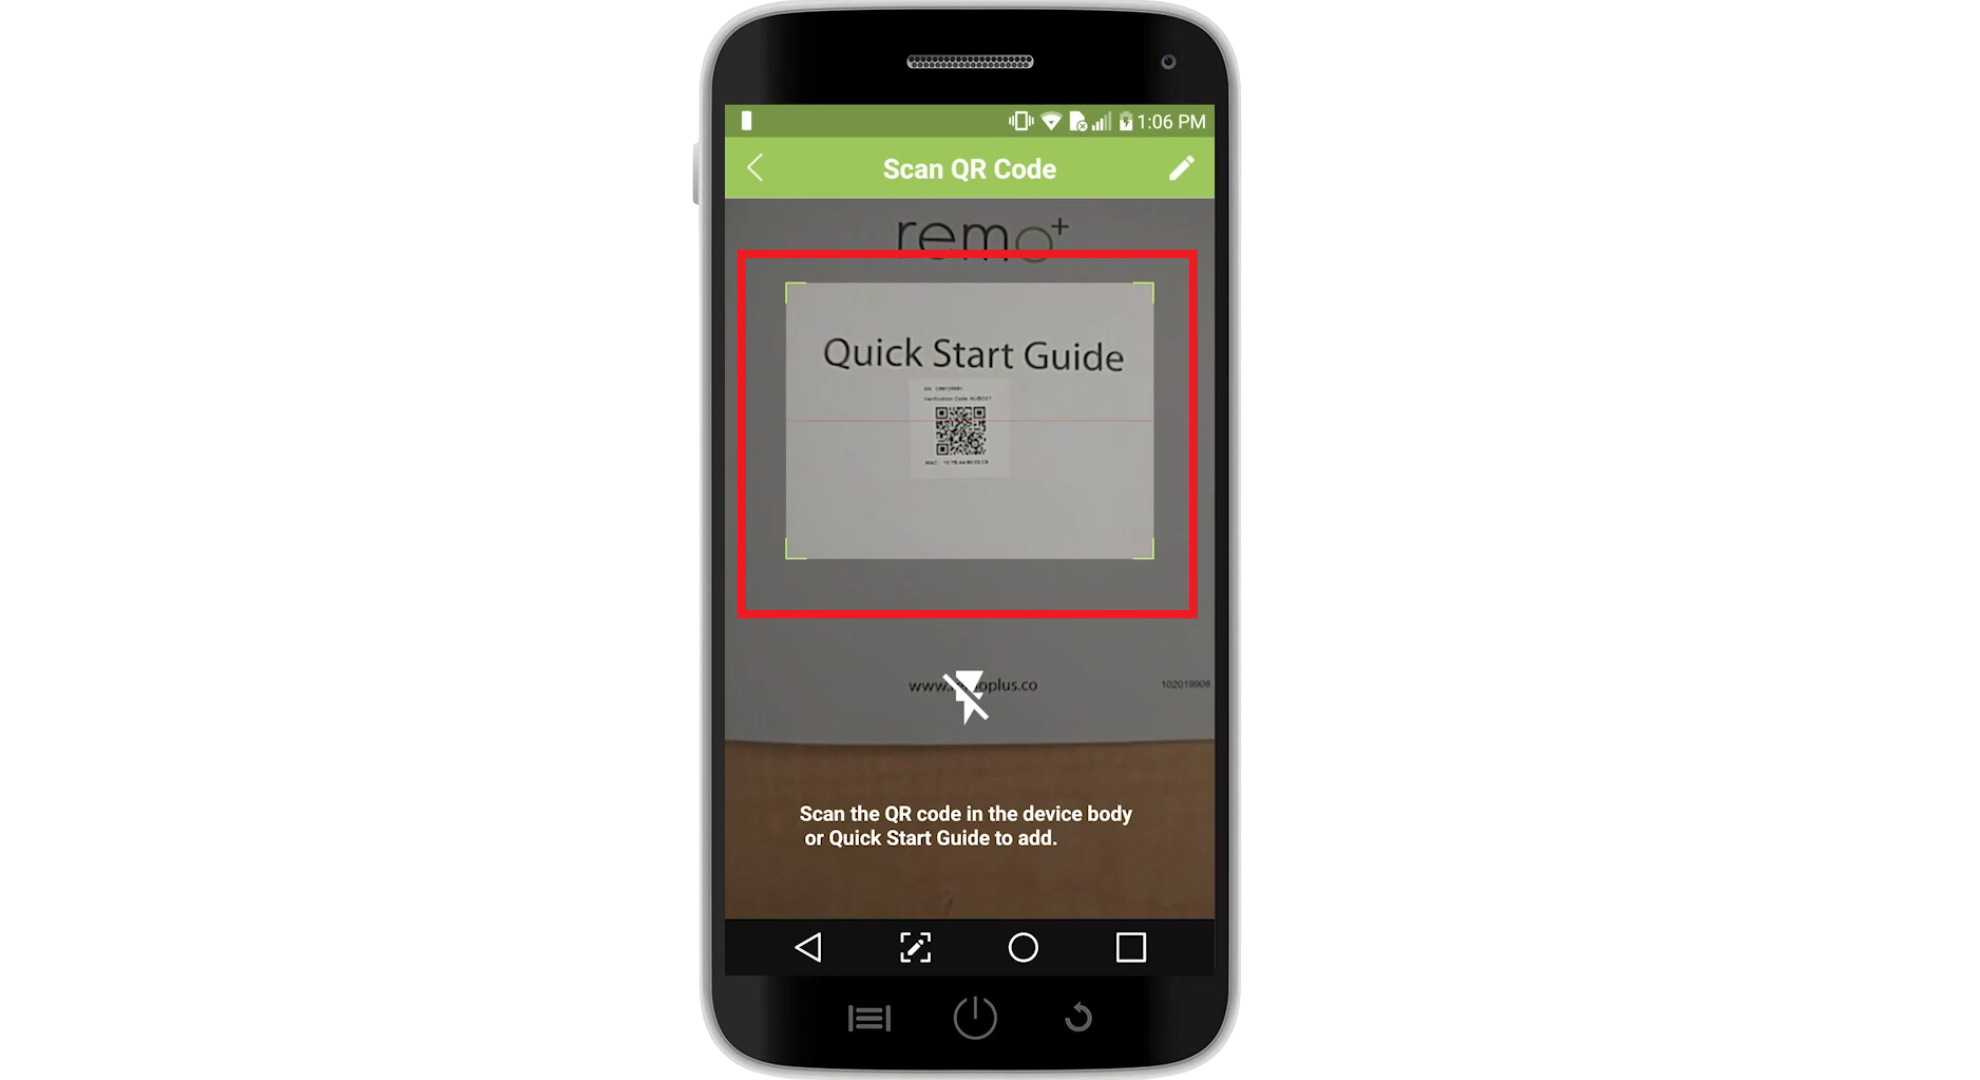
- Briefly navigate to your phone’s WiFi settings to connect to the RemoBell S network. Return to the Remo+ app, dismiss any “Internet not available” notifications, and tap “Continue.” Wait for the app to complete the registration process, which may take up to three minutes.
The post How to Fix RemoBell S Not Connecting to WiFi appeared first on Appuals.
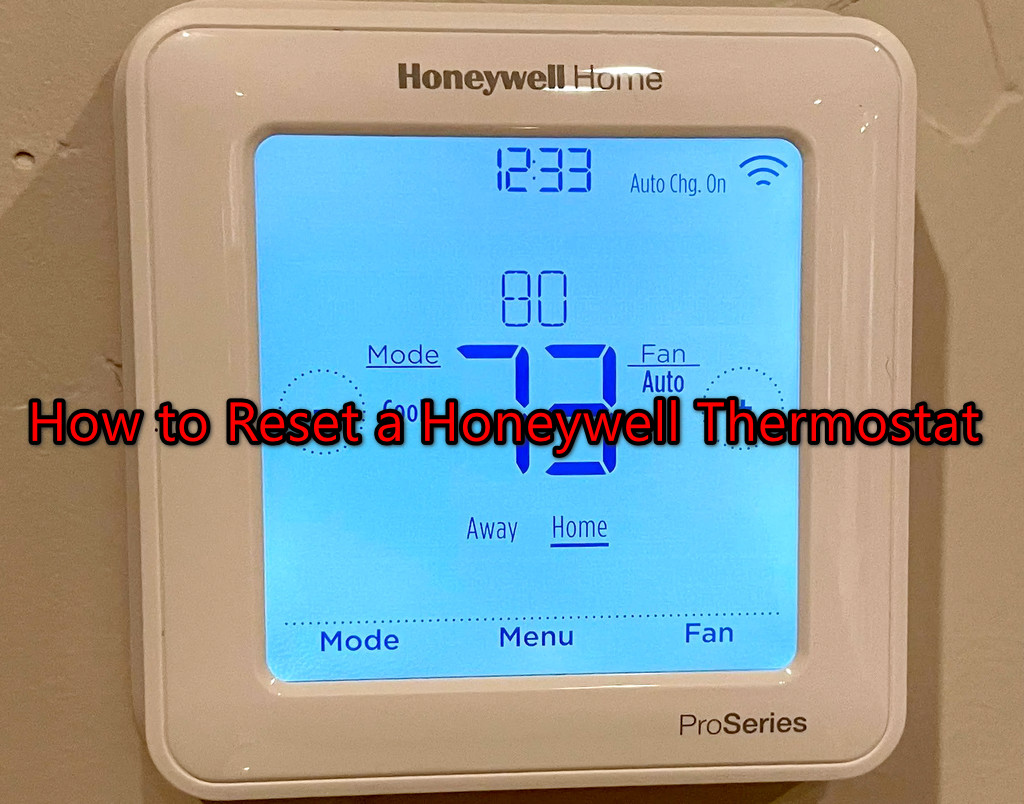
]]>The post How to Reset Your Honeywell Thermostat: A Step-by-Step Guide appeared first on Appuals.
]]>
Beyond these factors, there could be a variety of other reasons for resetting a Honeywell thermostat, such as moving to a different location, transferring ownership, changing equipment, resolving connection issues with AC or heating systems, or correcting inaccurate readings.
Before proceeding with the reset, you should take the following preparatory steps:
- Note Down the Current Settings: If you plan to reuse the thermostat, note down the existing settings for easier reconfiguration after the reset.
- Seek Necessary Permissions: Obtain permission from the landlord before resetting the thermostat, if it’s not your personal property.
- Turn Off Power: Ensure the safety of both yourself and the equipment by switching off your heating or cooling systems and any associated circuit breakers to prevent potential issues.
- Get the Proper Tools: Depending on your Honeywell Thermostat model, you might need specific tools, such as a compatible screwdriver, electrical tester, wire cutters, or electrician gloves. It’s important to have these tools on hand.
- Consult the Thermostat Manual: Consult the thermostat’s manual or online resources for any special instructions or precautions specific to your model.
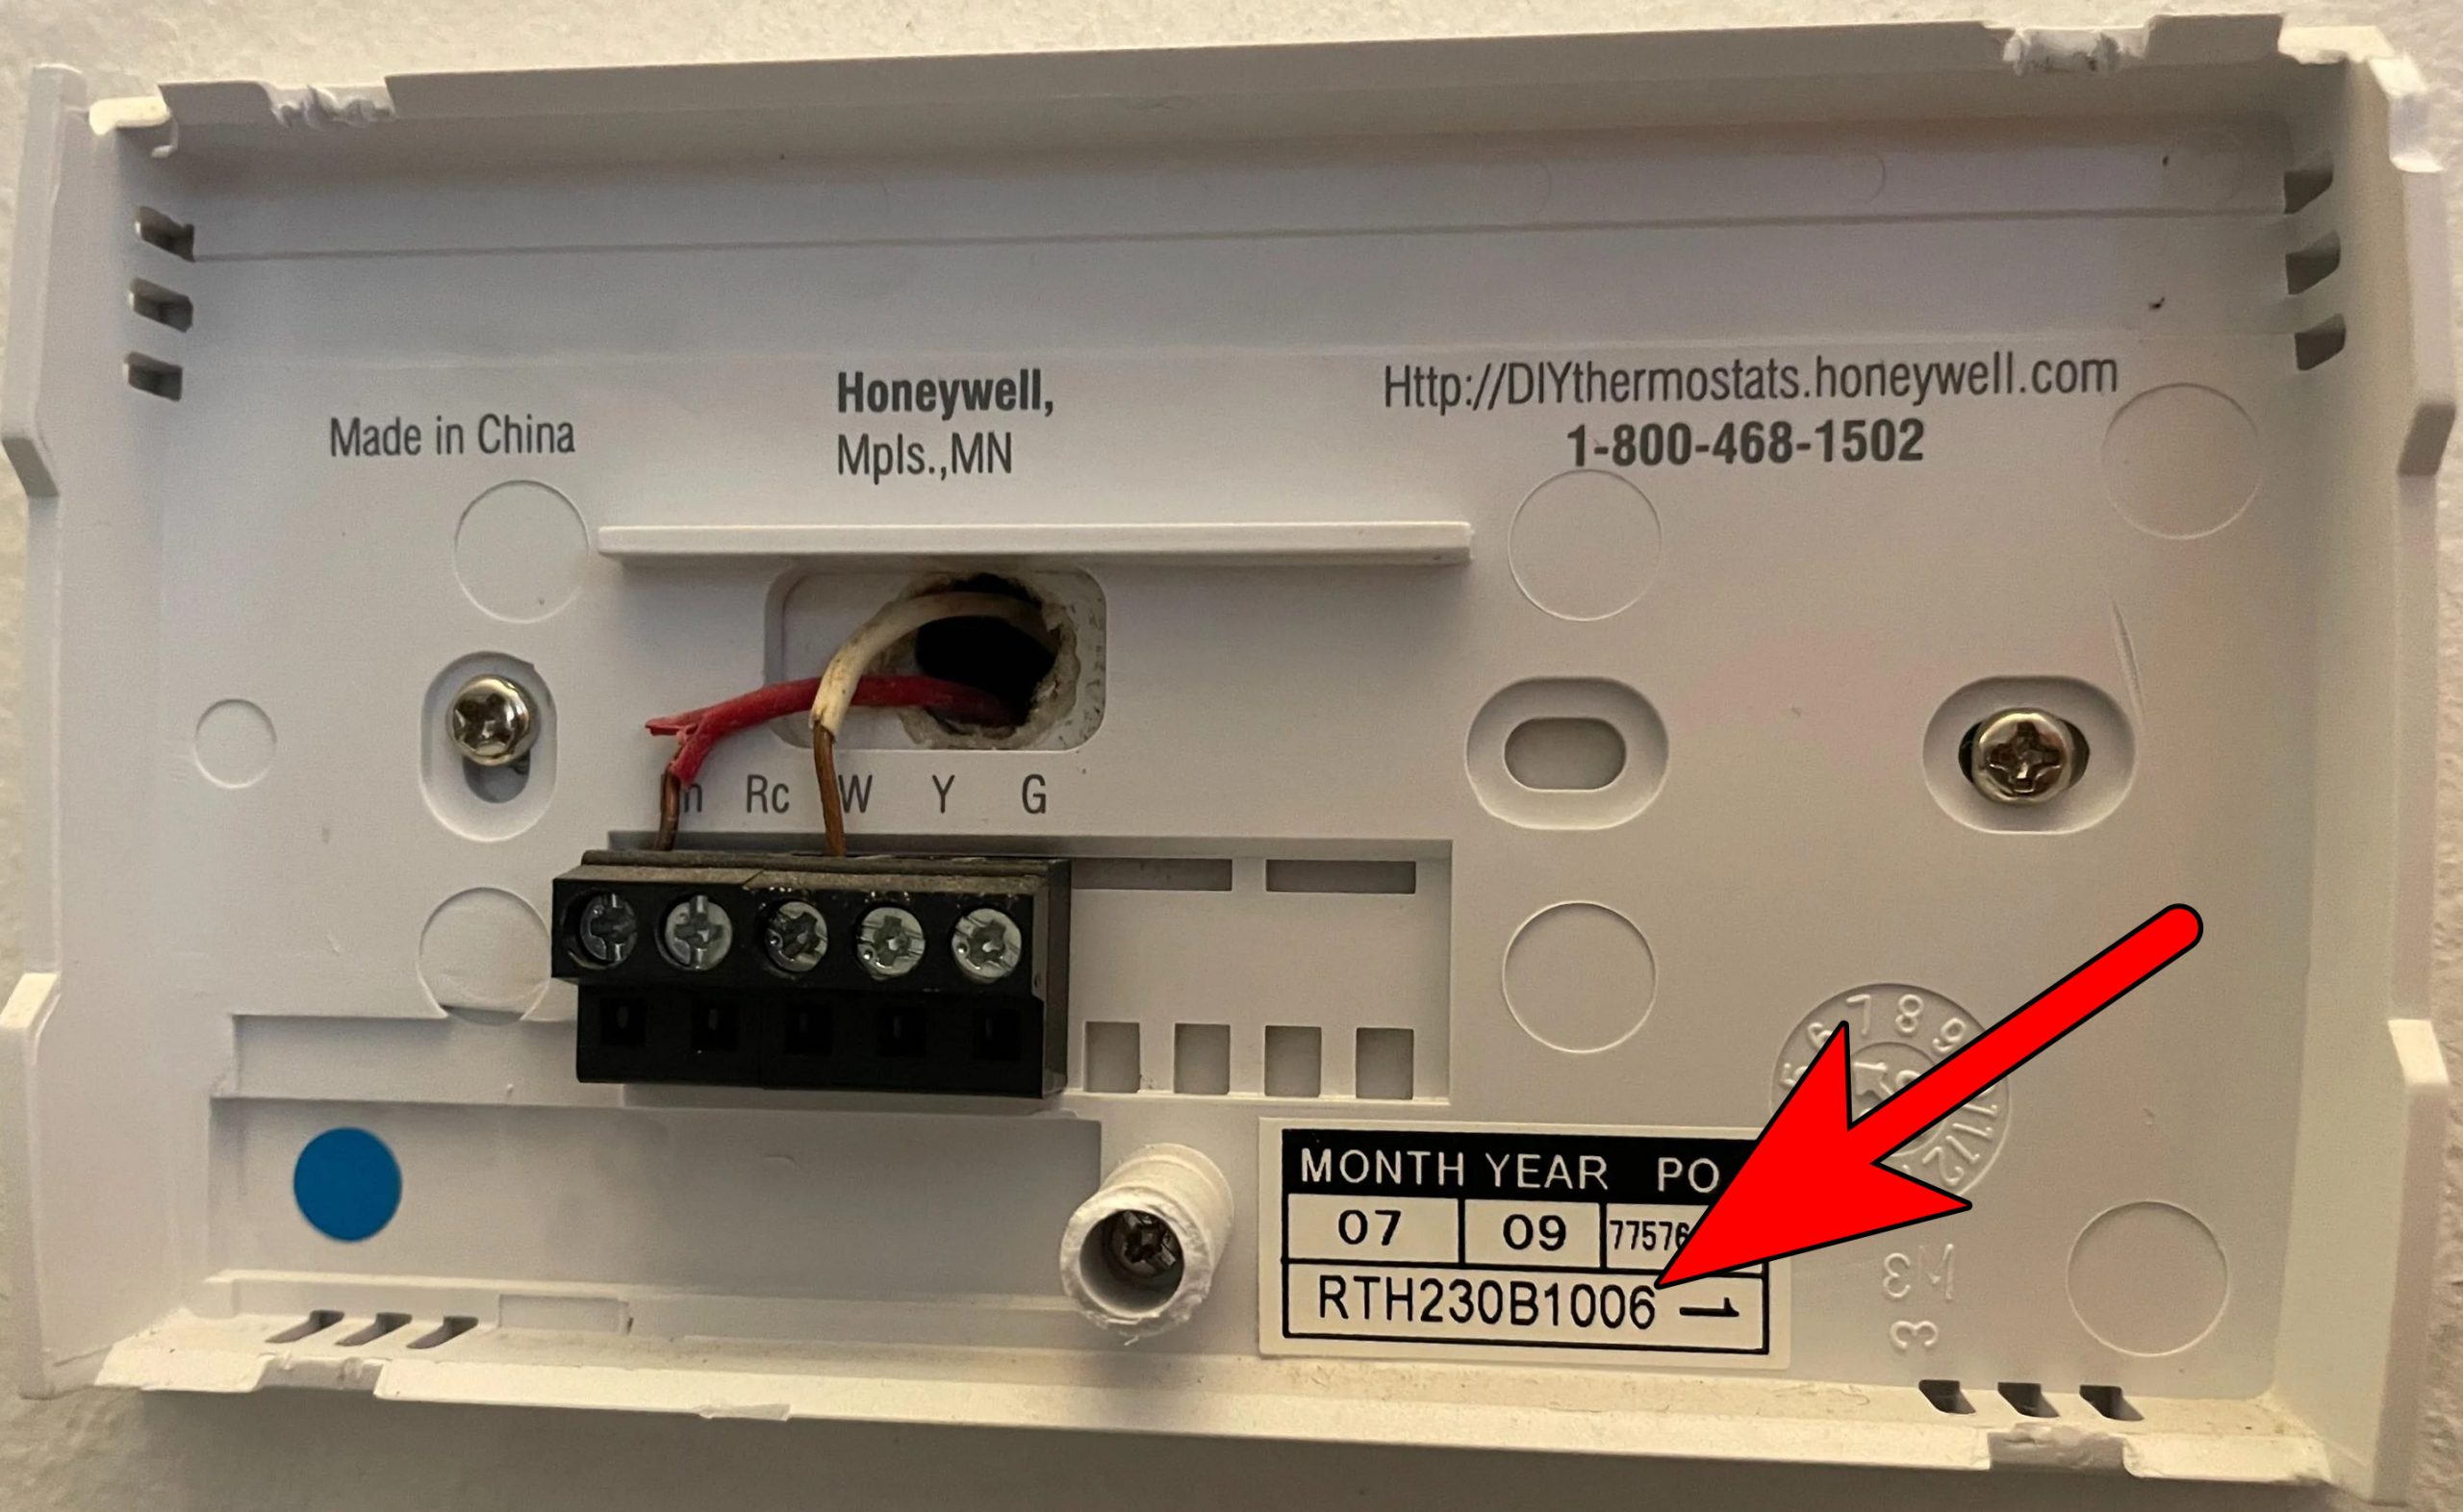
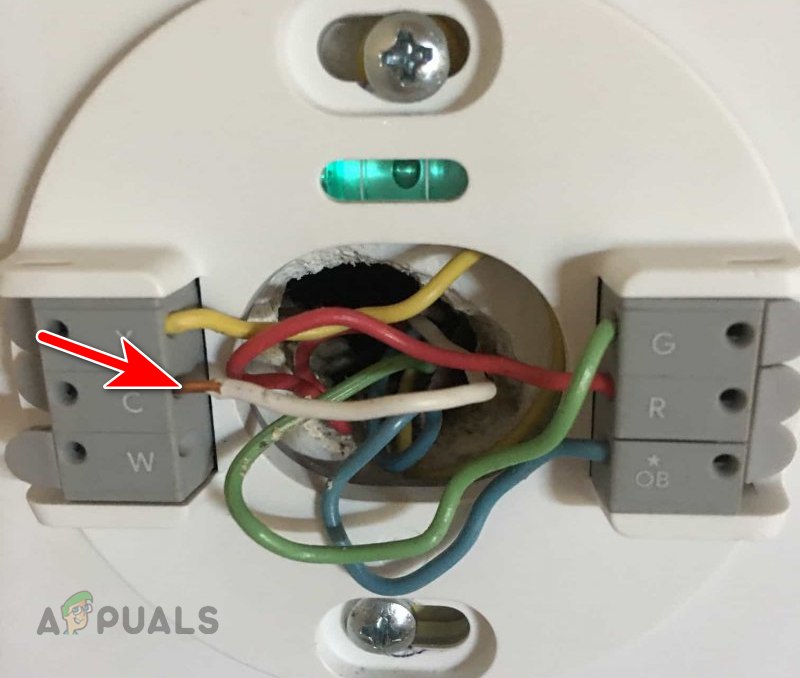
- Check the Model of the Honeywell Thermostat: Reset instructions vary by model. Find the model number on the product packaging or faceplate. If not readily visible, you may need to gently lift the thermostat from the wall (if possible) to check. If it’s not possible to find the model number, you can turn off the power (if applicable), remove the thermostat from the wall, and look for the model on the back. Alternatively, search the internet for characteristics of your thermostat to help identify the model.
Check the Model of the Honeywell Thermostat
You might need the passcode to reset your Honeywell Thermostat. Although the default passcode is usually 1234, if you’ve changed it and can’t remember the new one, follow these steps to reset it:
- Detach the thermostat’s backplate and jot down the code displayed.
- Add 1234 to the noted code. For example, if the code is 2116, adding 1234 gives you 3350.
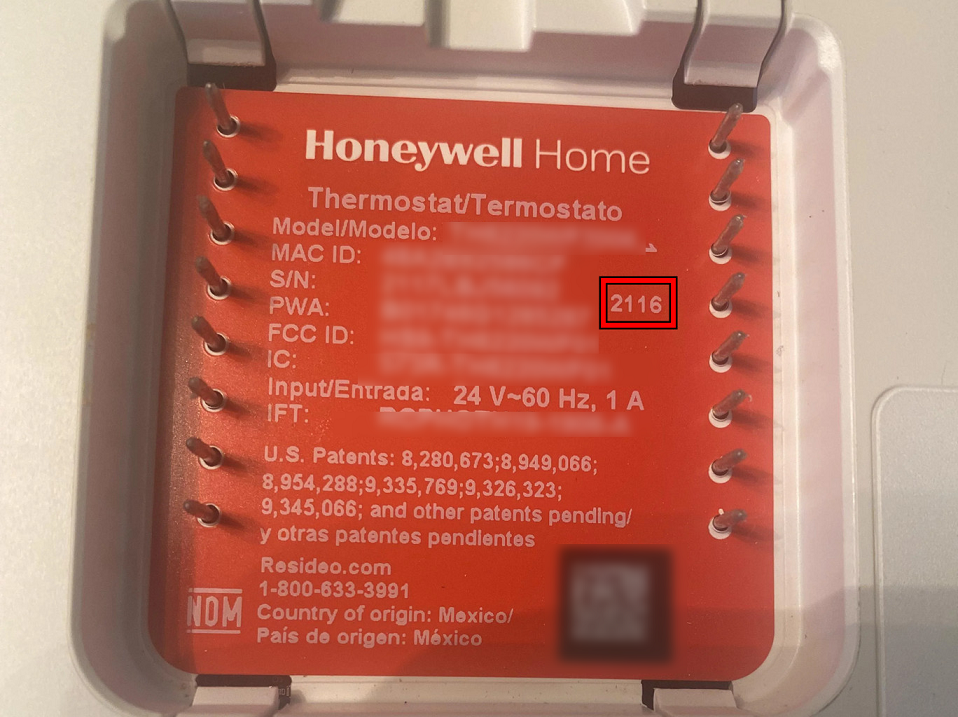
- Access the Security Settings in the thermostat’s menu and enter 2764 as the code.
Important: Note that many Honeywell Thermostats do not feature a physical reset button. Therefore, the reset button procedure is not applicable to these models.
After completing the reset, you will need to configure the thermostat to match the type of equipment it controls, be it heating or cooling.
There is a range of reset methods available for Honeywell Thermostats, and you should select the one relevant to your specific situation. Bear in mind that not all methods apply to every model.
- Soft Reset: This merely involves a simple power cycle of the thermostat.
- Hard Reset: Turn off the thermostat’s circuit breaker and wait for 5 minutes. This is effective when the thermostat does not respond to commands or is not functioning properly. For battery-operated models, remove the batteries to perform a hard reset.
- Wi-Fi Reset: Resolve connectivity issues with a smart Honeywell Thermostat by performing a Wi-Fi reset.
- Schedule Reset: If you’re experiencing problems related to scheduled operations, a Schedule reset can help.
- Model Specific Reset: Certain models with particular features, such as HomeKit integration, may require a targeted reset for that feature if it malfunctions.
- Factory Reset: Consider this a complete overhaul, which brings all settings back to their original state—as if the thermostat were brand new. This will erase all customized settings and schedules.
Warning: Proceed at your own risk because factory resetting some older models may require you to remove the thermostat from the wall, exposing wiring and posing a risk of electrical shock. Seek professional help if you lack the necessary experience. For those who choose the DIY approach, take detailed photographs of the wiring at each step to ensure correct reconnection later.
Depending on your model and type, you may use one of the following methods to perform a factory reset on your Honeywell Thermostat:
1. Reset a Battery Powered Thermostat
- Switch off the thermostat, if possible, and remove the batteries. Unmounting the unit from the wall may be necessary.
- Insert the batteries in reverse polarity, positive to negative and vice versa.
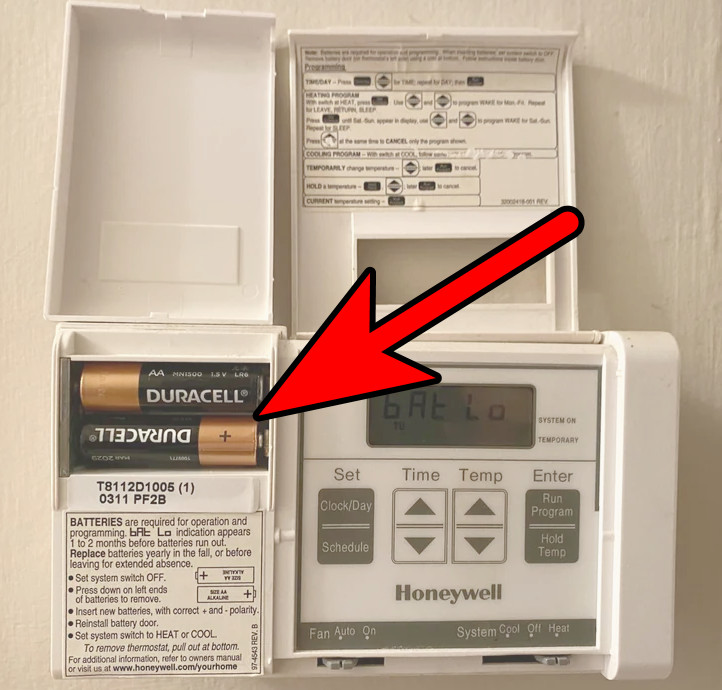
Insert the Batteries in the Honeywell Thermostat in the Reverse Polarity - Wait for 10 seconds before removing the batteries.
- Reinsert them correctly to complete the reset and proceed with configuration.
2. Reset the Touch or Button-based Honeywell Thermostats
- Navigate to Menu > Preferences > Restore Factory Settings.

Restore Honeywell Thermostat to Factory Defaults - Confirm the action and wait for the process to complete.
- Reconfigure the thermostat according to your needs.
3. Reset Instructions as Per the Series of Honeywell Thermostat
Select the reset method that corresponds to your Honeywell Thermostat’s series.
[The original text has a series of steps for resetting various Honeywell Thermostat series, which have been omitted from this correction for brevity.] If you continue to experience issues after a reset, if the thermostat stops working, or if your model isn’t listed, seek further assistance from Honeywell Support.
1000, 2000, and 7000 Series Thermostats
These battery-powered thermostats can be reset by following the method for resetting a Battery-Powered Thermostat as outlined above.
4000 Series Thermostats
- Turn the thermostat on and press the Program button three times.
- Insert a pointed object, such as a paperclip, into the Reset hole and hold it for 5 seconds.
- Your thermostat should now be reset and ready for reconfiguration.
6000 Series Thermostats
- Press and hold the Fan button.
- While holding the Fan button, also press and hold the Up arrow button.
- Maintain holding both buttons for about 10 seconds.
- Release both buttons and press and hold the first button on the right, labeled Hold.
- Continue to hold this button until you see number 39 appear on the display.
- Use the Down arrow key to change the displayed number from 39 to 0 and then press Done.
Reset the 6000 Series Thermostat - The appearance of a blinking Wi-Fi setup icon indicates that the reset is complete.
8000 Series Thermostats
- Press System and scroll through the Settings until you see the Reset to Factory Settings option.
- Wait for the thermostat to restart, signifying the completion of the reset process.
9000 and Vision Pro Series Thermostats
Follow the steps mentioned under “Reset Touch or Button-based Honeywell Thermostats.”
Reset a T10 Thermostat
The T10 Thermostat offers options for Schedule Reset, Wi-Fi Reset, HomeKit Reset, and Factory Reset.
Wi-Fi Reset
- Press the Menu button and navigate to Wi-Fi.
- Open Change Network to update the Wi-Fi network settings.
Schedule Reset
- Access the Menu, then go to Thermostat Information > Date Code.
- Press the Back arrow and select Installer Options.
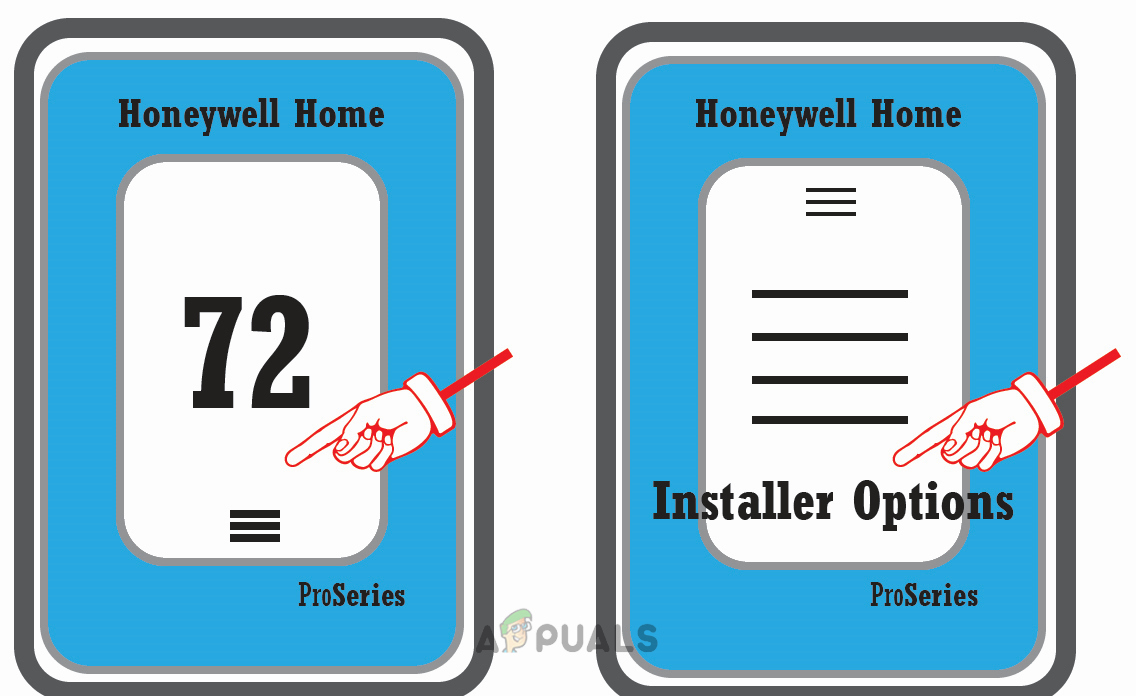
Reset a Honeywell T10 Thermostat - Enter the required Date Code when prompted for a password. If you’re unsure of the passcode, refer to the previously mentioned “Check for the Passcode” section.
- Select Reset, then choose Schedule Reset.
- After completion, enter new schedule settings.
HomeKit Reset
- Navigate to the Reset options previously described and select HomeKit.
- Once selected, the HomeKit Reset is complete.
Factory Reset
- Go to the Reset menu and pick Factory Data Reset.
- After the reset, set up the thermostat as if it were new.
Reset a T9 Thermostat
For the T9 Thermostat, follow similar steps as for the T10 for Wi-Fi Reset, Schedule Reset, HomeKit Reset, and Factory Reset.
Reset a T5, T5+, and T6
Implement a Wi-Fi Reset, Schedule Reset, or Factory Reset by accessing the appropriate menu options as previously discussed for the T10 series.
Reset a Smart/Lyric Round
Again, Wi-Fi Reset, Schedule Reset, HomeKit Reset, and Factory Reset are available options, with the necessary steps available in the T10 series section.
If none of the above solutions apply or if you continue to experience problems after attempting a reset, don’t hesitate to contact Honeywell Support for personalized assistance.
The post How to Reset Your Honeywell Thermostat: A Step-by-Step Guide appeared first on Appuals.
]]>The post How to Fix a Samsung Ice Maker That’s Not Dispensing Ice? appeared first on Appuals.
]]>
At times, water fills the Ice Maker’s tray, but ice is not dispensed. In some cases, large blocks of ice may be found in the tray. Upon inspection, you might discover that although the ice tray is filled, no ice has been dispensed into the container below.
Troubleshooting Prerequisites
- Ensure the ice maker is turned on; many models have a button to activate this feature.
- Confirm that child lock or dispenser lock is not enabled, as this could prevent operation.
- Verify that the temperature of the freezer is set correctly; ideally, the temperature should be at 0 degrees F, which you can confirm with a thermometer—an essential condition for ice production.
- Use the Test button on the ice maker to verify that the mechanism is working correctly.
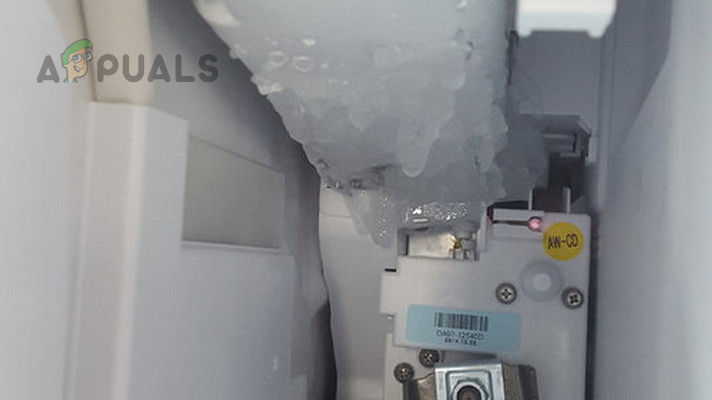
1. Defrost and Clean the Ice Maker
Ice build-up around the ice maker or its sensor may disable its operation. To address this, defrost and clean the ice maker. Prior to starting, disconnect the refrigerator from the power source.
Defrost with a Button
- Press and hold the ice maker and lights buttons on the front panel.
- Wait for a beep, then release the buttons.
- Continue pressing the light button until the Defrost option appears, then wait for the defrost cycle to finish, which could take about 30 minutes.
Use Forced Defrost
- Remove the ice bucket and press and hold the following buttons for 10 seconds:
Freezer Cool Select
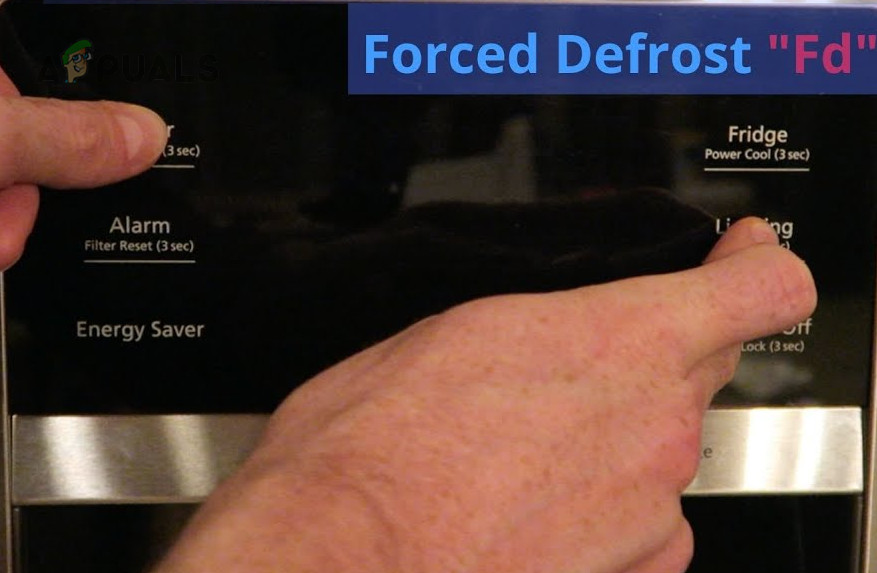
Forced Defrost the Samsung Ice Maker - Let go of the buttons, then press the Cool Select button again.
- Keep pressing the Cool Select button until the Forced Defrost mode is displayed. Be sure to select FD (Forced Freezer Defrost), instead of RD (Forced Refrigerator Defrost), and wait for the process to end.
Defrost Without a Button
- Use a hairdryer or a clothes steamer to melt the ice within the compartment.
- Ensure not to harm the insulation. Alternatively, leave the fridge or freezer unplugged, allowing it to defrost naturally over time.
Clean the Refrigerator and Ice Maker
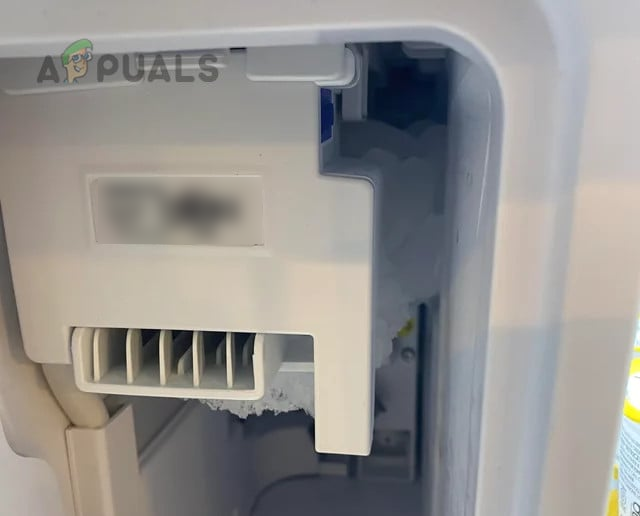
Once defrosted:
- Take out the ice bucket and look at the dispenser opening for bits of broken ice.
Clean the Samsung Ice Maker - Remove any ice from the dispenser opening as needed, by flushing it with lukewarm water.
- Clean out the compartment and the ice maker thoroughly, eliminating any ice residue. Handle the surfaces gently to prevent damage.
- Once the bucket is completely dry, put it back securely into place.
- Reconnect power to the refrigerator and examine whether the ice maker is now fully operational.
2. Clear the Passage to the Compartment Vents
Blocked air vents near the ice maker can disrupt the passage of cool air to the sensor, preventing it from activating the ice dispensing mechanism. Clear any obstructions to resolve this problem.
- Remove food and other items blocking the airflow within the fridge.
- After establishing proper airflow, test the ice maker again. If it works, reposition items to prevent future blockage of the vents.
3. Check the Leveling of the Fridge or Freezer
An unlevel fridge or freezer can hinder proper ice production in the Samsung Ice Maker. Incorrect leveling could lead to water overflow, affecting temperature and preventing ice formation. Adjust the leveling of the appliance slightly to the back or to the side where overflow occurs, about 1/4 inch higher.
- Set a level on the top and sides of the fridge or freezer, making adjustments to the adjustable casters to achieve an even balance.
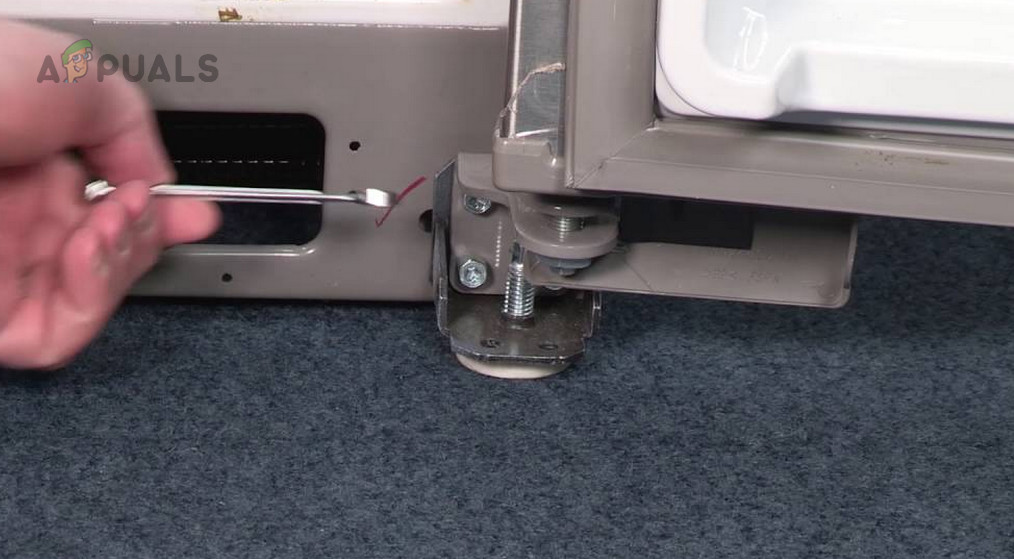
Level the Samsung Refrigerator - If you lack a level, employ trial and error to find the optimal balance. Ideally, the refrigerator door should close by itself when left slightly open, but it shouldn’t shut too forcefully.
4. Adjust the Water Pressure
Low water pressure, due to blockages or leaks in the supply line, can affect the operation of the ice maker. Adjusting the pressure may solve this issue.
- Measure the water pressure by filling a glass to check if 6 ounces of water are dispensed in 10 seconds. Adjust the flow if necessary.
Adjust the Water Pressure for the Samsung Ice Maker - Check the water lines for any obstructions or leaks.
- If the lines are free of leaks and blockages, regulate the supply valve to correct the water pressure and check whether the ice maker issue is resolved.
- If the water pressure adjustments make no difference, examine the water filters. Samsung recommends changing filters every 6 months. If filters are clogged or due for replacement, switch them out and retest the ice maker.
5. Reset the Samsung Ice Maker and Fridge
A firmware glitch in the ice maker or fridge may cause the ice maker to malfunction. Resetting both devices to their default settings could rectify the issue.
Reset the Ice Maker
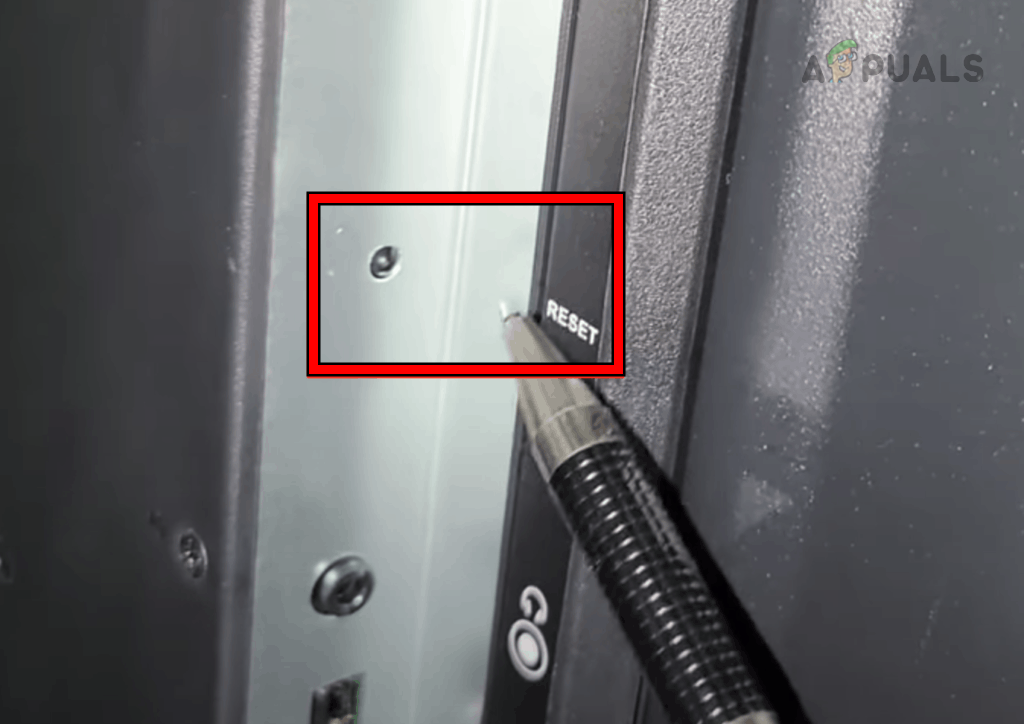
- Clear the ice bucket to get to the ice maker, where you will find a reset button.
- Press and hold this button until a chime sounds.

Reset the Samsung Ice Maker - Release the button and promptly put the ice bucket back. Verify if the issue has been resolved.
Reset the Fridge
- Disconnect the refrigerator from its power source and wait for about 5 minutes.
- Reconnect the fridge to power and confirm if the ice maker is now working correctly.
6. Seal the Ice Maker
Air leakage into the ice maker can slow the ice-making process, forcing the mechanism to overcompensate; this may result in a freeze-up around the sensor without dispensing any ice. Proper sealing of the ice maker can prevent this.
Consult the owner’s manual for instructions and use only sealants recommended by Samsung.
Warning: Avoid attempting this if your ice maker or fridge is under warranty, as this will void the warranty. Additionally, do not try to seal the ice maker yourself unless you have the appropriate skills.
- Remove all items from the compartment.
- If there’s a defrost option available, use it to defrost the fridge and ice maker. If not, unplug the appliance and defrost with a hairdryer or clothes steamer, ensuring not to damage the insulation.
- With the refrigerator off, extract the ice box and apply a suitable sealant (such as DAP 100% Silicone or Caulk) around the ice maker.
Seal Around the Samsung Ice Maker - Make sure to seal both the interior and exterior efficiently, filling any gaps with sealant.
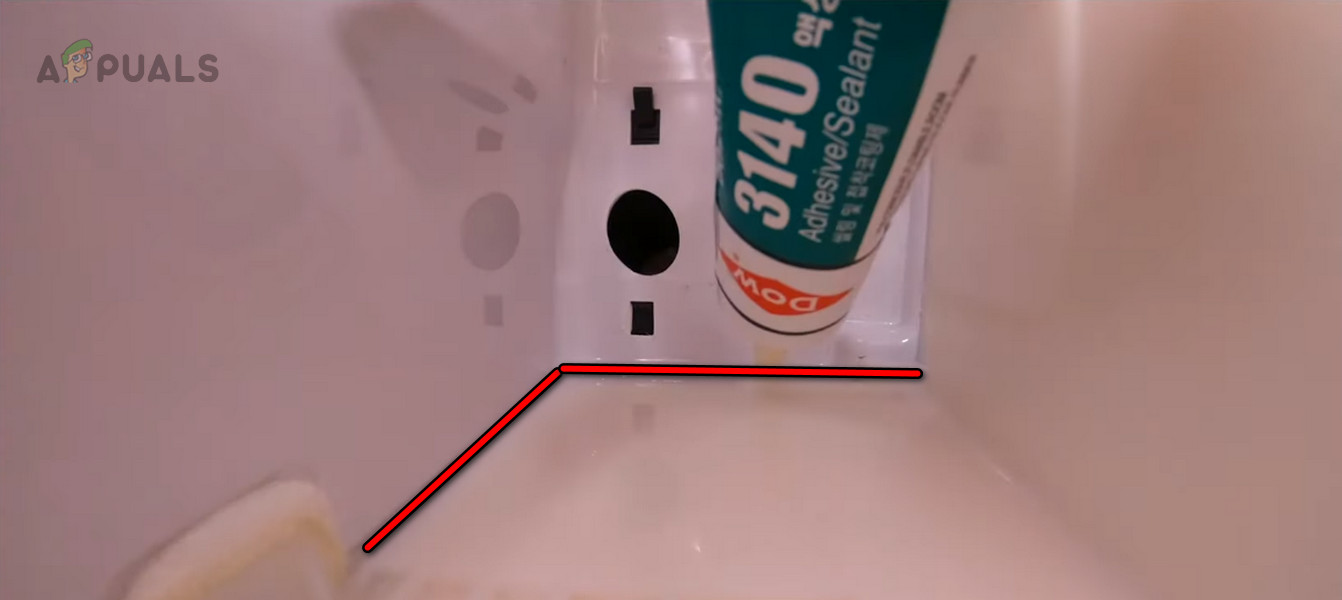
Apply Sealant Around the Samsung Ice Maker - Consider covering the box with Duct Wrap, which features an adhesive side and an aluminum surface, typically utilized for air conditioning ducts.
- Once the sealant is applied, reassemble all components and check the ice maker for proper operation.
If the issue still persists, get in touch with Samsung Support for further assistance. If your product is out of warranty, you may need to replace the ice maker.
The post How to Fix a Samsung Ice Maker That’s Not Dispensing Ice? appeared first on Appuals.
]]>The post How to Troubleshoot Roomba Error 15 iRobot? appeared first on Appuals.
]]>
1. Try Different Restart Methods
Error 15 on the iRobot often indicates that a crucial firmware module either didn’t load correctly or is locked in a loop. To resolve this, try various restart methods as detailed below.
Reboot Through the App
- Open the iRobot app and navigate to Products > (select your robot) > Product Settings > Reboot Roomba.
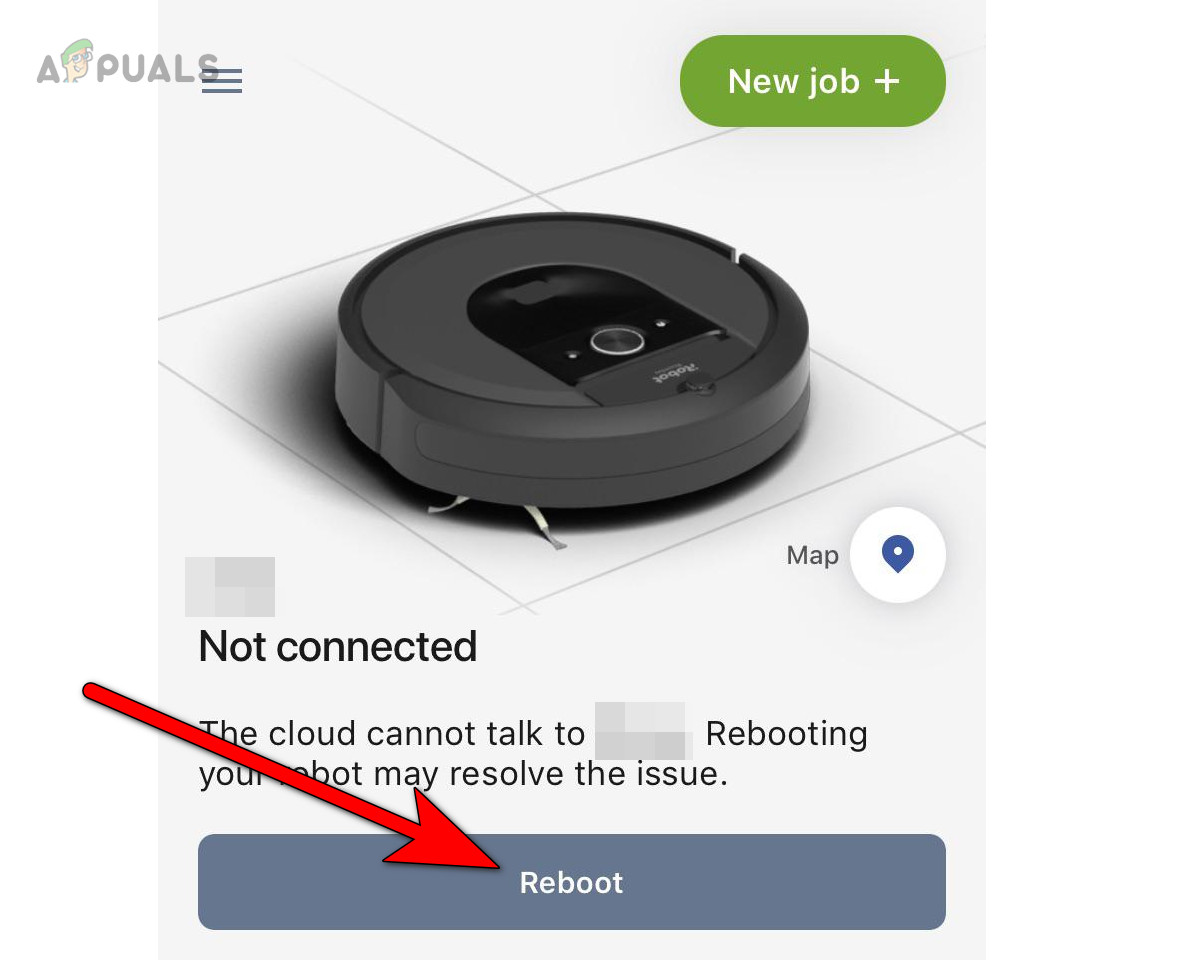
Reboot iRobot Through the App - Confirm to restart the robot and check if Error 15 is resolved.
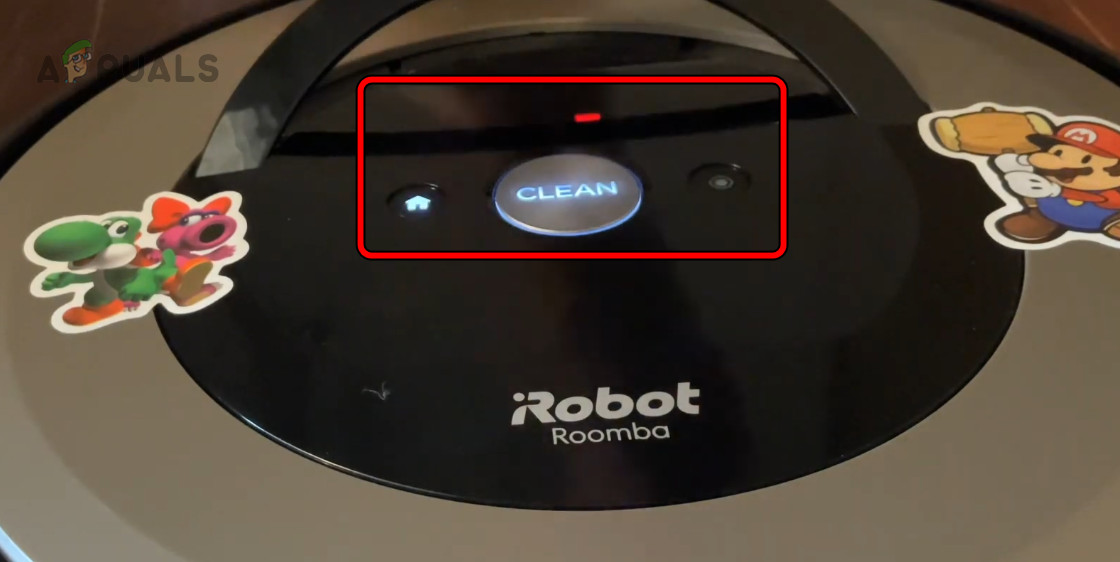
Hard Reboot Through the Buttons
- Press and hold the Clean button on the robot.
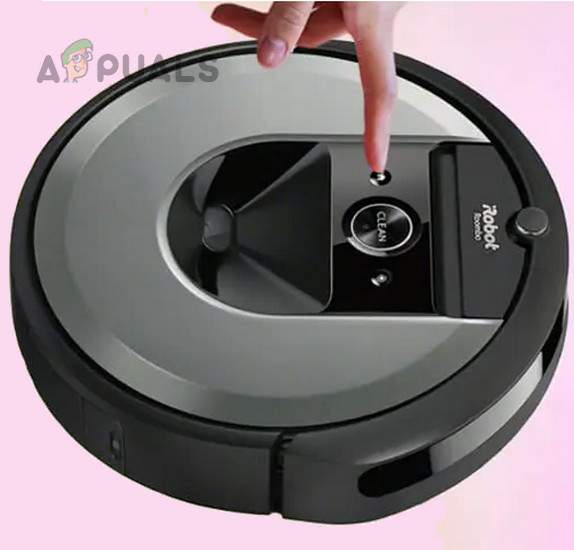
Press the Clean Button on the iRobot - Keep it pressed for 20 seconds, then release it.
- After the ring light turns off, power up the robot to check if it functions correctly.
Restart and Remove the Robot’s Battery
- Turn off the iRobot and place it upside down on a stable, flat surface. Have the necessary tools (like a screwdriver) ready.
- Remove the screws securing the back cover.
- Detach any screws holding the battery in place and extract the battery.
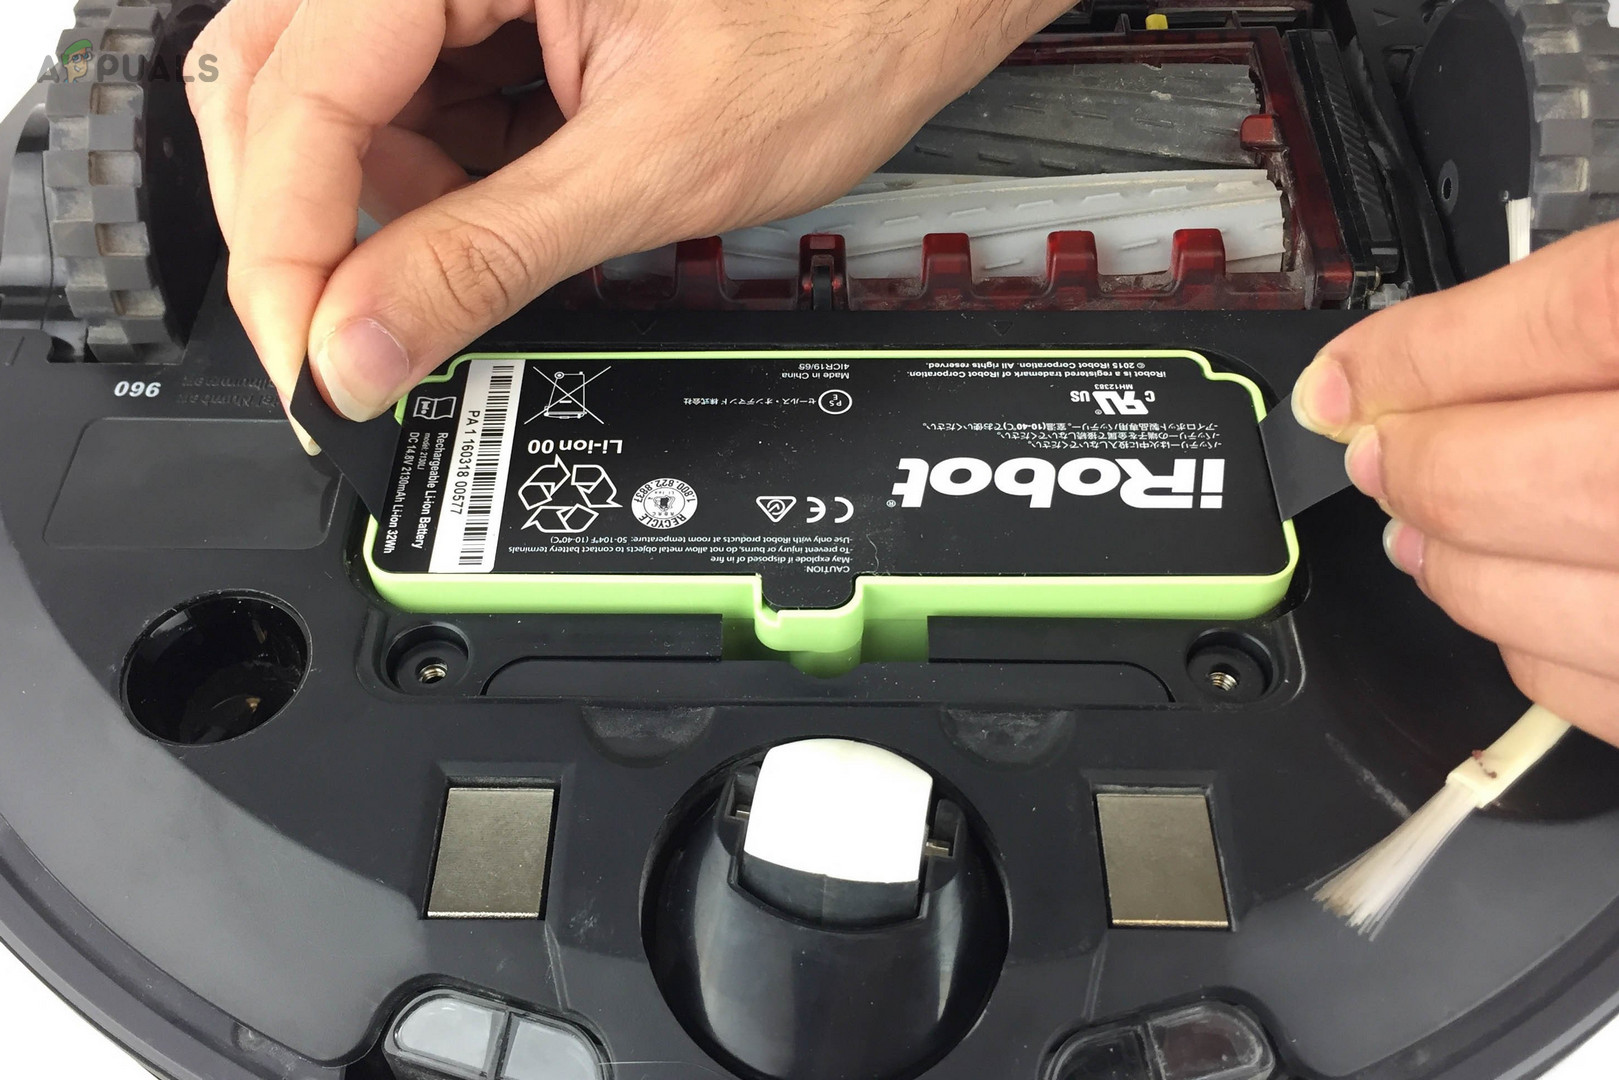
Remove the Battery from the iRobot - Wait for about 5 minutes before reconnecting the battery.
- Reattach the back cover and tighten the screws firmly.
- Switch on the robot and check if Error 15 has been cleared.
2. Fully Charge the Robot’s Battery
As Error 15 is a general communication error, insufficient battery power can affect the robot’s ability to communicate. Before indicating a low battery, the robot may instead display Error 15. Fully charging the robot’s battery can resolve this issue.
- Restart the robot and place it on the charging dock.
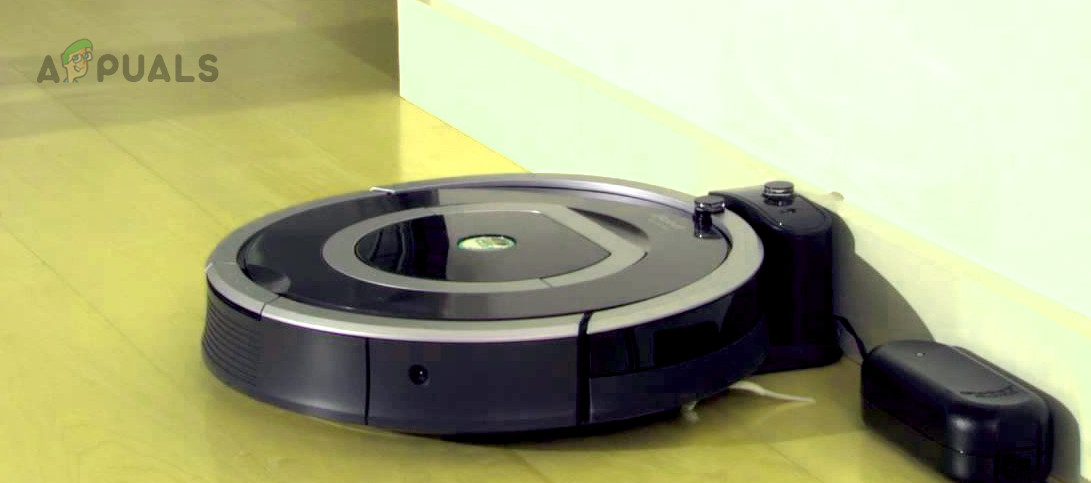
Put iRobot on Charging - Leave the robot to charge for at least 30 minutes, then verify if the error has been resolved.
3. Check for Electromagnetic Interference
Electromagnetic interference near the robot can disrupt its communication with your Wi-Fi network, resulting in the error in question. Eliminating potential sources of interference such as microwaves, cordless phones, large metal objects, and wireless devices like headsets is beneficial.
- Restart the iRobot and turn off other electronic devices in the vicinity. Specifically, power down gadgets like the Vive wireless headset and any similar devices.

Unplug the Power Cable of the Router - Check if the iRobot is now operating smoothly. You may then turn on the electronic devices one at a time to pinpoint the source of the interference.
4. Connect the Robot to the 2.4 GHz Wi-Fi Band
If your router supports dual-band connectivity, ensure that the iRobot is connected to the 2.4 GHz band, as it may not support the 5 GHz band, leading to communication failures. Ensuring a connection to the correct frequency band can clear the error.
- Access your router’s admin portal through a web browser (the address is usually found in the router’s manual) and look for the wireless settings.
- Within the Wireless settings, select Bands.
- Disable the 5 GHz option and enable 2.4 GHz.
Enable 2.4 GHz in the Router Settings - Confirm that the security setting is at WPA2 level.
- Connect both your smartphone and the robot to the 2.4 GHz network to test if the issue is resolved.
5. Check the Wi-Fi Signal Around the Robot
A weak Wi-Fi signal in specific areas where the robot operates can cause Error 15. Improving the Wi-Fi signal strength in such spots can resolve the issue.
- Reboot both the robot and Wi-Fi router.
- Position the router closer to the area where the problem occurs and reconnect the robot to Wi-Fi. Check if the robot operates without issues around that spot.
Bring the Router Close to the iRobot - If the problem persists, set up a Wi-Fi hotspot on a different mobile phone (where the iRobot Home app is not installed).
- Link both the iRobot and your smartphone (with the iRobot Home app) to the new hotspot. Assess whether Error 15 has been resolved.
6. Delete and Relearn the Map on the Robot
Conflicts between the robot’s and the app’s maps can cause errors. Deleting the existing map and guiding the robot to relearn it can correct this mismatch.
- Open the iRobot Home app and navigate to the maps section of the affected robot.
- Delete the existing map and then restart the robot.
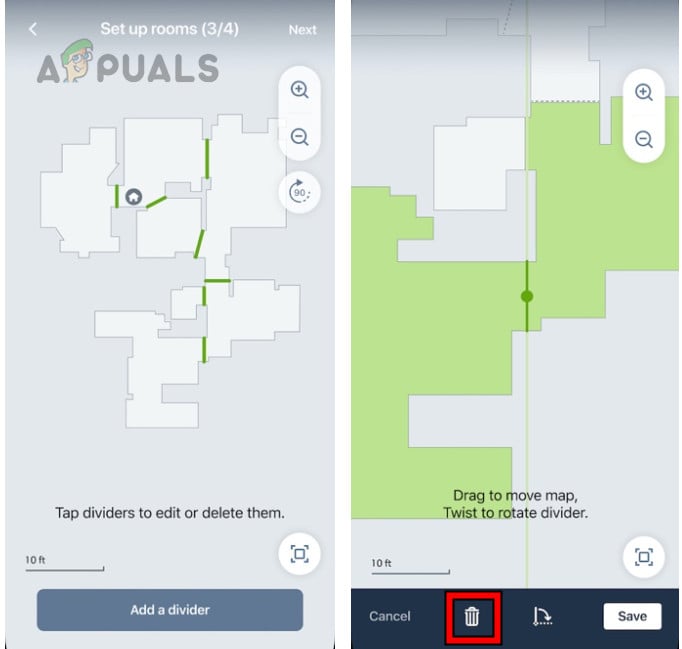
Delete the Map of the iRobot - Also, restart the smartphone and help the robot with the relearning process. Confirm that it operates without issue.
- If this doesn’t work, divide the cleaning jobs into segments shorter than 5 minutes to determine if the error is prevented with this approach.
7. Thoroughly Clean the iRobot
Dirt accumulation on the robot may cause it to use more power than usual during operations. This, in turn, may affect the current provided to the Wi-Fi antenna and result in Error 15. A thorough cleaning can solve the issue.
- Power off the robot and place it upside down on a clean, flat surface.
- Undo the screws and remove the back cover.
- Clean each component thoroughly to remove dust, debris, and hair. The use of a Compressed Air Can might be helpful in this step.
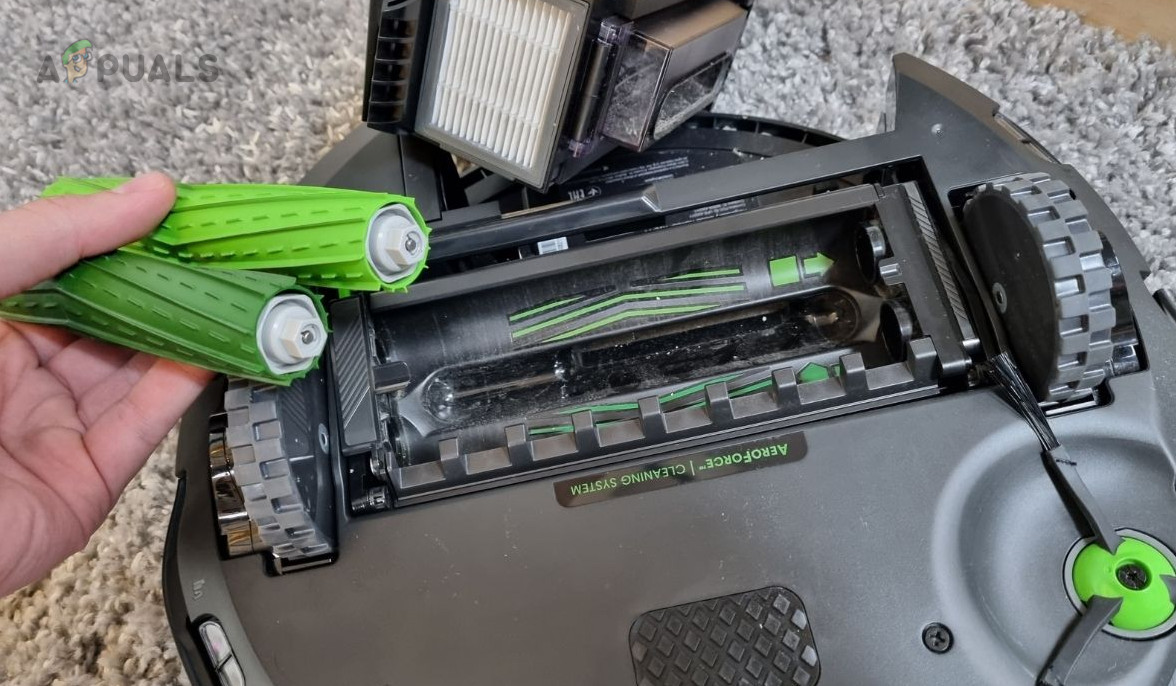
Thoroughly Clean the Robot - Wipe all sensors and brushes, and ensure the robot’s charging base is clean as well.
- Reassemble and secure the back cover with screws.
- Switch on the robot and check if Error 15 has vanished.
8. Reinstall the iRobot App
Damage to the iRobot’s firmware core could cause the app to deliver conflicting commands to the device, consequently leading to Error 15. Reinstalling the iRobot Home app may address the issue.
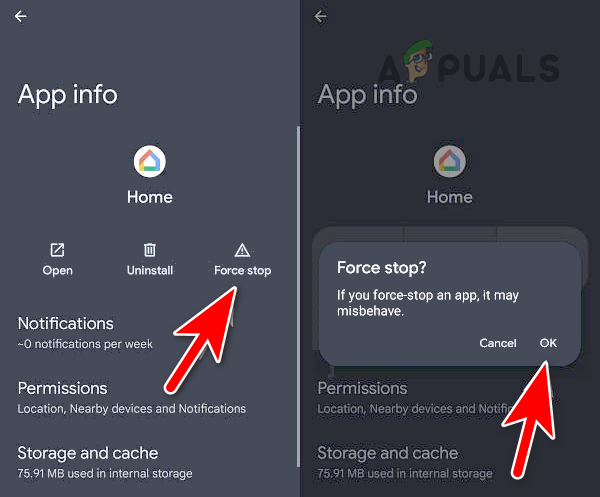
Steps for an Android phone:
- Restart the robot and open Android Phone Settings > Apps > iRobot Home.
- Select ‘Force Stop’ for the app and proceed to Storage.
- Clear the app’s cache and data to remove outdated references before reinstalling.
- Return to the previous screen and uninstall the app.
Uninstall the iRobot Home App - Reboot the phone and reinstall the iRobot Home app.
- Open the app and pair it with the robot to check if normal operation resumes.
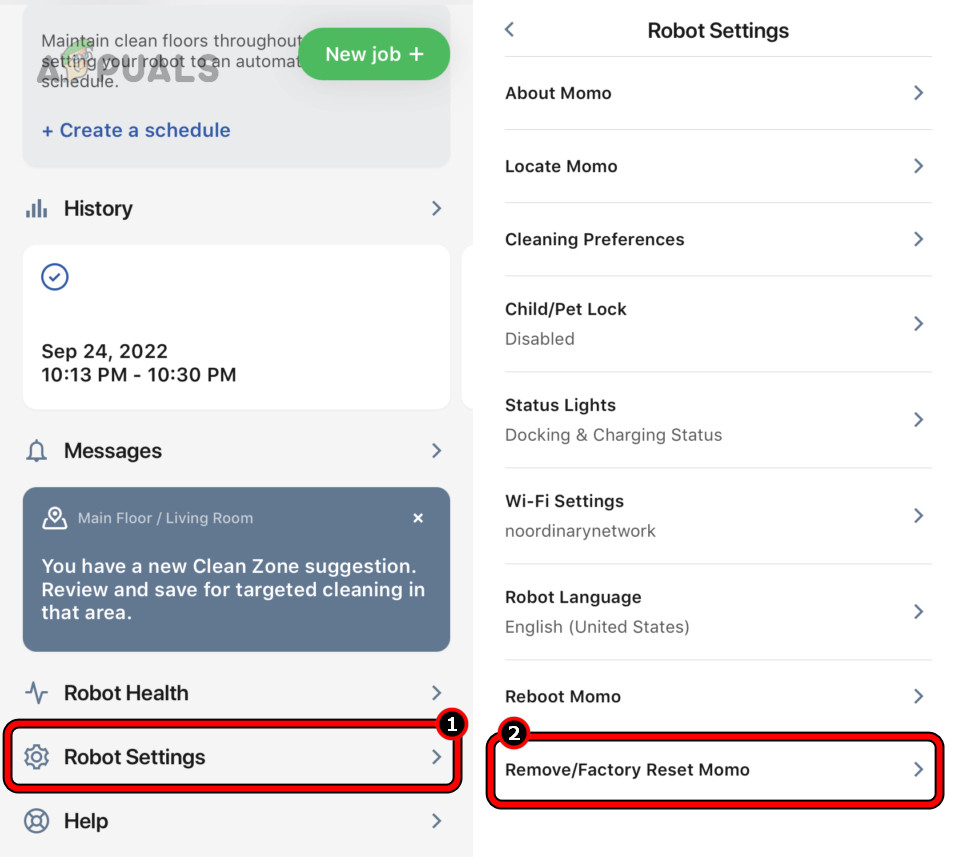
9. Reset iRobot to Factory Defaults
If the robot’s firmware is damaged—perhaps due to an improper patch during a recent update—resetting the iRobot to factory defaults can help. Keep in mind, this action will erase all settings and remove the robot from your account if completed through the app.
Through the App
- In the iRobot Home app, head to the robot’s Product Settings > About (the robot) > Then select Remove Device from Account.
- Opt for the Factory Reset and adhere to the on-screen instructions to complete the reset. Save your maps beforehand if necessary.
Reset the iRobot to the Factory Defaults - After the reset, set up the robot again according to your preferences and verify if the issue has been resolved.
Through the Robot’s Buttons
- Simultaneously press and hold the following buttons on the robot:
Home Clean Spot Clean
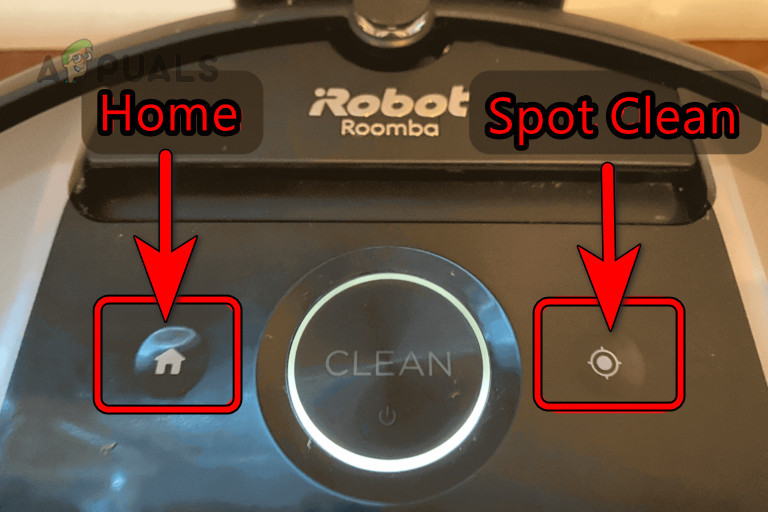
Factory Reset the iRobot Through the Buttons - Wait until the white light around the Clean button stops circling, then release the buttons.
- Reconfigure the robot to your preferences and check if Error 15 has been resolved.
10. Test the Robot in Diagnostic Mode
If a factory reset fails to resolve the issue, you can use the diagnostic mode to identify the problematic component.
Before proceeding, be aware that entering the diagnostic mode may void the iRobot’s warranty. If the robot is under warranty, it’s advisable to contact support and avoid the diagnostic mode. Additionally, normal safety features are not active in diagnostic mode, which can lead to unintended issues, so proceed with caution and at your own risk.
To enter the diagnostic mode on the Roomba Discovery model #4100, follow these steps:
- Initiate the Roomba robot diagnostic mode.
Run Tests on the iRobot in the Diagnostic Mode - Proceed through the tests. If the robot fails any of them, investigate that particular component and attempt to rectify it.
Should the issue persist, it might be related to hardware, and you should consider having the robot examined for hardware errors. If your robot is still under warranty, contact iRobot Support for further assistance.
The post How to Troubleshoot Roomba Error 15 iRobot? appeared first on Appuals.
]]>The post How to Connect Alexa to Wi-Fi Without the App [Updated] appeared first on Appuals.
]]>Table of Contents
Why Does Alexa Need Wi-Fi?
It’s essential to know that Alexa requires a Wi-Fi connection to function optimally. When you ask Alexa a question or give a command, it sends an audio recording to Amazon’s servers via the internet (for which it uses Wi-Fi), processes it, and then sends back the response.
Connecting Alexa to Wi-Fi
There are two ways you can connect your Alexa to Wi-Fi. One of them involves using Amazon’s app for controlling and configuring Echo devices, and the other method omits the usage of their app. However, certain users have reported that they can no longer configure their Alexa without using Amazon’s app. So, we will take a look at both methods.
How to Connect Alexa to Wi-Fi Without Using the App
There are various reasons for wanting to set up Alexa without the app. Perhaps you don’t have access to a smartphone, or maybe you prefer using a computer. Regardless, here are the steps for connecting Alexa to Wi-Fi without using the app.
Be wary that this method is outdated and might not work correctly, if not entirely. If that is the case, then move on to our section explaining how to connect Alexa to Wi-Fi with the app.
Users have reported the Amazon Alexa site being changed since launch. So, if this method doesn’t work out for you, skip to the next one.
- Open a browser on your device and head over to Alexa.Amazon.com.

Amazon Alexa Login Page - Log in using your Amazon account credentials. If you do not have an Amazon account, you can easily create one at the bottom of the page.
- After logging in, click on “Settings“. This option will be available in the left-hand sidebar.
- Click on “Set up a new device.”
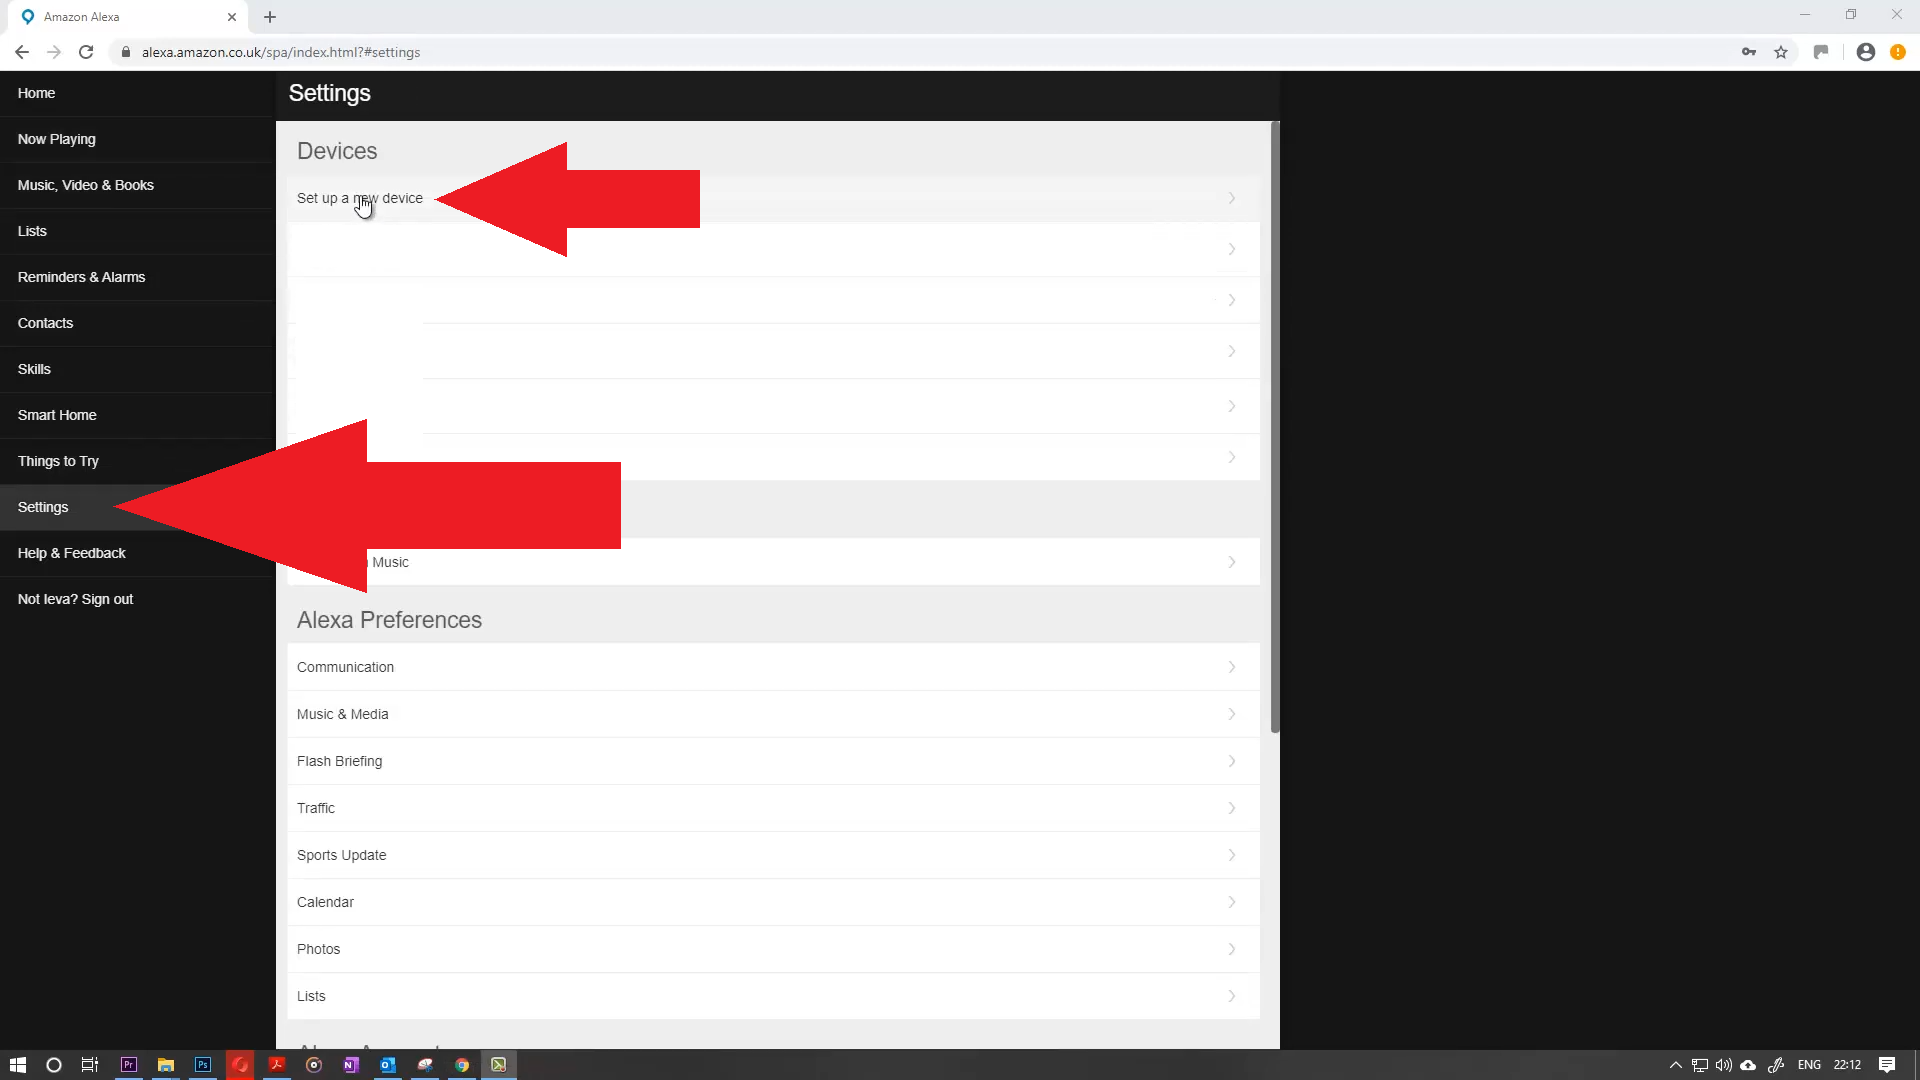
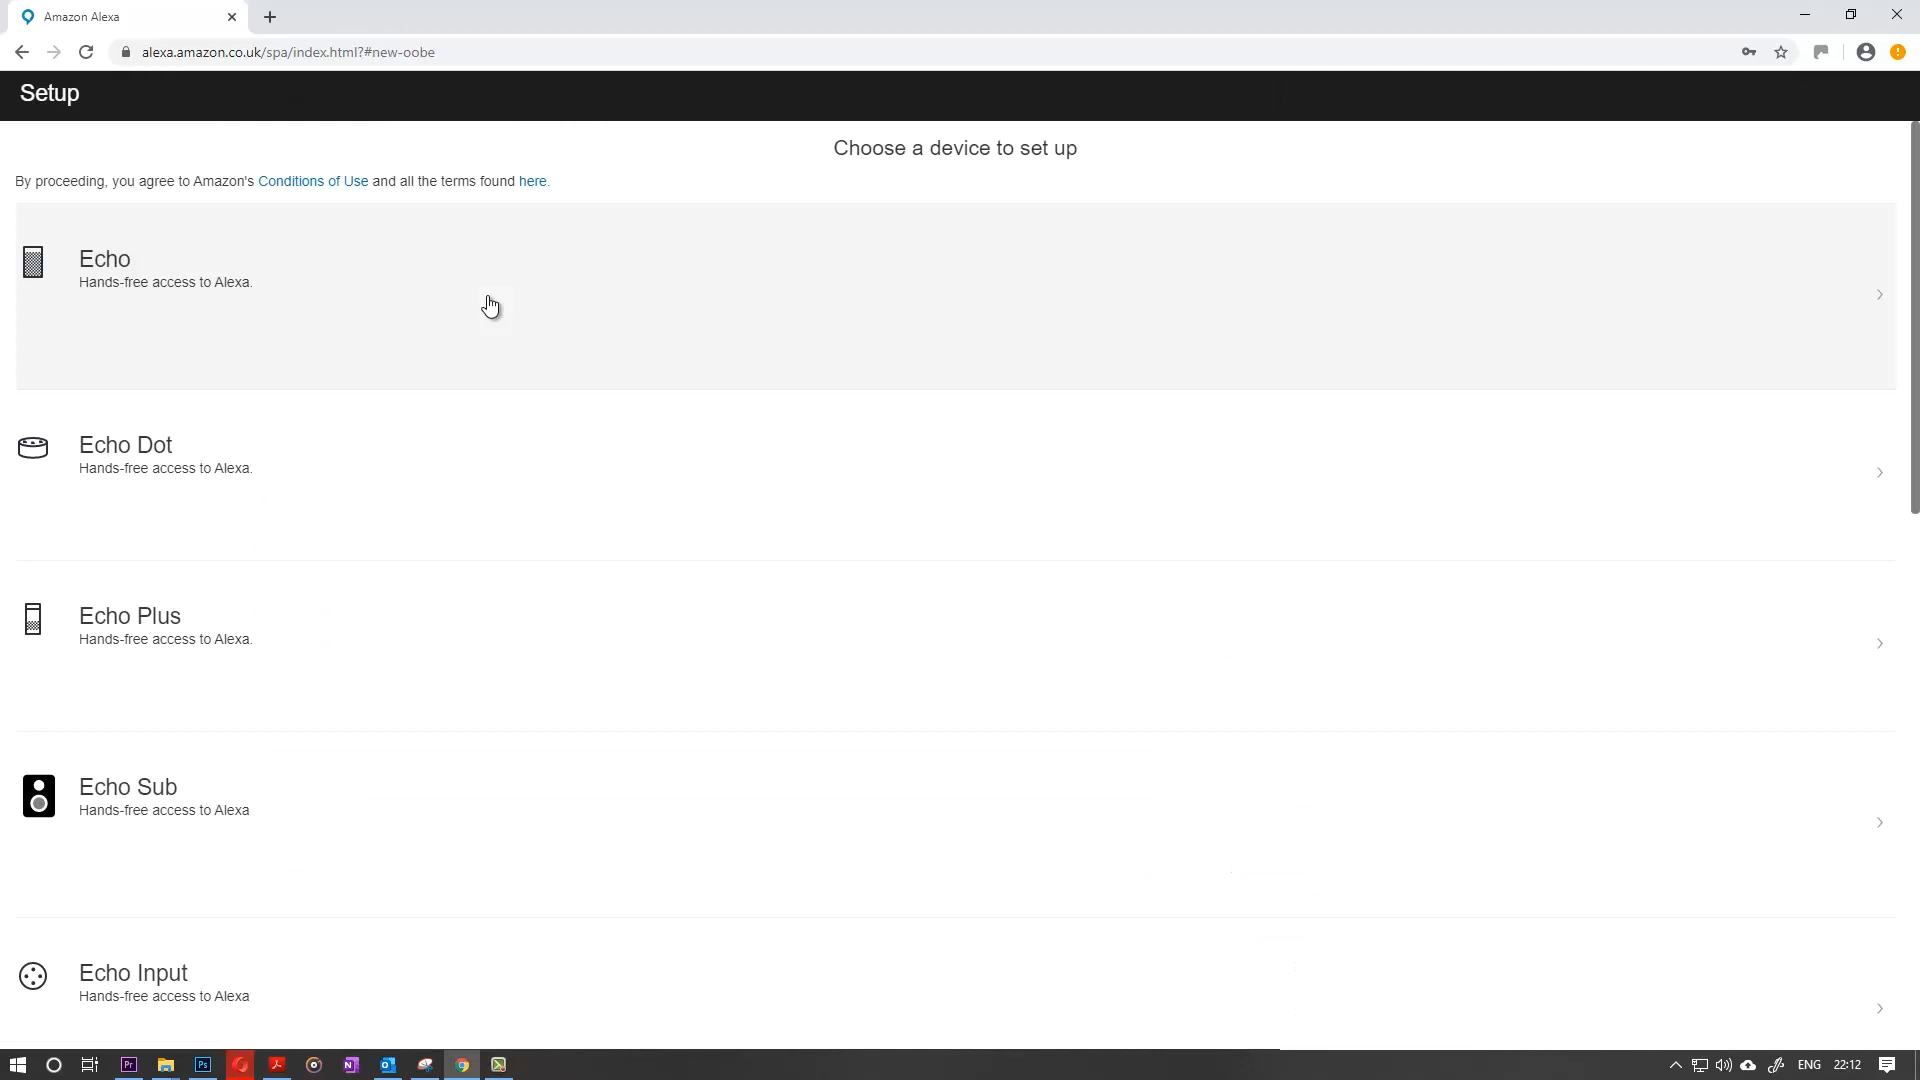
Alexa Setup A New Device - Here, you can select the Alexa device you want to set up on your Wi-Fi network.
- Choose the device you own and press on “Continue.”
Setup Alexa Device - Now, you must plug your Alexa device into a power source to turn it on.
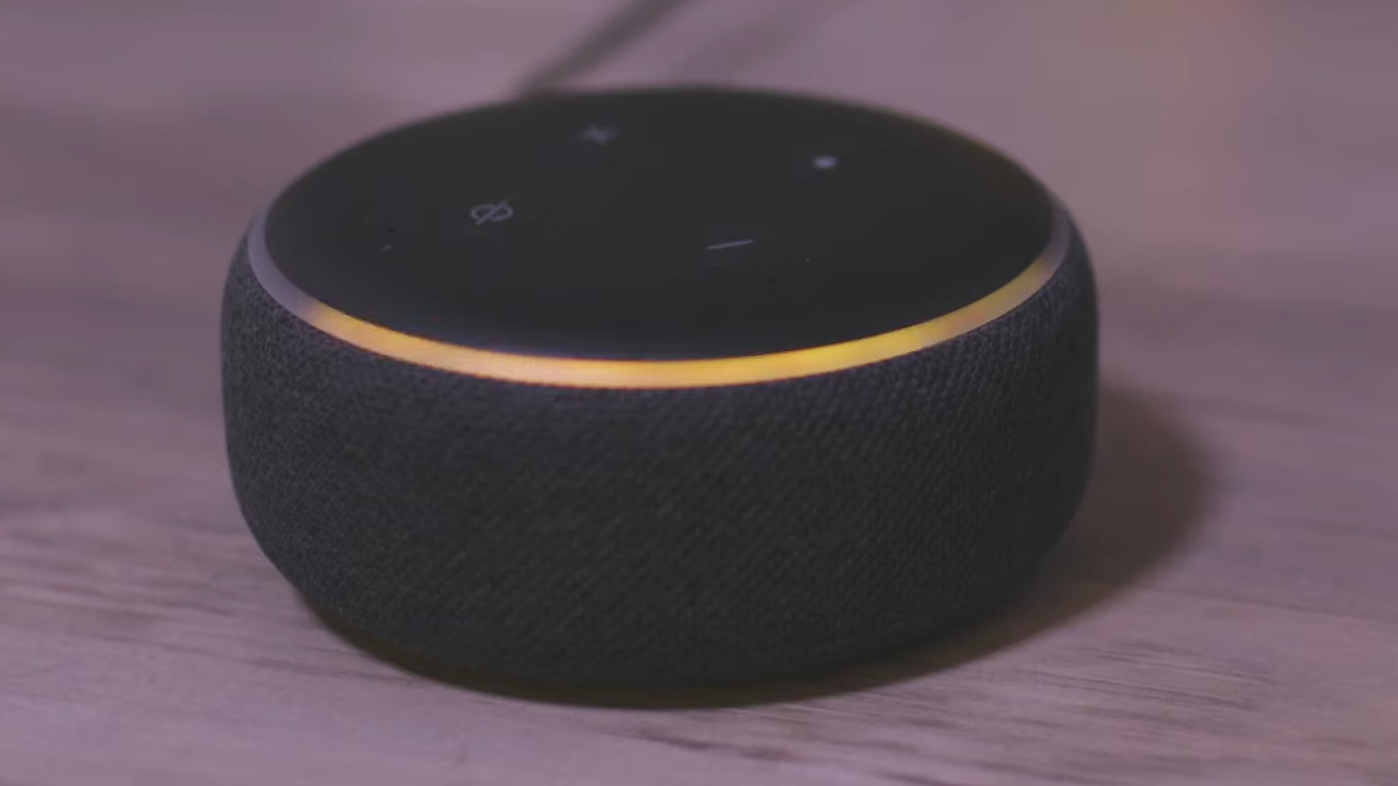
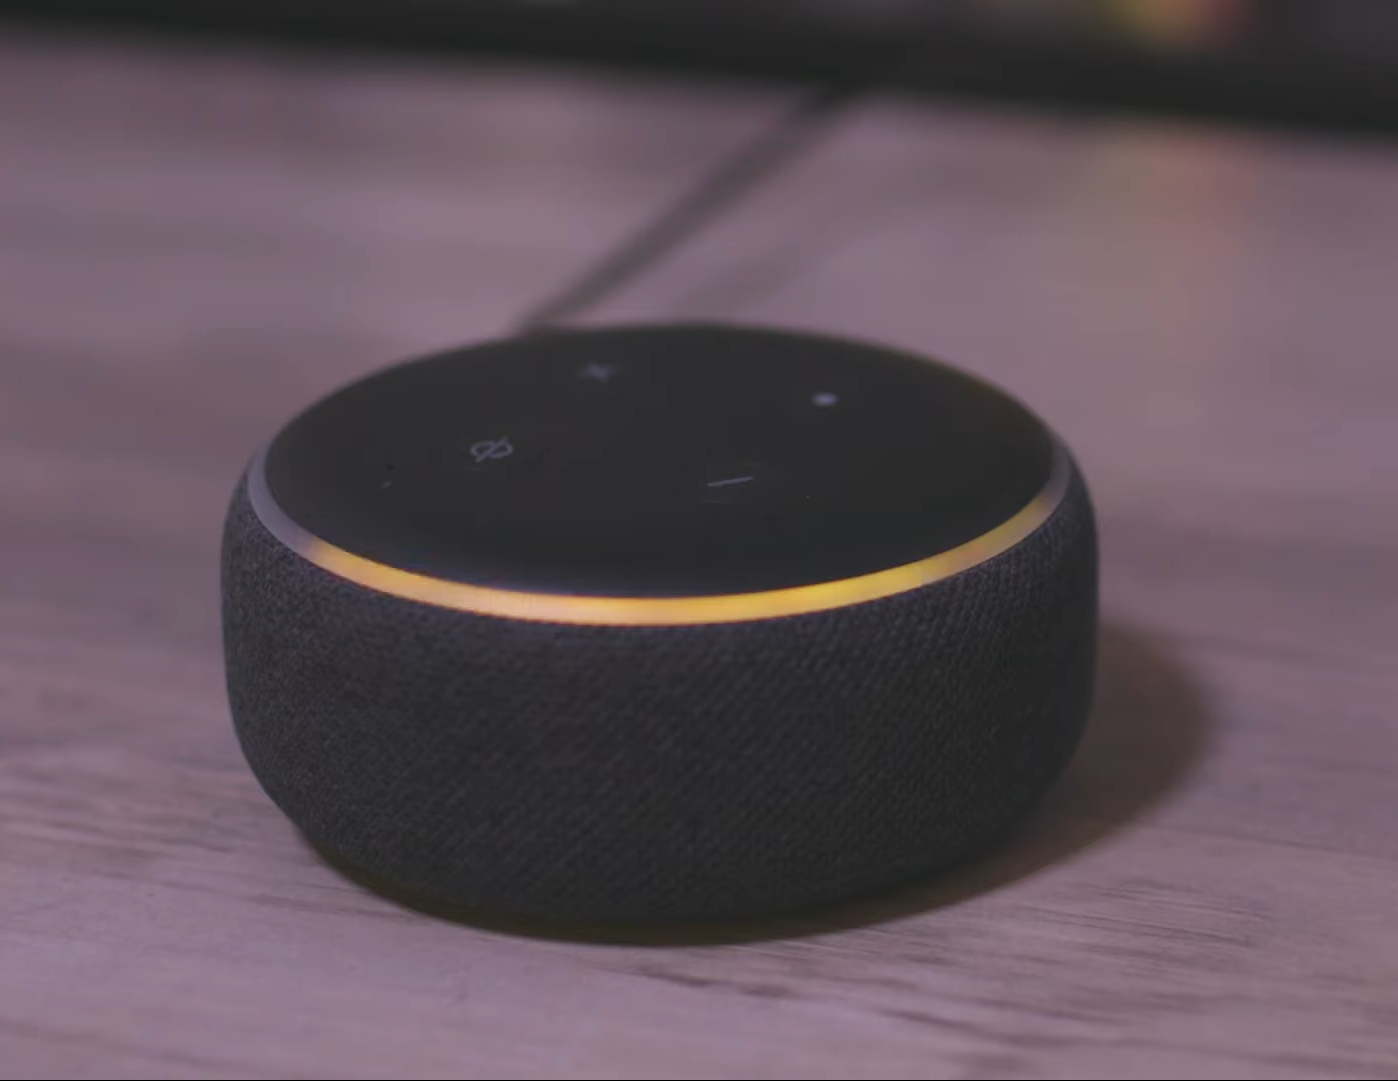
- After turning it on, please wait for the right light to turn orange. The orange light means it is ready to connect to the internet.
Alexa Orange Ring Light - Now, you must connect your system to the Wi-Fi with the SSID being Amazon-XXX without closing your browser.
When connecting to the “Amazon-XXX” Wi-Fi, it’s the setup mode for Alexa devices. It acts as a bridge between the device and your browser or app, allowing you to provide your actual Wi-Fi credentials for Alexa to use. - After connecting to Amazon Wi-Fi, open your browser again and click on “Continue.” Now, you will be able to see “Your computer is connected” to your Alexa device.
- Now, select the Wi-Fi network you want your Alexa to be connected to.
- Enter your Wi-Fi password so that Alexa can connect to it and click “Connect.”
- Finally, your Alexa will soon be connected to the Wi-Fi network. Wait for a few minutes, and then test the connection by asking Alexa a question.
After these steps, your Alexa device will have internet access and be able to solve all of your queries.
How to Connect Alexa to Wi-Fi with the App
As we mentioned earlier, most people won’t be able to connect their Alexa to Wi-Fi without an app as Amazon has removed this functionality recently. Therefore, all you have to do is download Alexa’s app and start configuring. Here are the steps to accomplish this task:
- Download and install the Amazon Alexa app on your smartphone.
Play Store App Store. - Open the Amazon Alexa app and tap on “Devices,” you will see this option in the bottom-right corner of your screen.
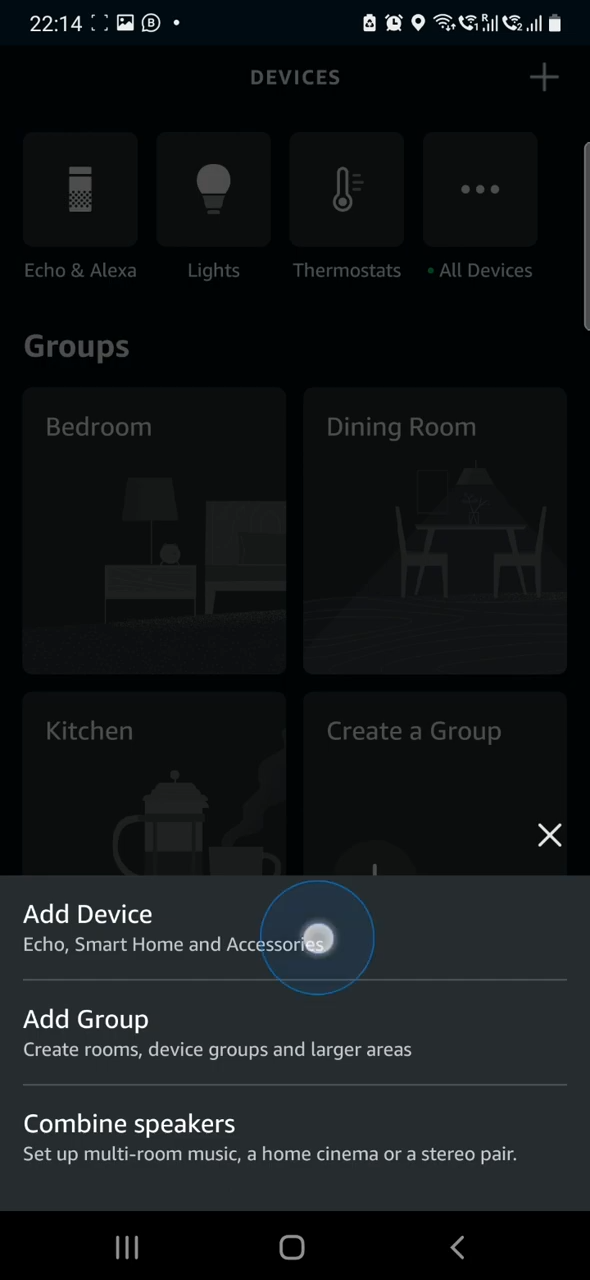
- Now, tap on the + in the top-right corner and select “Add Device.”
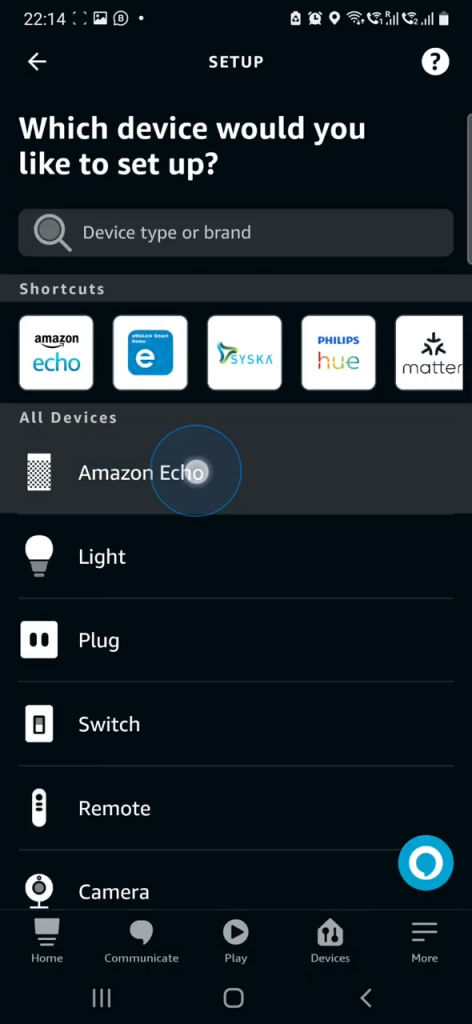
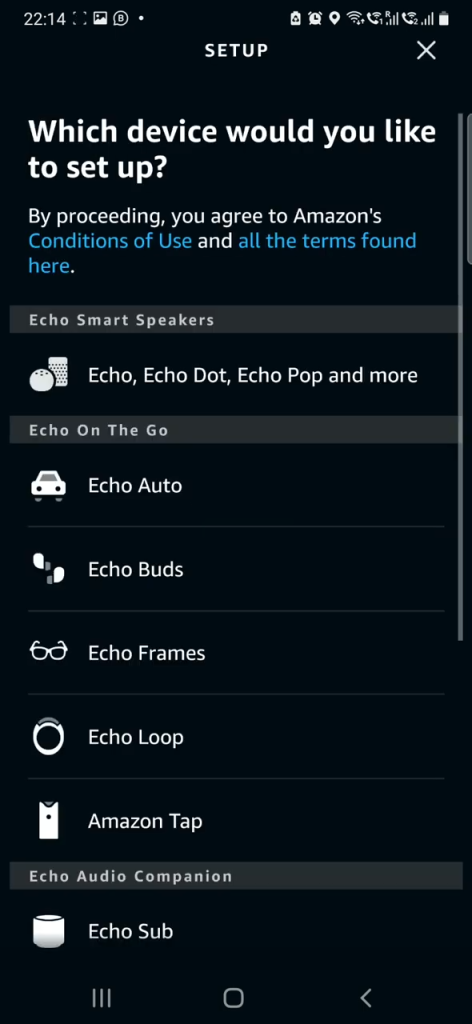
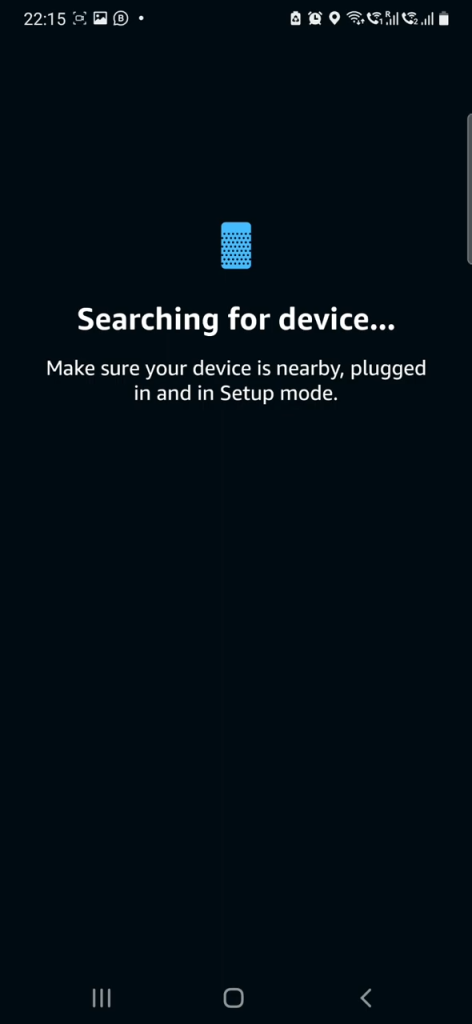
Add a device - Select “Amazon Echo” from the list that pops up, then select your specific Echo device from the next list.
 You might be asked for location and Bluetooth permissions, so allow those.
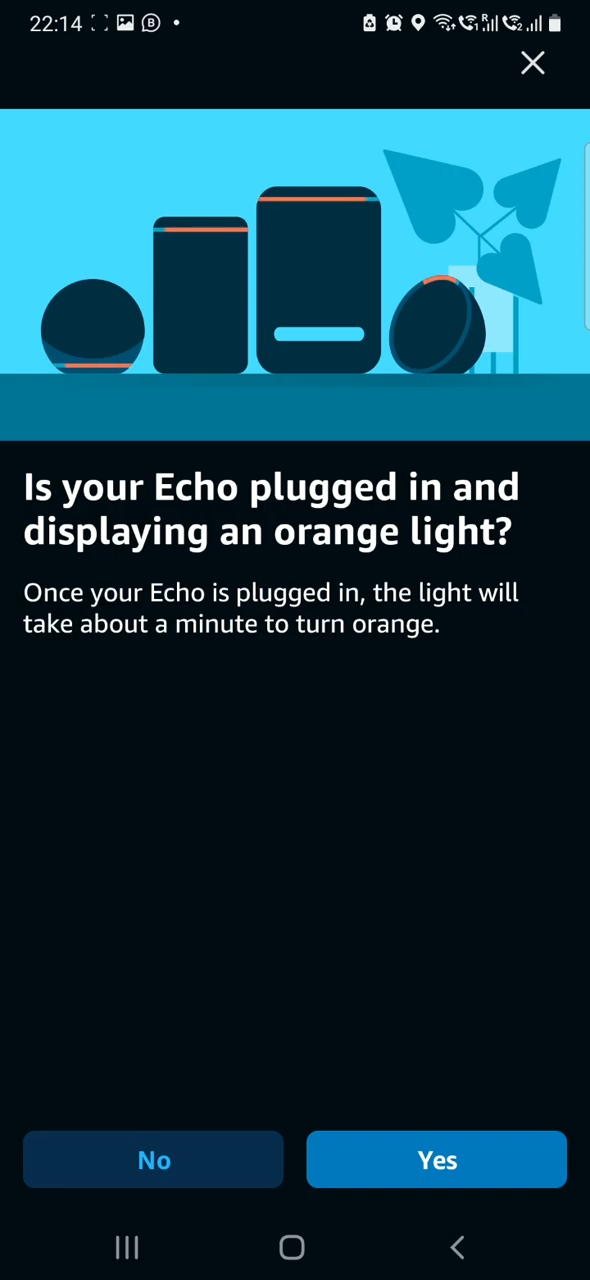
 - Next, it will show you a screen asking if your Echo device is turned on and in pairing mode—pulsing with an orange light. After you’ve turned it on, select Yes if it’s showing the orange light or No if it’s not. If you select No, it will show you on-screen instructions to pair it, otherwise it will start searching for Echo devices nearby if you select Yes.
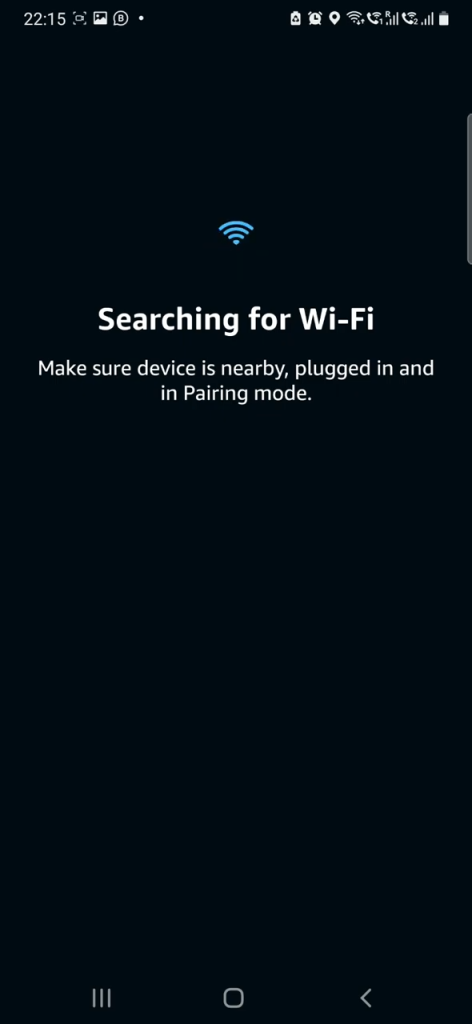
- After the searching is complete, select your Echo device from the list.

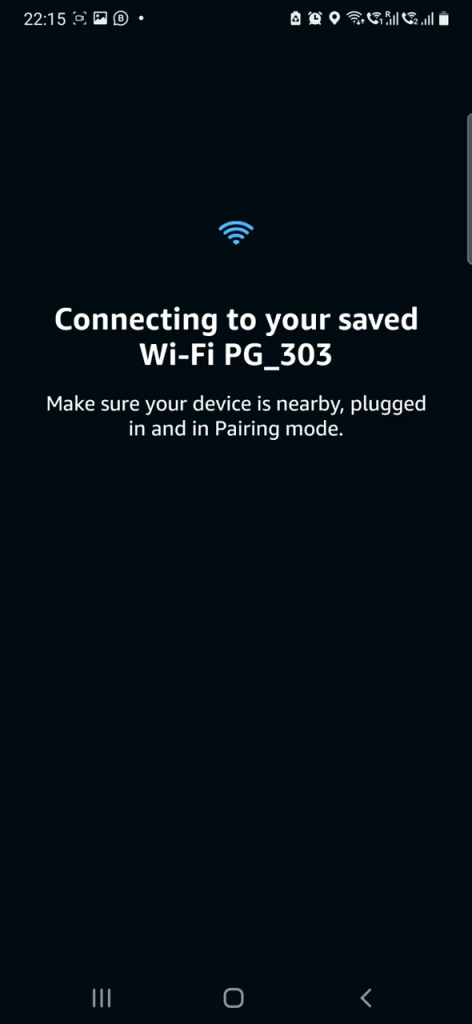
- Next, choose your Wi-Fi network from the list of available networks, enter the Wi-Fi details and wait for it to connect.
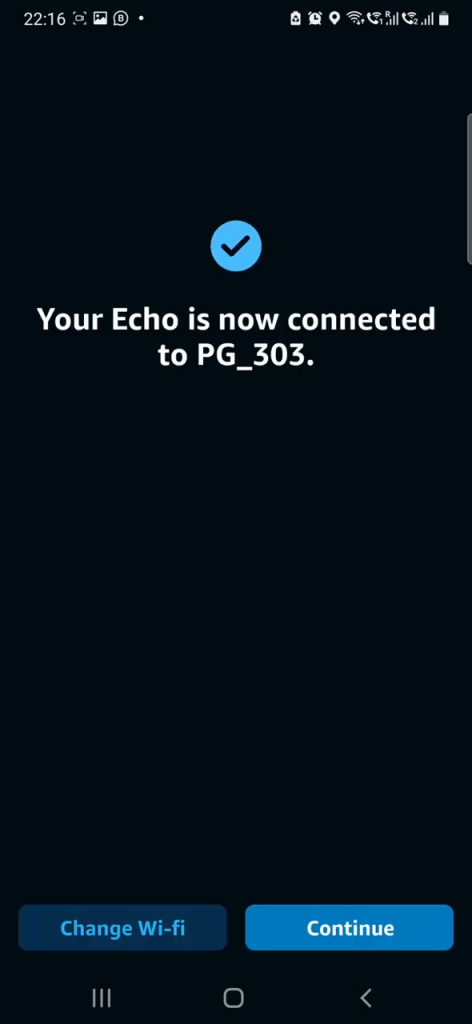
- Congratulations! Your Amazon Echo device is now connected to Wi-Fi. Continue with the on-screen instructions and start using Alexa when setup is finished.
If you’re having issues connecting your Alexa to Wi-Fi because the light isn’t turning orange, check out our detailed guide on how to troubleshoot Alexa flashing yellow and green.
Conclusion
Connecting Alexa to Wi-Fi is no biggie. You can accomplish this with or without the app, ensuring your Alexa device is ready to respond to your commands, play music, provide weather updates, and more without needing a mobile application.
We can only hope Amazon will make this process a little more seamless in the future, to the extent that users can connect their Alexa to the Wi-Fi directly without needing an external device.
FAQs
What if I have multiple Alexa devices? Do I need to set up each one individually?
Is it necessary to have an Amazon account to set up Alexa with the app?
Yes, you need to sign in with your Amazon account credentials to access the settings and set up your Alexa device through the app.
Can I set up Alexa with a mobile hotspot?
Yes, you can use a mobile hotspot to set up Alexa. Ensure your hotspot has a stable internet connection and follow the same steps for connecting to a WiFi network.
The post How to Connect Alexa to Wi-Fi Without the App [Updated] appeared first on Appuals.
]]>The post Fix: “Unable to join the network” Ring Doorbell Issue appeared first on Appuals.
]]>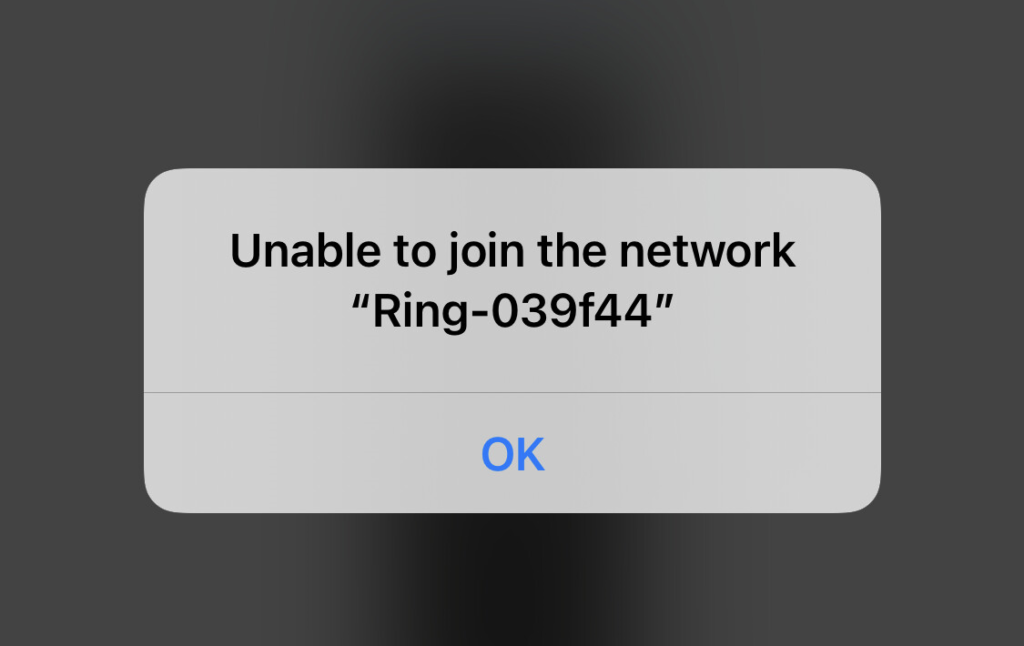
This, without a doubt, is an issue that needs to be addressed as soon as possible. Generally, the issue occurs when your router is too far away, there’s a glitch in the Ring app itself, or you’re using an incompatible network connection band.
There are a total of 10 fixes which include disabling the VPN, fully charging the Ring doorbell, rebooting the router, resetting the doorbell, and more.
In the next section, we’ll look at how these methods can help you get your Ring doorbell connected to your network again. Afterward, I’ll list down the step-by-step guide for each fix.
How Do I Fix a Ring Doorbell that Won’t Connect to WiFi
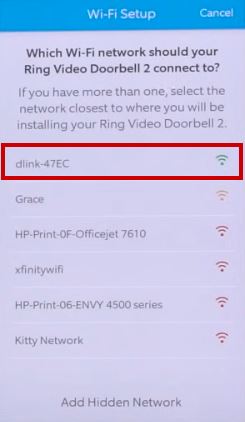
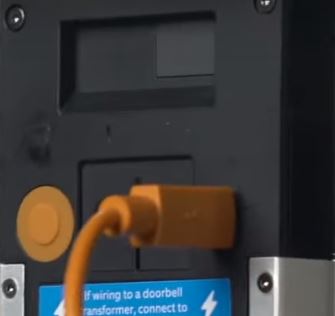
- Connect to Ring Setup Access Point: While the initial setup, your Ring video doorbell will broadcast a WiFI network for a temporary period which you need to connect to on your mobile device. Make sure you do this as this is an important part of the setup process and will help you connect the Ring device to your WiFi afterward
- Move your Router Closer to the Ring Doorbell: If the router is too far away, then the signals might not reach the Ring doorbell and it will be unable to connect to your WiFi network. Therefore, make sure your router is closer to the bell, or use network extenders.
- Disable VPN on Your Phone: Enabling VPN changes your IP address and it’s a problem in connecting a Ring device to the network. So, turn the VPN off on your mobile device and connect to the doorbell again.
- Uninstall Android Apps that Conflict with the Ring App: Some particular applications interfere with the Ring app and hinder its performance and connectivity to the doorbell itself. I’ll list all of them in the following section.
- Use Another Mobile Device: If a mobile device is not able to connect to Ring, then try a different mobile for this purpose. Simply install the Ring application and see if the secondary phone can connect with the bell.
- Reinstall the Ring App: A potential error in the Ring application can be the reason why connectivity issues are happening. In such cases, it’s a good idea to reinstall the app and connect your WiFi to the video doorbell again.
- Fully Charge the Ring Doorbell: Make sure the Ring doorbell is fully charged. Because if it’s not, then it won’t join the WiFi network no matter what you do. It takes around 5-10 hours for the doorbell to charge 100%.
- Use a 2.4 GHz Network Band if the Ring Doorbell is Incompatible with 5 GHz: All Ring doorbells are not compatible with the 5 GHz band. Check your bell and see if it uses 2.4 GHz or 5 GHz. If it’s the former, then change your WiFi band from 5 GHz to 2.4 GHz and the bell will connect to the network now.
- Reboot Your Router or Modem: WiFi networks can freeze sometimes and rebooting the router fixes this problem. So if the Ring doorbell isn’t connecting to your WiFi, then reboot your router or modem and try again
- Reset your Doorbell: Resetting the Ring doorbell is the last resort. If nothing else works, then most probably there’s an issue with the bell itself. In such a case, reset the device and then see if it connects to the network.
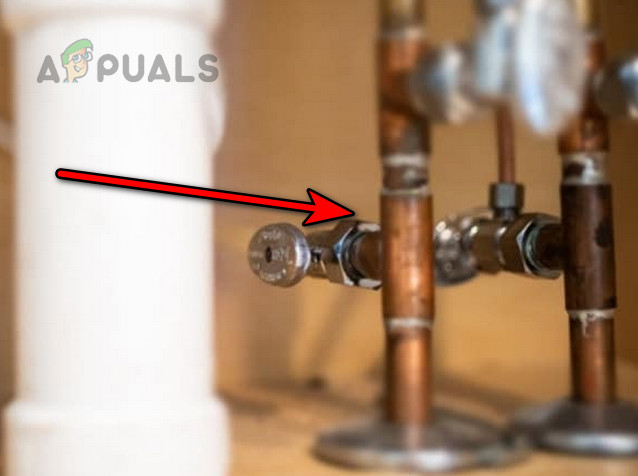
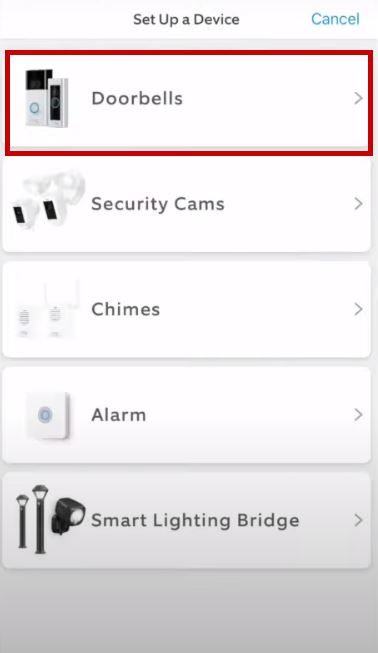
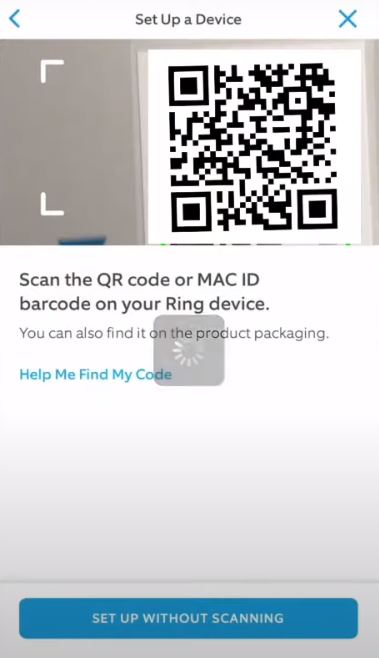
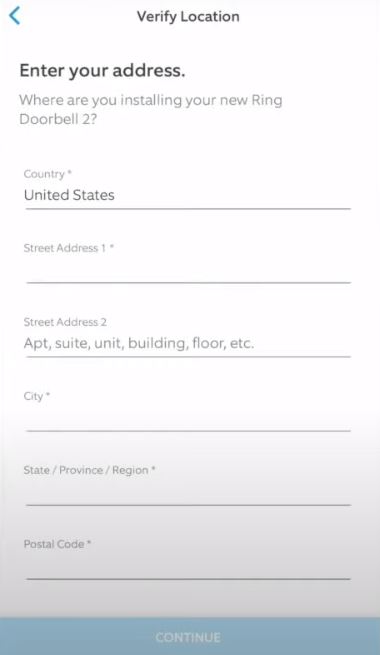
1. Connect to Ring Setup Access Point
- Download the Ring – Always Home application.
- Create your account or sign in if you’ve got an existing one.
- Select Set up a Device and tap on Doorbell.
- Scan the QR code or MAC ID barcode on the doorbell or instruction manual.
- Enter the location info.
- Select the doorbell’s name and turn on two-factor authentication.
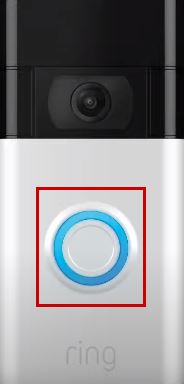
- Now the Ring device will be in setup mode and you’ll be able to see a blinking or spinning white light. If you don’t see it, then press and hold the setup button on your doorbell to put it into setup mode. If the light still doesn’t turn on, then charge the battery.
- Now go to Settings > WiFi on your mobile.
- The Ring access point will be showing up as ‘Ring’ and the last 6 digits of your MAC ID will be written. Or, it will be labeled as ‘Ring Setup’ and the last two digits of your MAC ID will be written.
- Select the access point for connection.
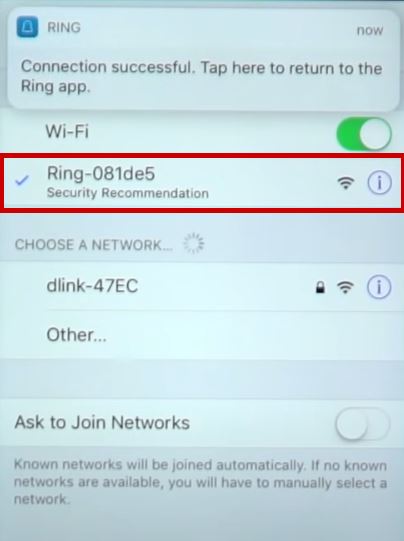
- Now go back to the Ring app and connect to your WiFi.
- Once done, see if the doorbell functions now.
2. Disable VPN on Your Phone
- Open your VPN application.
- Select Disable/Off to turn it off.
- Now reconnect your WiFi to the Ring device.
3. Uninstall Android Apps that Conflict with the Ring App
The following apps interfere with the Ring app and you should uninstall them if you don’t use them often:
- 360 Security
- 360 Battery Plus
- AdGuard
- All-In-One Toolbox
- Avast Clean-up and Boost
- AVG AntiVirus
- Booster Kit
- Clean Master
- CM Security
- DFNDR: Antivirus & Cleaner
- Droid Optimizer
- DU Battery Saver
- ES File Explorer File Manager
- Fast Cleaner
- Free Shield
- Lookout
- McAfee Mobile Booster
- Network Master
- Power Clean
- Purify
- Samsung Max
- Security & Privacy
- Storage Analyzer
- Super Cleaner
- Super Fast Charger
- Supo Optimizer
- Zedge
4. Reinstall the Ring App
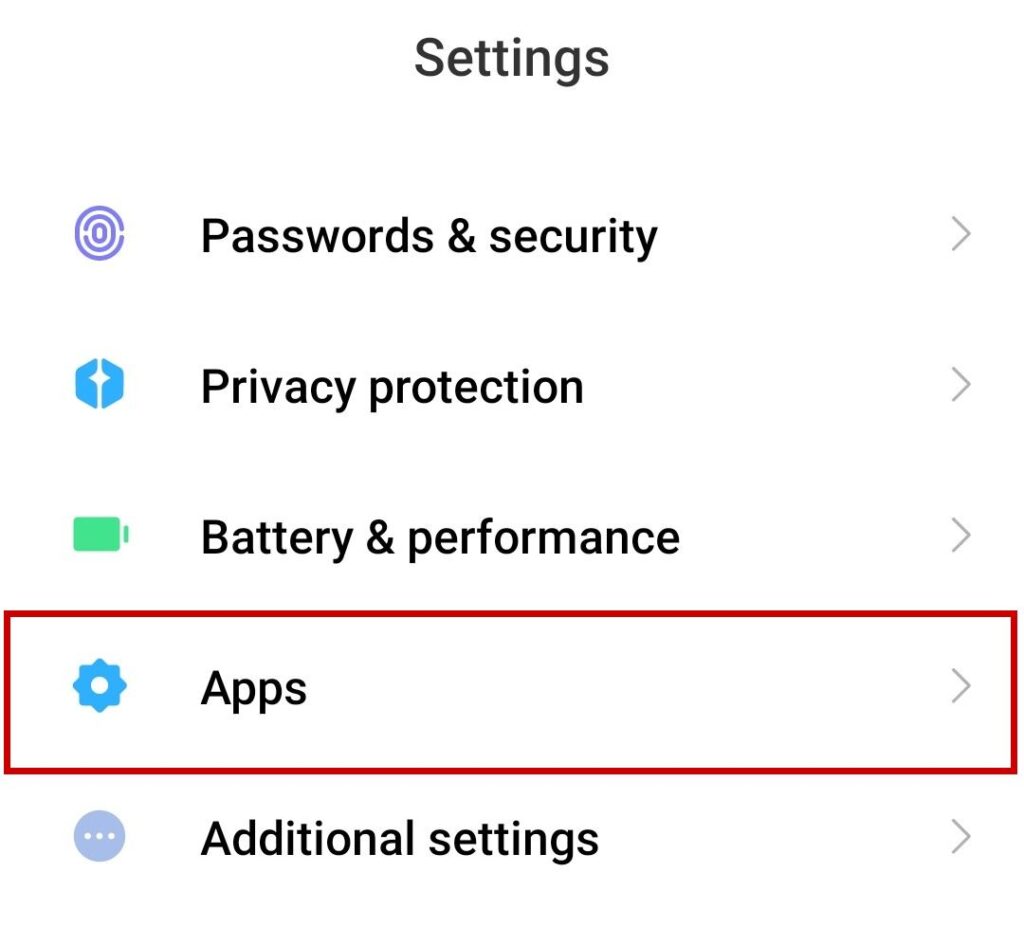
- Go to Settings > Apps/App Management on your mobile.
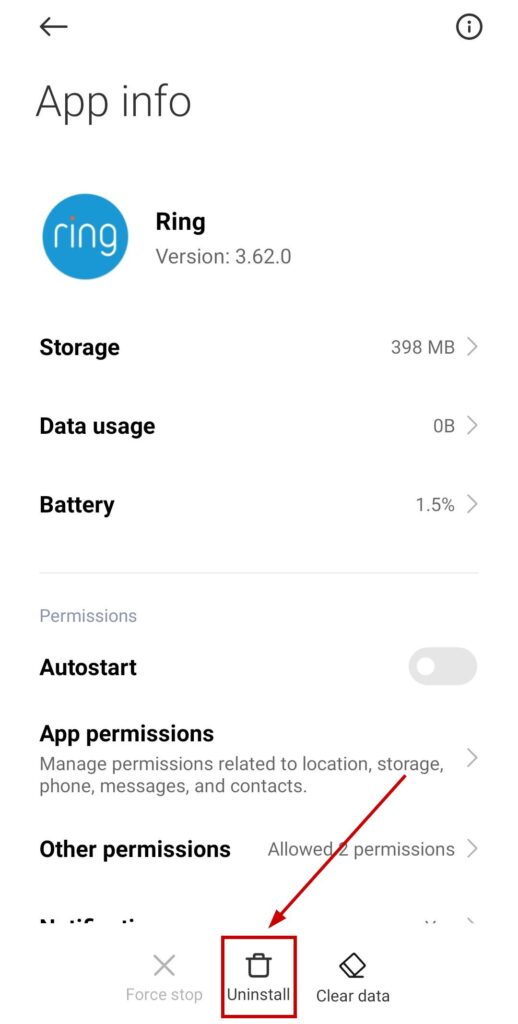
- Look for the Ring app and tap on it.
- Now select Uninstall.
- Go to the Google Play Store or Apple App Store and search for Ring – Watch Home.
- Install the app and set up your doorbell again.
- Connect the doorbell to the WiFi network now.
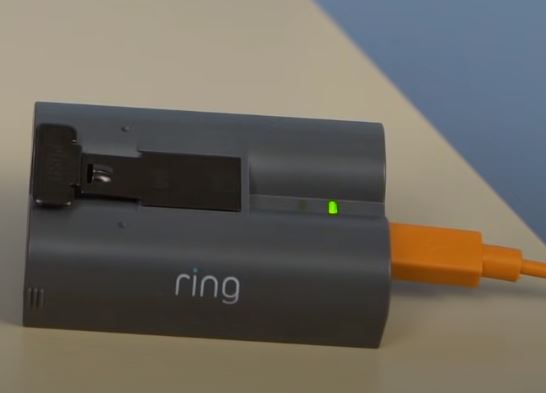
5. Fully Charge the Ring Doorbell
Firstly, check the battery level of your Ring doorbell as follows:
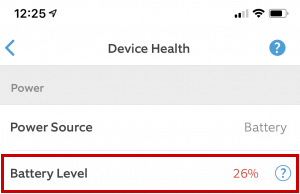
- Open the Ring app and tap on the hamburger menu.
- Tap Devices > Your doorbell.
- Select Device Health.
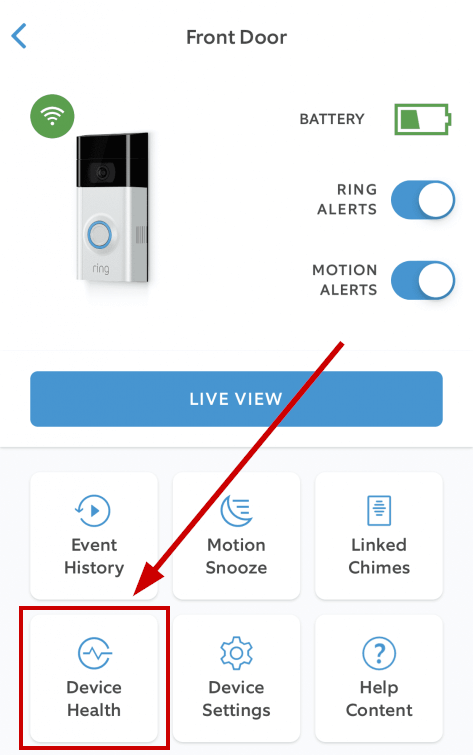
- Check the Battery Level.
Now to charge 1st and 2nd Generation Ring Video Doorbells, follow the steps below:
- Remove the security screws fit at the doorbell’s base.
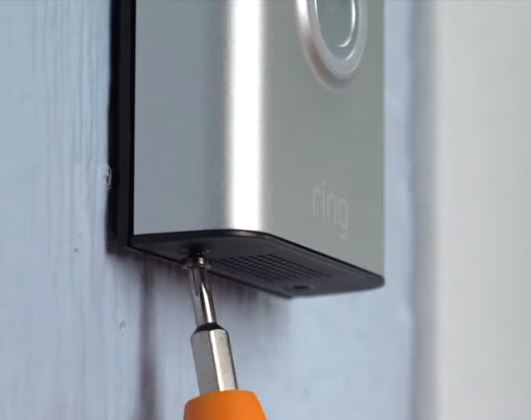
- Now take out the doorbell from the mounting bracket by lifting it.
- Plug in the micro-USB cable in the charging port on the back of the doorbell.
- Once the battery is completely charged, you will see the blue LED fully lit.
- Reattach the doorbell to the mounting bracket using the security screws.
- Now connect it to your WiFi again.
Here’s how to charge Ring Video Doorbell 2, 3, 3+, 4, and Battery Doorbell Plus:
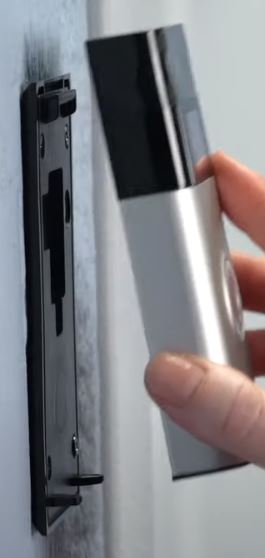
- Remove the security screw fit in the faceplate’s base.
- Now gently squeeze both sides of the faceplate ridges and lift off the faceplate.
- Release the battery by pressing the black tab.
- Connect the doorbell with your micro-USB cable and let it charge. While charging, both red and green lights will be lit up. And once the charging is done, you will only see the green LED fully lit.
- Now slide the battery back into the doorbell. You’ll hear a click sound if it’s placed correctly.
- Wait a minute for the doorbell to power up and boot.
- Now reattach the faceplate and the doorbell.
- Fit it with the security screw.
- Now connect the doorbell to the network again.
6. Use a 2.4 GHz Network Band if the Ring Doorbell is Incompatible with 5 GHz
- Enter your default IP address or your router’s login URL.
- Enter the username and password.
- Now click on Wireless > Advanced.
- Change the band from 5 GHz to 2.4 GHz.
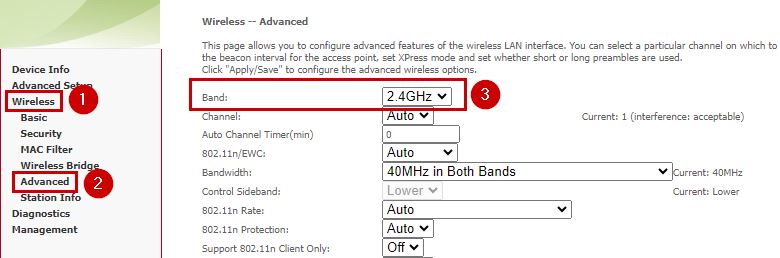
If you have a 5 GHz compatible doorbell but it’s still not connecting to the network, then again, shift to 2.4 GHz and connect the bell. Once done, shift back to 5 GHz again.
7. Reboot Your Router or Modem
- Turn off your router/modem.
- Wait for 30 seconds.
- Now plug in the router and modem and wait for 30 seconds.
- Turn them on now and wait for the internet lights to appear.
- Reconnect the Ring doorbell to the network now.
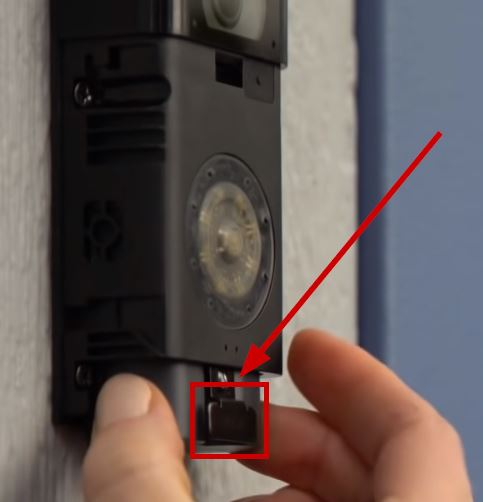
8. Reset your Doorbell
The resetting procedure varies with the doorbell’s model as follows:
For 1st & 2nd Generation Ring Video Doorbells
Press the orange button on the doorbell’s back.
For Ring Video Doorbells 2, 3, 3+, and 4
Press the small black button under the faceplate on the front.
For Ring Video Doorbell Plus and Wired
Press the small black button having an orange dot located under the faceplate.
For Ring Video Doorbell Pro and Pro 2
Press the small black button on the doorbell’s right side. Wait 30-60 seconds until the light goes off.
For Ring Video Doorbell Elite
Press the small black button on the doorbell’s front.
Each of these methods has worked for many different users and they should work at your end as well. But if your Ring doorbell is still unable to join a network, then I suggest contacting Ring Support as there can be a hardware failure or something else. They will suggest some steps or replace your doorbell with a working one.
The post Fix: “Unable to join the network” Ring Doorbell Issue appeared first on Appuals.
]]>The post “Delayed” Message in Nest Thermostat (Explained & Fixed) appeared first on Appuals.
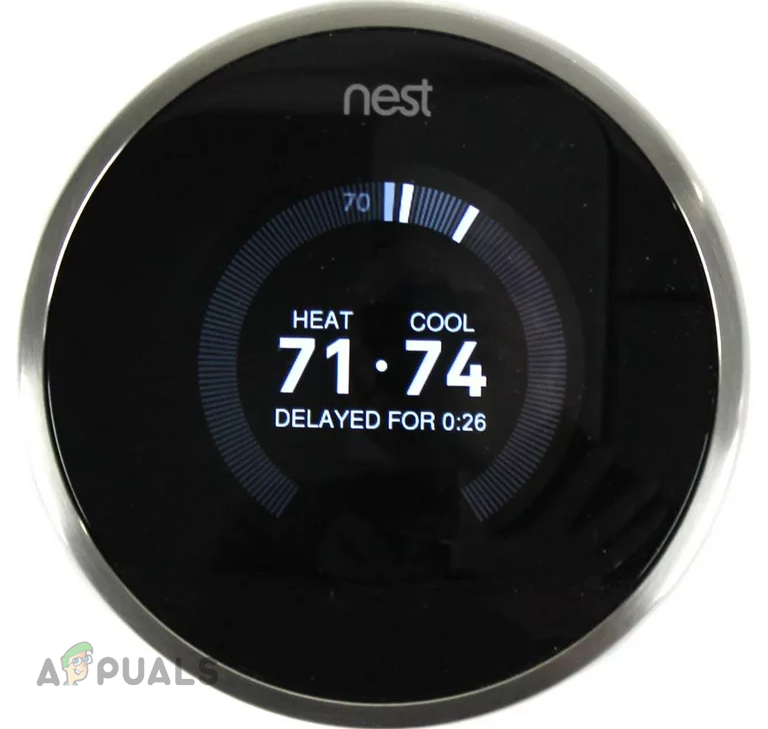
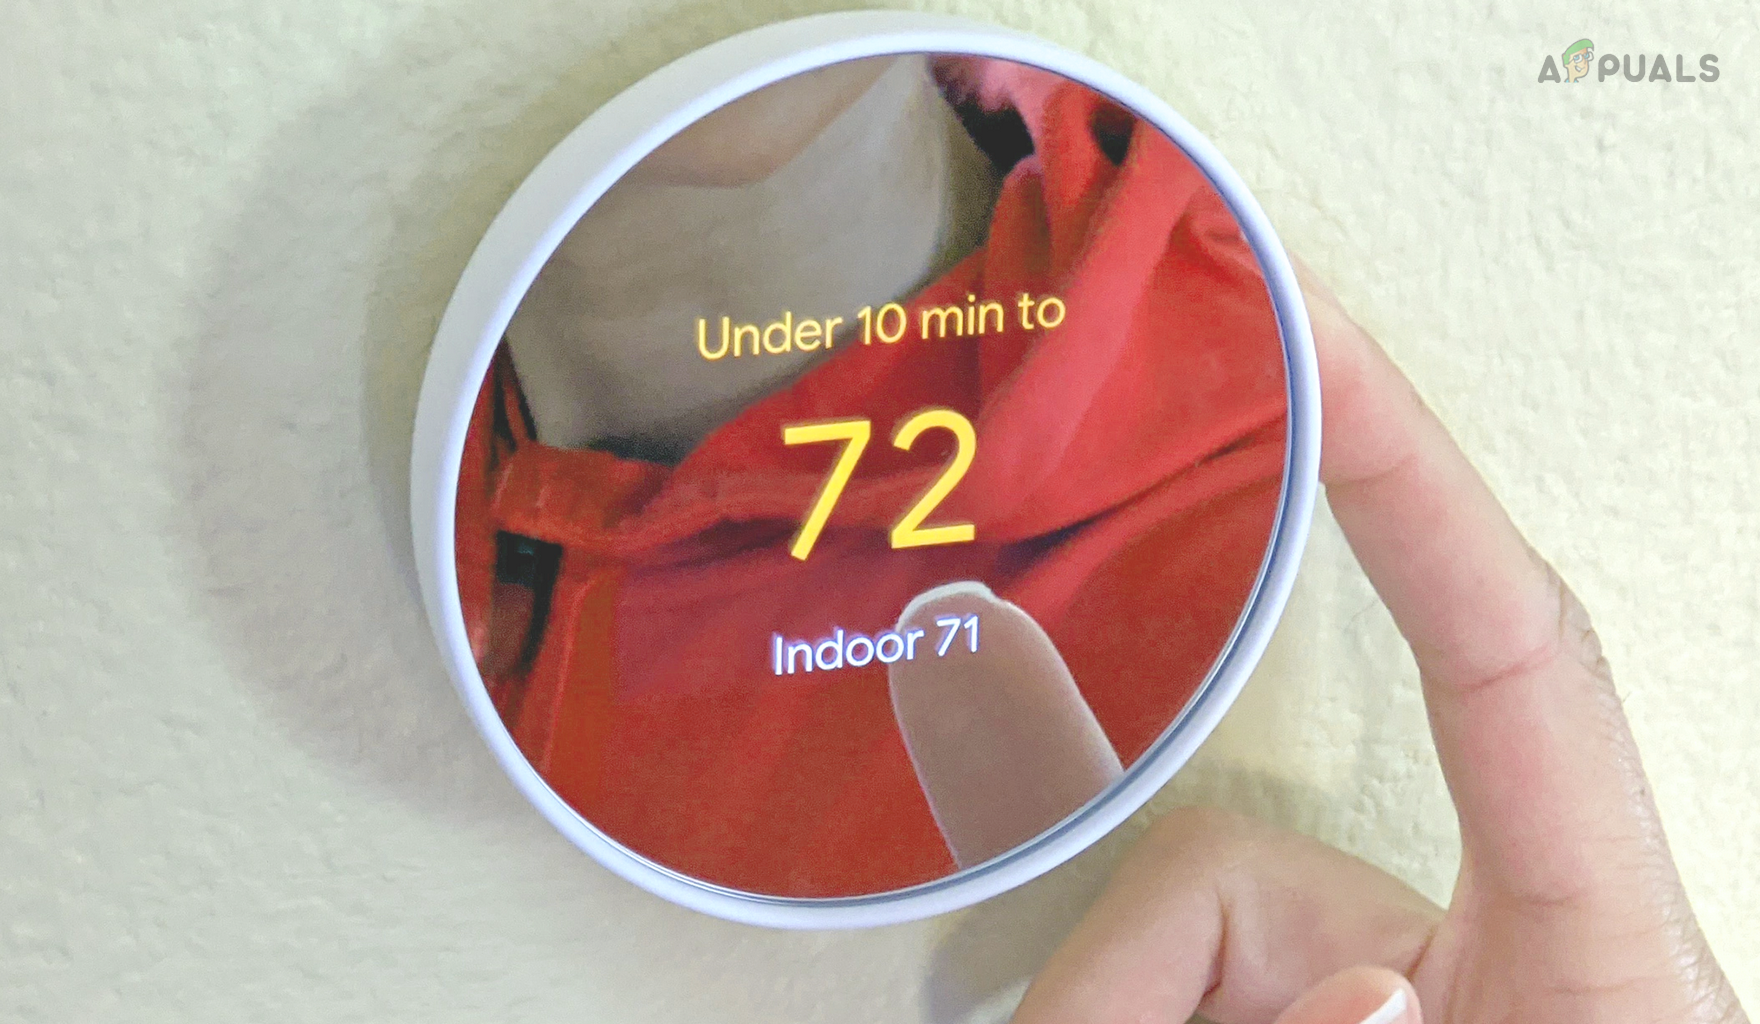
]]>The Nest thermostat uses these delays even when you change the temperature quickly. This delay is called a maintenance band, differential, dead band, or temperature swing.
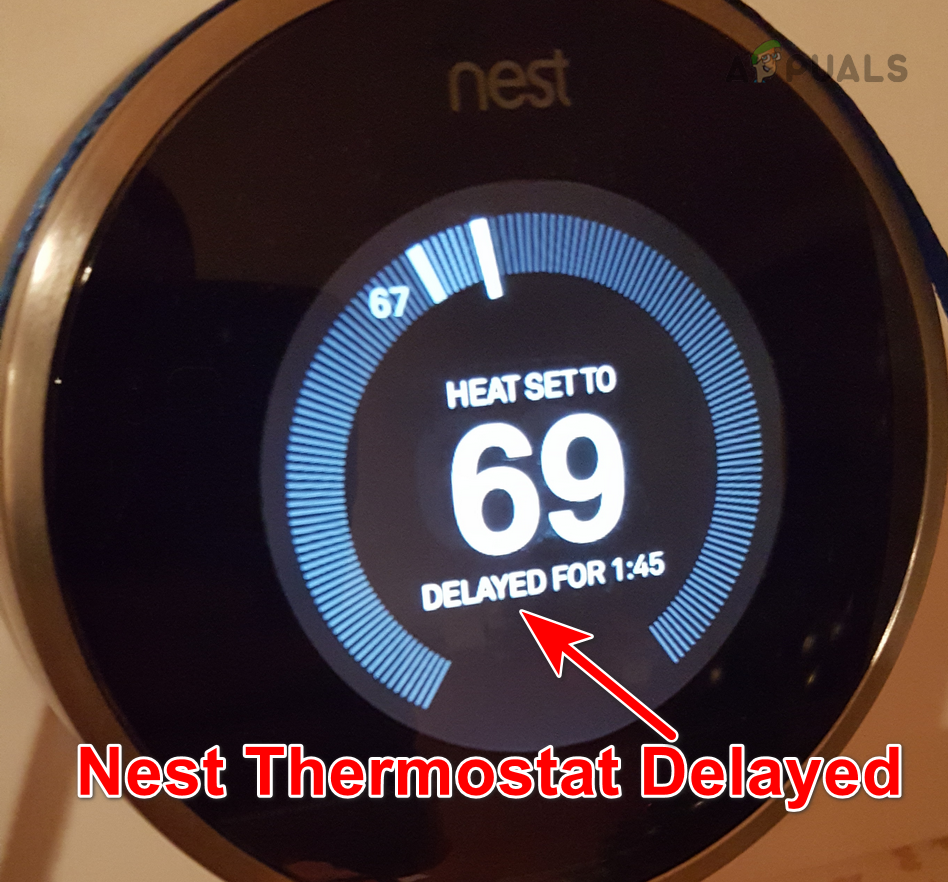
Common Scenarios
Apart from the previously mentioned delay, if the thermostat shows the delayed message for hours or the message is shown more frequently, then another factor is triggering this message. This problem is reported on different variants or generations of Nest thermostats with different heating or cooling systems.
In some cases, when the delayed message will disappear from the thermostat and the heating or cooling unit will try to power on. However, the unit will turn off and again, the delayed message will be shown on the thermostat.
Additionally, there are cases when the issue only occurs on heating or cooling but not on both. At times, you will constantly see a delayed message on the thermostat whereas, the heating or cooling system will not start. If by any means, the system powers on, it fails to provide the required heating or cooling.
Troubleshooting Prerequisites
- Check if you are not part of a peak-reducing plan or smart assistance with your energy company. If so, they will cut your energy demand at the peak time and cause delays in heating or cooling at peak times.
- There are reports where people got to the required temperature by increasing or decreasing the temperature one degree at a time from the room temperature. Do not use this method as this will cause permanent damage to your heating or cooling unit and its repair can be very heavy on your pocket.
How to Fix the Delayed Message on your Nest Thermostat?
We will start with the most basic troubleshooting methods and work our way down to more complex ones. Make sure you follow this guide step-by-step.
1. Force Close the Nest App on Your Devices
The constant pinging of the thermostat by the Nest app may overload the device’s battery which might be running low. The app might be in the background on your devices but it can still send commands to the IoT device. This can especially be true if a C wire is not available to charge the battery.
In such a case, closing the Nest app, on all of your devices will solve the problem.
- On your mobile phone, open the app switcher and swipe up the Nest or Home app.
- For Android, go to Settings > Applications > Google Nest or Google Home and force close the app.
Force Stop the Google Home App - Close the app on other linked devices or systems, in the form of a browser or an app.
- See if the thermostat is clear of the delayed message.
2. Restart the Nest Thermostat and Equipment
A malfunction in the core firmware components of the Nest thermostat can result in heating or cooling delays. Additionally, if the heating or cooling system is not in the state required by the thermostat, the IoT device will show delays.
In any case, restarting both i.e., the Nest thermostat and your heating/cooling equipment will resolve the issue, as it resets the necessary modules to their default startup state.
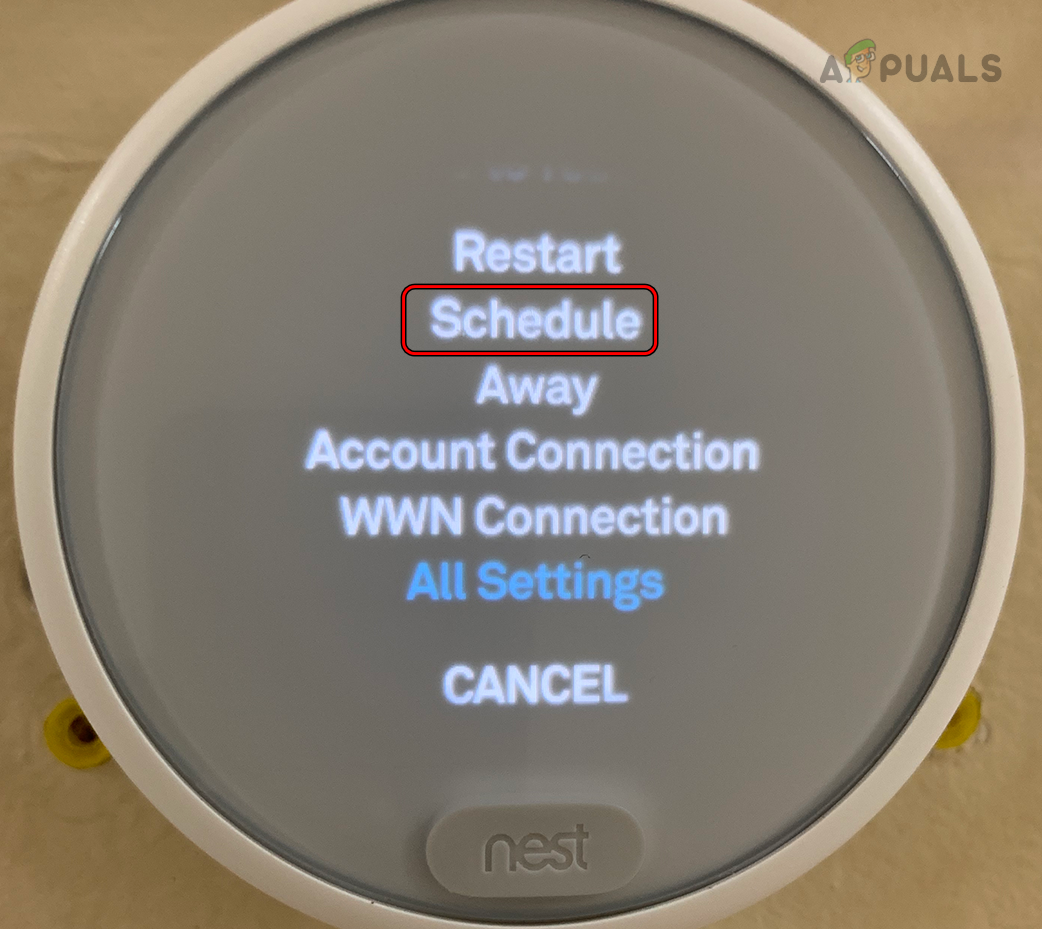
- On the Nest thermostat, go to Settings > Reset.
- Select Restart and once fully powered on, cut the power to the entire heating or cooling unit by turning off the respective circuit breakers.
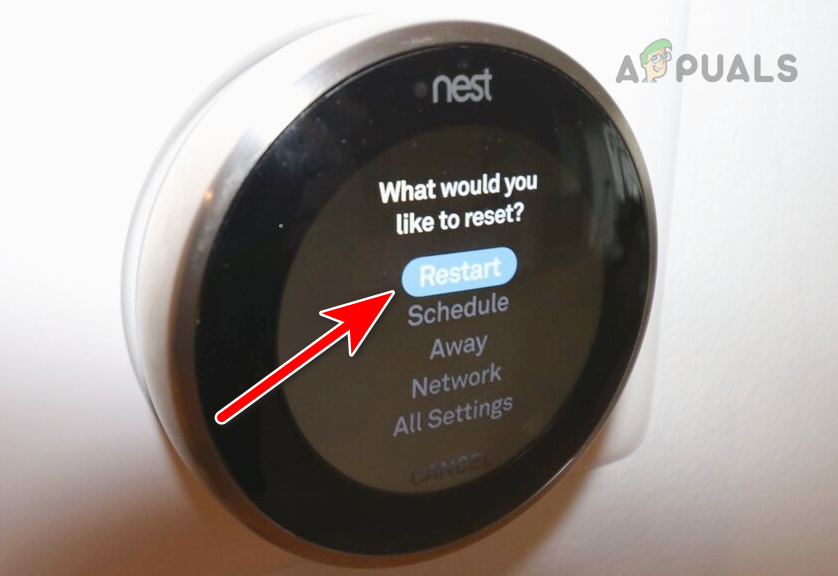
Restart the Nest Thermostat - Wait for a minute and power back everything. Check if the delay issue is resolved.
3. Use Heat Mode or Cool Mode
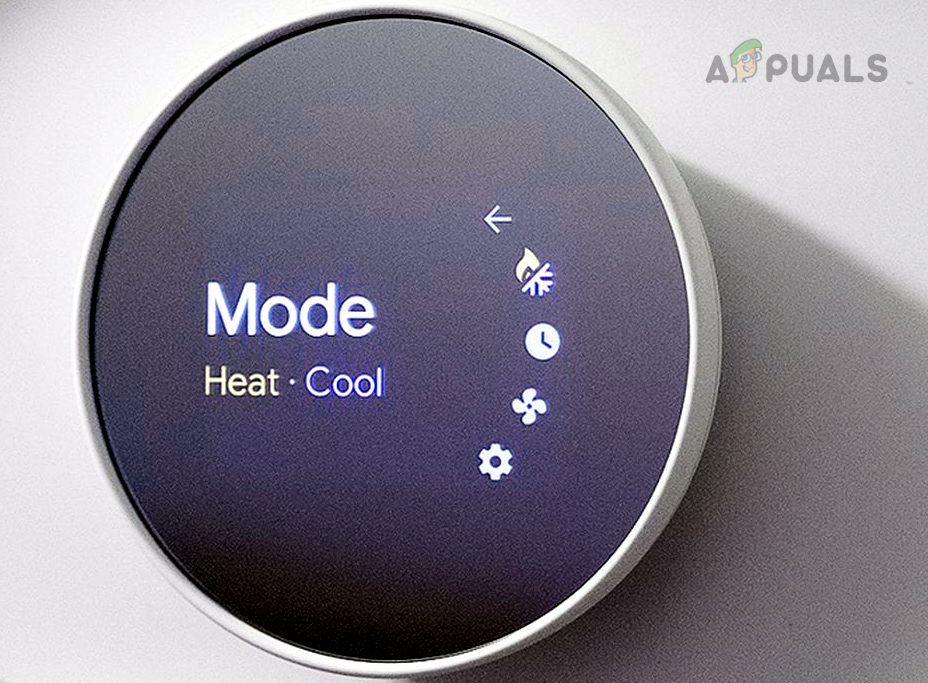
In a Heat – Cool mode, the Nest thermostat will try to keep your system within the specified temperature range. The range will sometimes need heating and sometimes, cooling. This mode is useful for hotter climates where cooling may be required during the day and heating may be required at night.
If there is frequent switching between the heat or cool mode, the thermostat will put a delay to avoid any potential damage to your heating or cooling unit. Here, switching to a single mode and then manually changing the mode will do the trick.
You can also increase the gap between your temperature range to avoid frequent switching between the modes.
- On the Nest app, select the problematic thermostat and open Mode. You can also do these steps on the thermostat itself.
- Select Heat mode or Cool mode (but not Heat Cool mode) and check if the issue is resolved.
Change the Mode on the Nest Thermostat
4. Disable Home/Away Assist
The Home/Away assist feature makes the Nest thermostat energy efficient. Through this feature, the thermostat detects that you are not home and as a result, it lowers the cooling or heating till you are back.
You will see a delay on the Nest thermostat if it is failing to detect your presence. This might have occurred due to a malfunction in the device’s firmware modules or due to a misconfiguration of the feature. In such cases, disabling the Home/Away Assist feature will do the trick.
- On the thermostat, go to Settings > Home/Away Assist. You can also change these settings on the Nest or Google Home app.
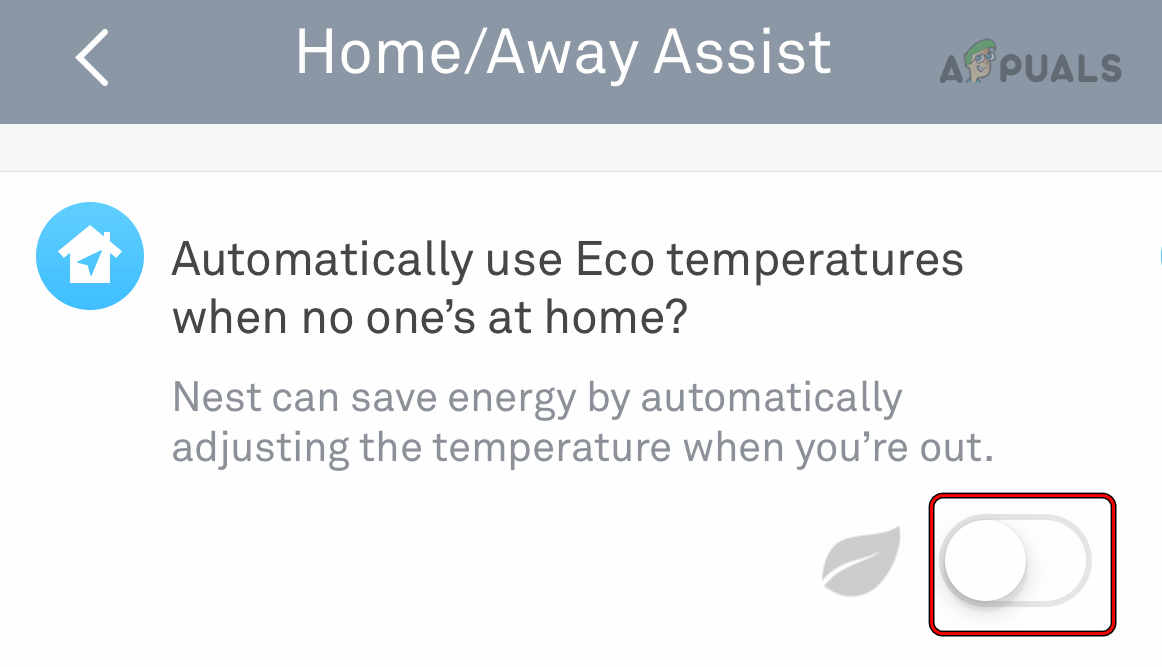
Disable Home-Away Assist in the Nest App - Disable it and check if the delay issue is resolved.
5. Disable Auto-Schedule or Reset Schedules
You will see a delay on the Nest thermostat if Auto-Schedule or manual schedules are holding the thermostat to start heating or cooling, till the scheduled time comes. To address this, disable Auto-Schedule or reset schedules on the thermostat.
Disable Auto-Schedule
- On the problematic thermostat, navigate to Settings > Auto-Schedule.
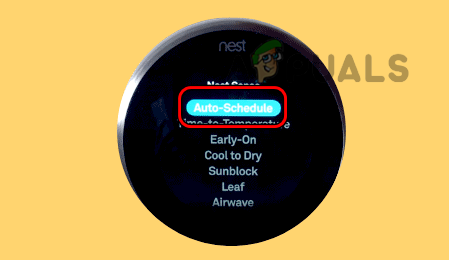
Disable Auto Schedule on the Nest Thermostat - Disable it and check if the delay issue is resolved.
Reset Schedules
- On the thermostat, go to Settings > Reset > Schedules.

Reset the Schedule on the Nest Thermostat - Confirm to reset the schedules and once done, verify if the delayed message has disappeared from the IoT device.
6. Disable Smart Features on the Nest Thermostat
The delayed message can also be shown on the Nest thermostat if any of its smart features are hindering the normal heating or cooling of the IoT device. To solve this, disable the thermostat’s smart features.
- On the thermostat, go to Settings and disable the undermentioned. The availability of these features may vary depending on the thermostat model. If your particular thermostat includes any extra smart features, make sure to disable those as well. You can also do this in the Nest app
Home/Away Assist Auto-Schedule Early on Cool to Dry Sunblock Eco Temperatures Leaf Motion Sense Learning Features
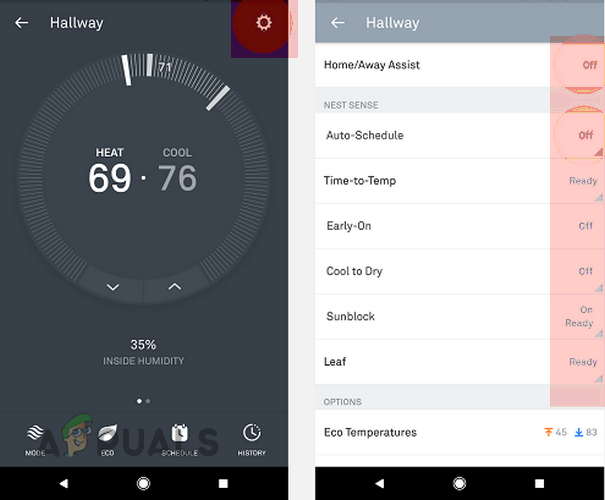
Disable Smart Features on the Nest Thermostat - Once done, check if the thermostat is clear of the delayed message. If so, you may enable the smart features one by one and check which one is causing the problem.
7. Reset the Nest Thermostat to the Factory Defaults
The Nest Thermostat will not be able to turn on heating or cooling instantly and will show a delay if its firmware modules are damaged. This might have occurred when the latest firmware update could not properly be applied to the previous installation.
Here, resetting the Nest Thermostat to the factory defaults will solve the problem.
Remember that resetting the thermostat will erase any learned or manually created schedules. You can note the current wiring or configurations under the thermostat’s Settings > Equipment.
- On the Nest app, go to Settings > Security.
- Remove the problematic Nest thermostat from the app.
- On the thermostat, navigate to Settings > Reset > All Settings.

Reset All Settings on the Nest Thermostat - Confirm to reset the thermostat and wait till the process completes.
- Once done, set it up as per your requirements, and hopefully, that will make the delay go away.
8. Connect or Remove C or Common Wire
The Nest thermostat relies on the C or Common wire for charging its battery and if this wire is not connected, it will use other wires for charging. When a heating or cooling session is in process, the thermostat cannot charge through other wires.
If there is no break during the heating or cooling process, the thermostat will not be able to charge itself. Hence it will add a delay in the heating or cooling process to get itself charged. This can be fixed by connecting a C or common wire at both ends.
If the C wire is already connected but not correctly grounded, it will fail to charge the thermostat and the thermostat will also not charge through other wires, thus it will show a delay. Here, removing the wire will solve the problem.
Our primary focus will be on providing general guidelines for connecting the C wire, considering that the specific products and equipment involved can vary. For a successful implementation in your particular scenario, it may be necessary to conduct further research and delve deeper into the details. You can check the battery health under thermostat Settings > Technical Info > Power.
Please be cautious and try the wiring changes at your own risk, as incorrect wiring may damage your cooling/heating system, the wiring within your place, and the Nest thermostat. If unsure, seek professional assistance to ensure a safe and successful setup.
Connect the C wire
- Connect the C wire to the Nest thermostat and your equipment. Your equipment may have a C or common wire written on the place where it has to connect. The circuit board near the thermostat may also have a point for the C or common wire.
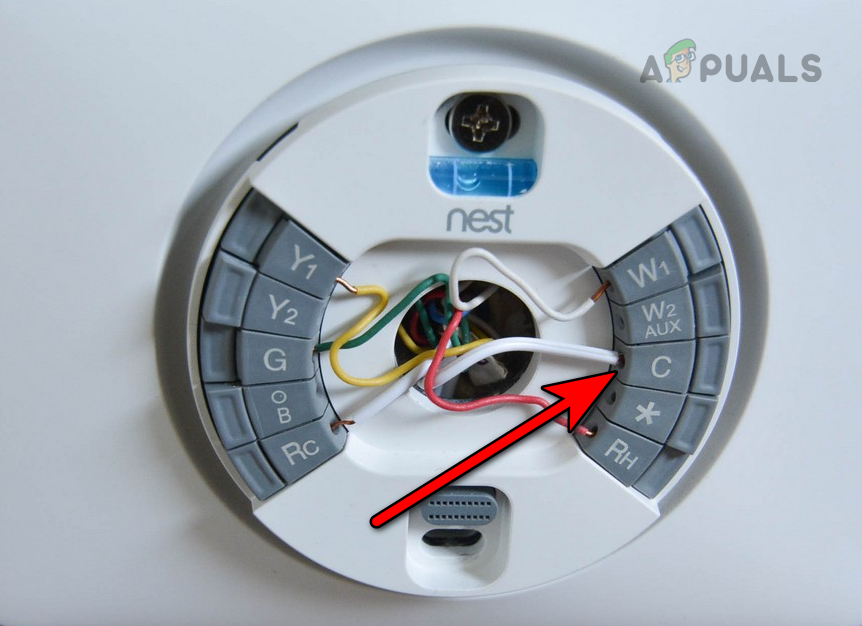
Connect C Wire in the Nest Thermostat - Once done, check if the delayed issue is resolved.
Put the Thermostat on Charging
If you are not confident to attach a C wire, then
- Remove the Nest thermostat from the wall and put it on charging by using a micro USB charger.
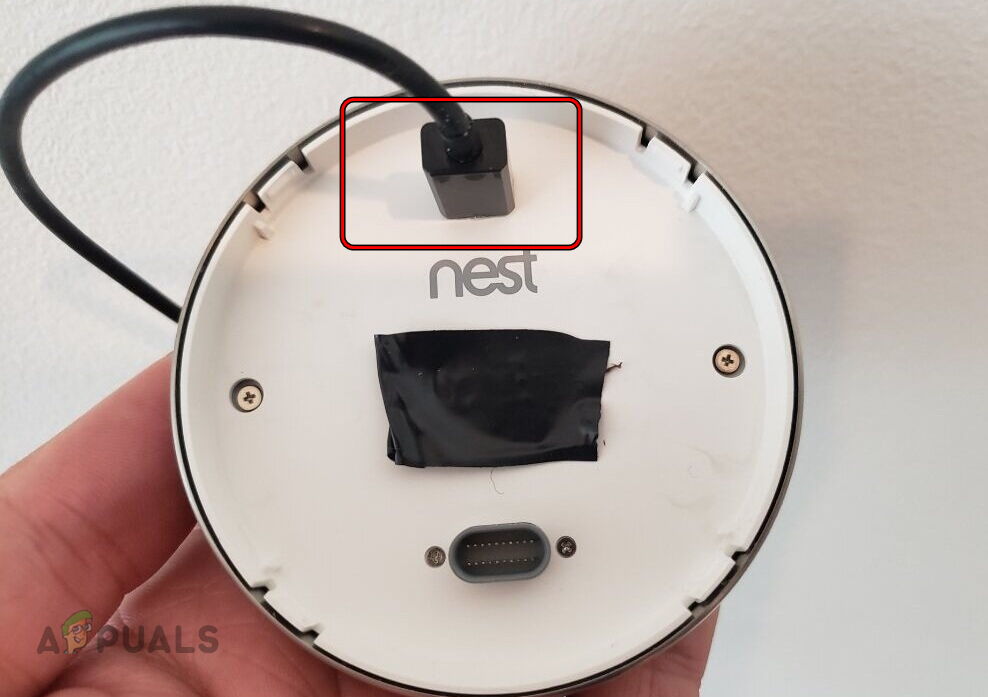
Put the Nest Thermostat on Charging - Wait for at least an hour and connect back the thermostat. See if it is working correctly. If so, then a C wire is required to keep the IoT device charged.
Disconnect the C Wire
If the Common or C wire is already attached:
- Disconnect it from the thermostat and your equipment.
Disconnect the C Wire from the Nest Thermostat - Verify if the delayed message is removed from the thermostat.
9. Clean the Heating or Cooling System
If a filter is choked or a drainage pipe is blocked, an equipment sensor will trip. Resultantly, when a power-on signal is received by the equipment from the thermostat, the equipment will report that it is not in a ready condition.
Hence, the thermostat will show a delayed message and will wait for the equipment to be back in working condition. In such cases, cleaning the heating or cooling system will solve the problem.
We will discuss some general guidelines and you may need to make them work in your particular scenario.
- Clean the filters of your heating or cooling equipment.

Clean Air Filters of Your Heating and Cooling Equipment - Check the condensate drainage pipe for any blockage. If the flow is slow, the unit will trip whenever the reservoir will get filled.
- In the case of heating equipment, clean the flame sensor of the heating equipment
- After cleaning the heating or cooling equipment, power back the setup, and hopefully, the thermostat will be clear of the delayed message.
If the problem persists after trying the above-mentioned solutions, replace the Nest thermostat with another thermostat (if available) and check if there is no delay. If there is no delay with the other thermostat, the Nest IoT device is faulty. Otherwise, the issue lies within your heating or cooling equipment.
If the problem is in the thermostat, contact Google Support and ask for help in verifying the wiring of your setup. If the wiring is proper, ask the support to guide you to power on the equipment directly, without the thermostat. If the equipment powers on directly, the issue lies in the thermostat.
You can claim a replacement thermostat from the support if it is still under warranty. Otherwise, contact a repair service and get your heating/cooling system checked.
The post “Delayed” Message in Nest Thermostat (Explained & Fixed) appeared first on Appuals.
]]>The post Is your TCL TV Not Turning On? Here Try These Solutions appeared first on Appuals.
]]>
Most of the time, the issue is largely related to the power modules, and using an alternative supply usually solves the problem. In some rare cases, the firmware becomes corrupted and needs to be reinstalled. This situation is very common in newer versions where a heavy Android OS is installed on the TV.
Common Scenarios
Turning off when using a specific application: Occasionally, the TV may become unresponsive while running a specific app like Netflix. This will result in an automatic shutdown of the TV and subsequent failure to power on, leaving the screen blank or black. Changing the Picture Brightness to a higher setting, such as Brighter, has been observed to trigger this issue in certain cases.
Flickering on the screen: There are instances in which a momentary flicker occurs when attempting to turn on the TV. Surprisingly, this problem has been reported even with newly purchased TCL TVs. The majority of TCL TV models have been associated with this issue. Additionally, in certain instances, the TV’s audio functions properly, but no video is displayed on the screen. At times, the power-on light is enabled, but the TV shows no display.
Troubleshooting Prerequisites
- Check if the TV responds when you press the remote’s Home button.
- Remove the Ethernet cable from the TV (if present) and check if the TV can be powered on.
How to Fix a TCL TV That is Not Turning on
We will first cover the most common scenarios encountered in this situation and move on to more complex workarounds later on in the guide.
1. Re-plug the TV into the Power Source
If the static current is affecting the TV’s circuit, your TCL TV will not power on because it will fail to detect a good power signal. Should the remote be non-functional, powering on the TV using it will not be possible.
In either case, re-plugging the TV into the power source and powering it through the TV’s power button will get the job done.
Re-plug the TV
- Unplug the power cable of the TCL TV from the TV and power source.
Unplug the Power Cable of the TCL TV - Disconnect peripherals like an Xbox from the TV’s HDMI port.
- Press and hold the TV’s power button without interruption for one minute.
- Release the button and after 5 minutes, connect back the power cable.
- Press the TV’s power button and see if it has powered on.
- Should the above not yield results, detach the TV’s power cable and leave it overnight.
- The next morning, plug back the TV and verify if it is turning on.
Try Another Power Source
- Remove the TV from the current power source and connect it to another source. Make sure no surge protector or extension cable is used.
Connect the TCL TV to Another Power Source - Press the TV’s power button and check if the TV has powered on. If so, then the power source earlier used was not compatible with the TV.
Try Another Power Cable
- Arrange a compatible power cable and use it to connect the TV to its power source.
Try Another Power Cable with the TCL TV - Verify the TV’s status by pressing its power button.
2. Hard Reset the TCL TV
If the firmware of your TCL TV is damaged, you will not be able to power it on. This situation may occur if the latest update was unable to successfully patch the previous installation. To resolve this issue, perform a hard reset on the TCL TV, which will erase all information and data stored on the TV.
All preferences on your TV will be reset and accounts logged in to other services will be logged out as well. Please backup your data before proceeding.
With a Reset Button
- Make sure the TV is connected to the power source.
- Locate the Reset button on the TV.
Press the Reset Button on the TCL TV - Use a toothpick or paperclip to press and hold the reset button.
- Wait till the TV reboots (may take around 30 seconds) and hopefully, that will do the trick.
Without a Reset Button
- Press/hold the following buttons on the back or side of the TV:
Volume Up Menu (If the menu button is not present, use the Input button)
Reset the TCL TV Through its Physical Buttons - While holding these buttons, press and release the power button.
- Count to 5 and release the other two buttons.
- Press the TV’s power button and check if it has powered on.
Reset Through Remote
Confirm that the remote is operational, and the TV is properly connected to a power outlet.
- Press the remote’s power button while pointing it to the TV.
- 5 times press the Home button and then press the Up button once.
- 2 times press the rewind button and then press the fast forward button twice.
Reset the TCL TV Through its Remote - Wait for a minute and check if the TV can be turned on.
3. Reinstall Firmware
If you have or can arrange the firmware (you can request TCL support), then reinstalling the firmware will solve the problem. Do not use firmware available on 3rd party websites as it can cause security or privacy issues.
4. Stop the Recurrence of the Issue (Preventive measures)
If you have successfully powered on the TCL TV but encounter the problem again, certain settings on the TV may be causing the issue. To solve it, adjust those settings.
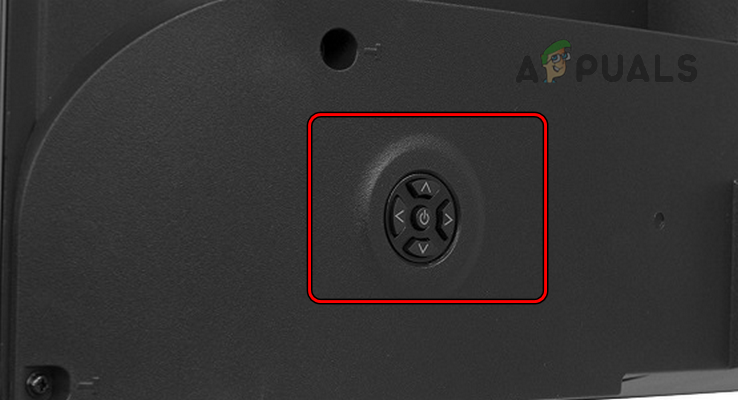
Change the TV’s Power Settings
- Launch the TCL TV Settings and go to System > Power > Auto Power Savings.
Disable Auto Power Saving Options of the TCL Roku TV - Disable all the options shown and see if the problem reoccurs.
Disable Screenless Service
- Go to Settings > System > Power and Energy Settings.
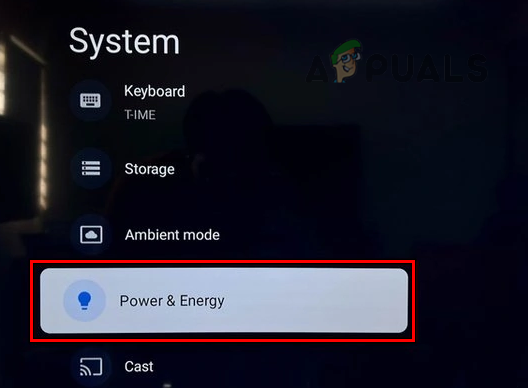
Open the Power & Energy Settings of the TCL TV - Disable Screenless Service and verify if that gets the job done.
Disable Fast TV Start
- Go to Settings > System > Power.
- Disable Fast TV Start and check if that solves the problem. In some models, you may see the option labeled as Quick Start which may be located under Settings > More Settings > Device Preferences.
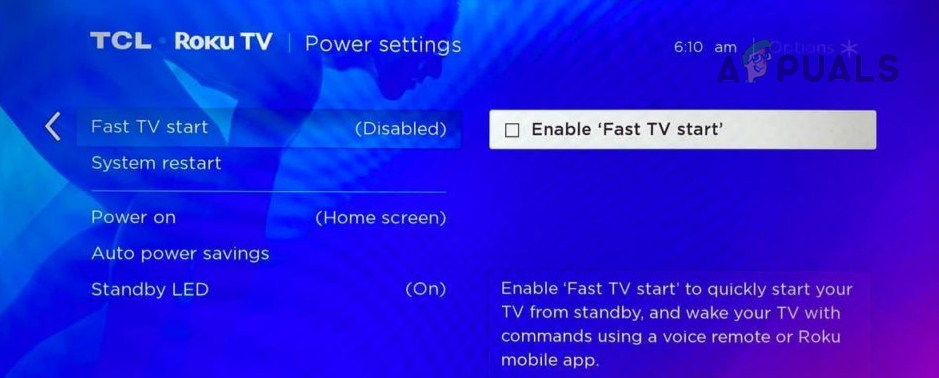
Disable Fast Start TV in the TCL TV Settings
Change Brightness to Normal
- Open the TV Settings and navigate to Picture > Brightness.
- Change it to Normal and check if that solves the problem.
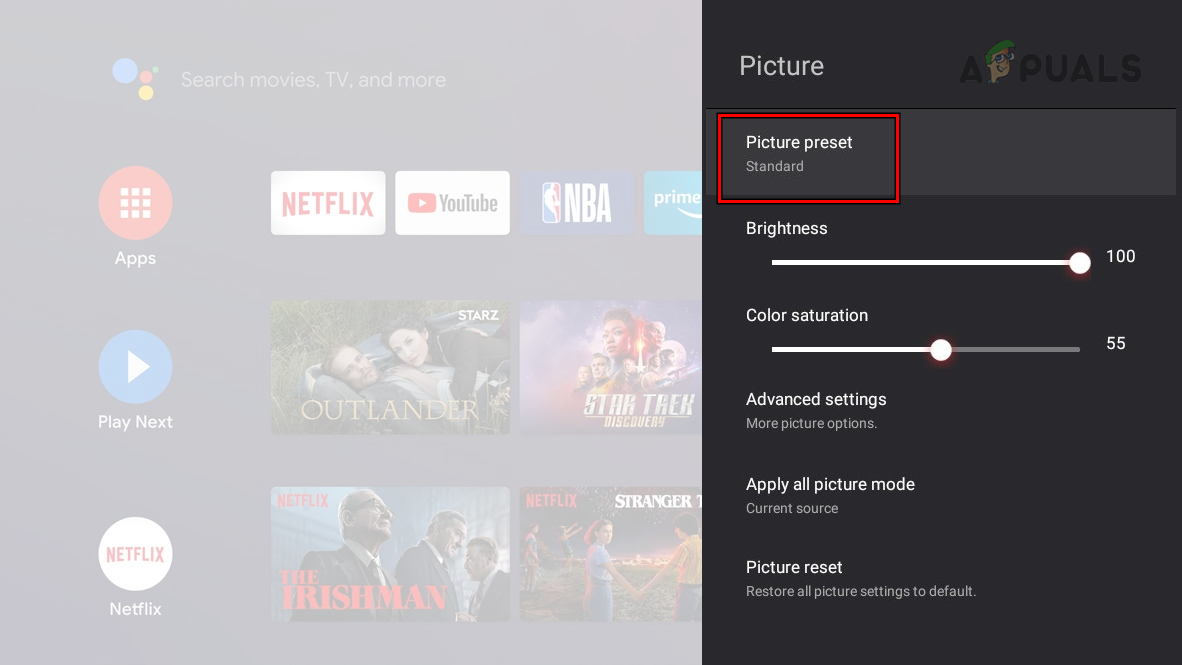
Change Picture Preset Mode to Normal or Standard on the TCL TV
Enable 1-touch and System Standby
- Navigate to Settings > System > Control Other Devices (CEC). In some models, CEC may be labeled as T-Link and you may need to enable it.
- Enable 1-Touch Play and System Standby. Confirm if that solves the problem. In some TCL TVs, there will be other options such as ARC and System Audio Control may also be present. If so, enable these options as well.
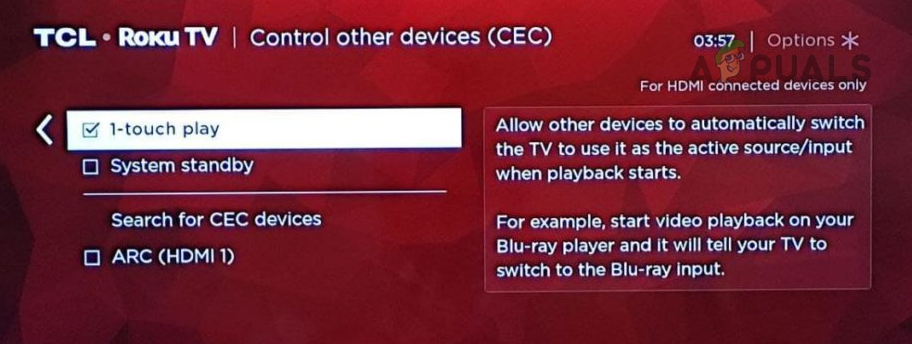
Enable 1-Touch Play and System Standby in the TCL TV Settings
5. Check for Hardware Issues
If you have tried all the previous troubleshooting methods without success, a hardware issue may be causing the problem. To determine this:
- The fault could be in the backlight or its power supply if the TV plays audio but shows nothing on the screen. You can use the flashlight on your mobile phone at an angle near the screen to verify this or put the TV in a dark room. If faint images are visible, it indicates that strips of the backlight are malfunctioning and need to be replaced.
- If you possess the necessary skills and your TV’s warranty is expired, cautiously remove the back panel of the TV. Inspect the boards for visible physical damage, like a blown-out capacitor or burn marks. If such damage is detected, you will need to replace the affected part or board, such as the main board.
If the issue persists after trying the above solutions, contact TCL support. If the TV is under warranty, claim a replacement one. Otherwise, get the TV checked for a hardware malfunction.
The post Is your TCL TV Not Turning On? Here Try These Solutions appeared first on Appuals.
]]>The post How to Fix a Pelaton Bike That’s Not Turning ON? appeared first on Appuals.
]]>
It should also be noted that there are instances where the bike is completely bricked due to it sustaining substantial physical damage or because of a corrupt firmware update which is extremely rare.
Common Scenarios
Issues when assembling for the first time: This scenario is extremely common where due to incorrect assembly of the machine, it is not able to initialize and doesn’t power on.
Problems installing software: Another scenario that is common is ‘smart’ bikes not being able to turn on due to a bad software update or after a factory reset. If the software isn’t installed properly, you might even experience even with out-of-the-box equipment.
How to Fix Peloton not Turning on?
First, we will attempt to connect your Peloton bike to the power if it is already not connected. After performing troubleshooting steps for this, we will move on to connection issues and make sure all the connections are working.
1. Re-seat the Power Cable of the Peloton Product
If the power cable is not properly connected to the power source, the Peloton product will not power on. However, simply reseating the cable will solve the problem.
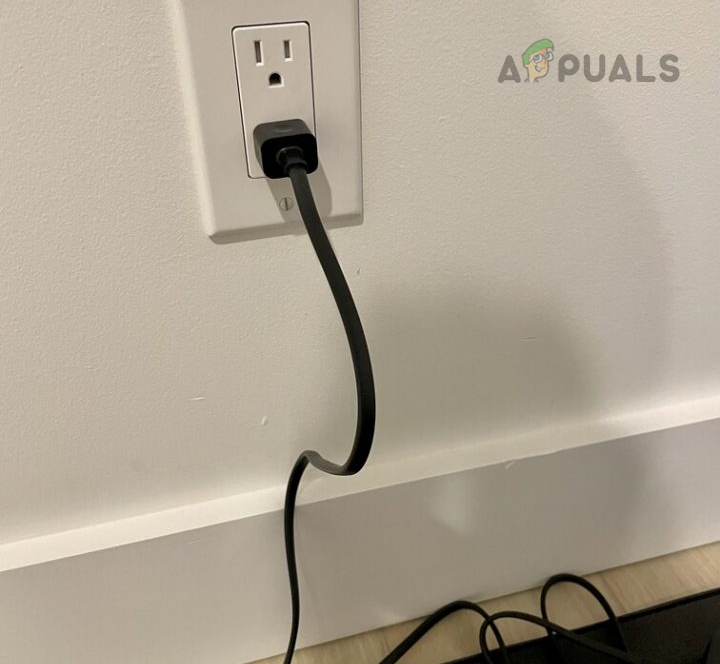
- Disconnect the power cable from the power source and the Peloton product.
- Reconnect the power cable and properly seat the cord on both ends. See if the issue is resolved.
Reseat the Power Cable of the Peloton Product - If not, leave the power cable unplugged for an extended time (such as overnight) and then plug it back. Check if the problem is solved.
2. Press and Hold the Power Button
If there is a static current on the Peloton product, it will prevent the main board from detecting the proper power signal from the power supply, causing the product to remain inactive. Here, pressing and holding the power button after disconnecting the power supply will get the job done.
- Unplug the power supply from the Pelton product.
- Press and hold the power button for 10 seconds. In case, the power switch is a toggle, toggle it to the on position, wait for 10 seconds, and toggle back the switch.
Press and Hold the Power Button of the Peloton - Plug back the power supply and check if the product can be turned on.
- If not, press and hold the power button for 10 seconds while the product is connected to the power supply. See if it has powered on.
- If this does not work, press and hold the power button.
- While holding the power button, unplug and re-plug the power cable. Verify if the problem is solved.
3. Try Another Power Source
The Peloton product won’t turn on if the power source is failing to provide the required current to the product. To address this problem, try another power source.
- Disconnect the Peloton product from the current power source.
- Connect it to a different power source and see if that lets you turn on the product.
Connect Peloton to Another Power Source - If not, connect the product to the power source by using a surge protector and see if that solves the problem.
4. Ensure Proper Connections
If the connections of the Peloton product are loose, it can prevent the device from powering on properly as the current fails to reach the main board. Vibrations from running or cycling sessions can potentially loosen these connections over time. To resolve this issue, carefully inspect the connections and ensure they are securely seated.
As there are multiple products, you must ensure that the right cable is connected to the right port during the reseating process. Remember some of these locations may not be available on your product but an equivalent may exist.
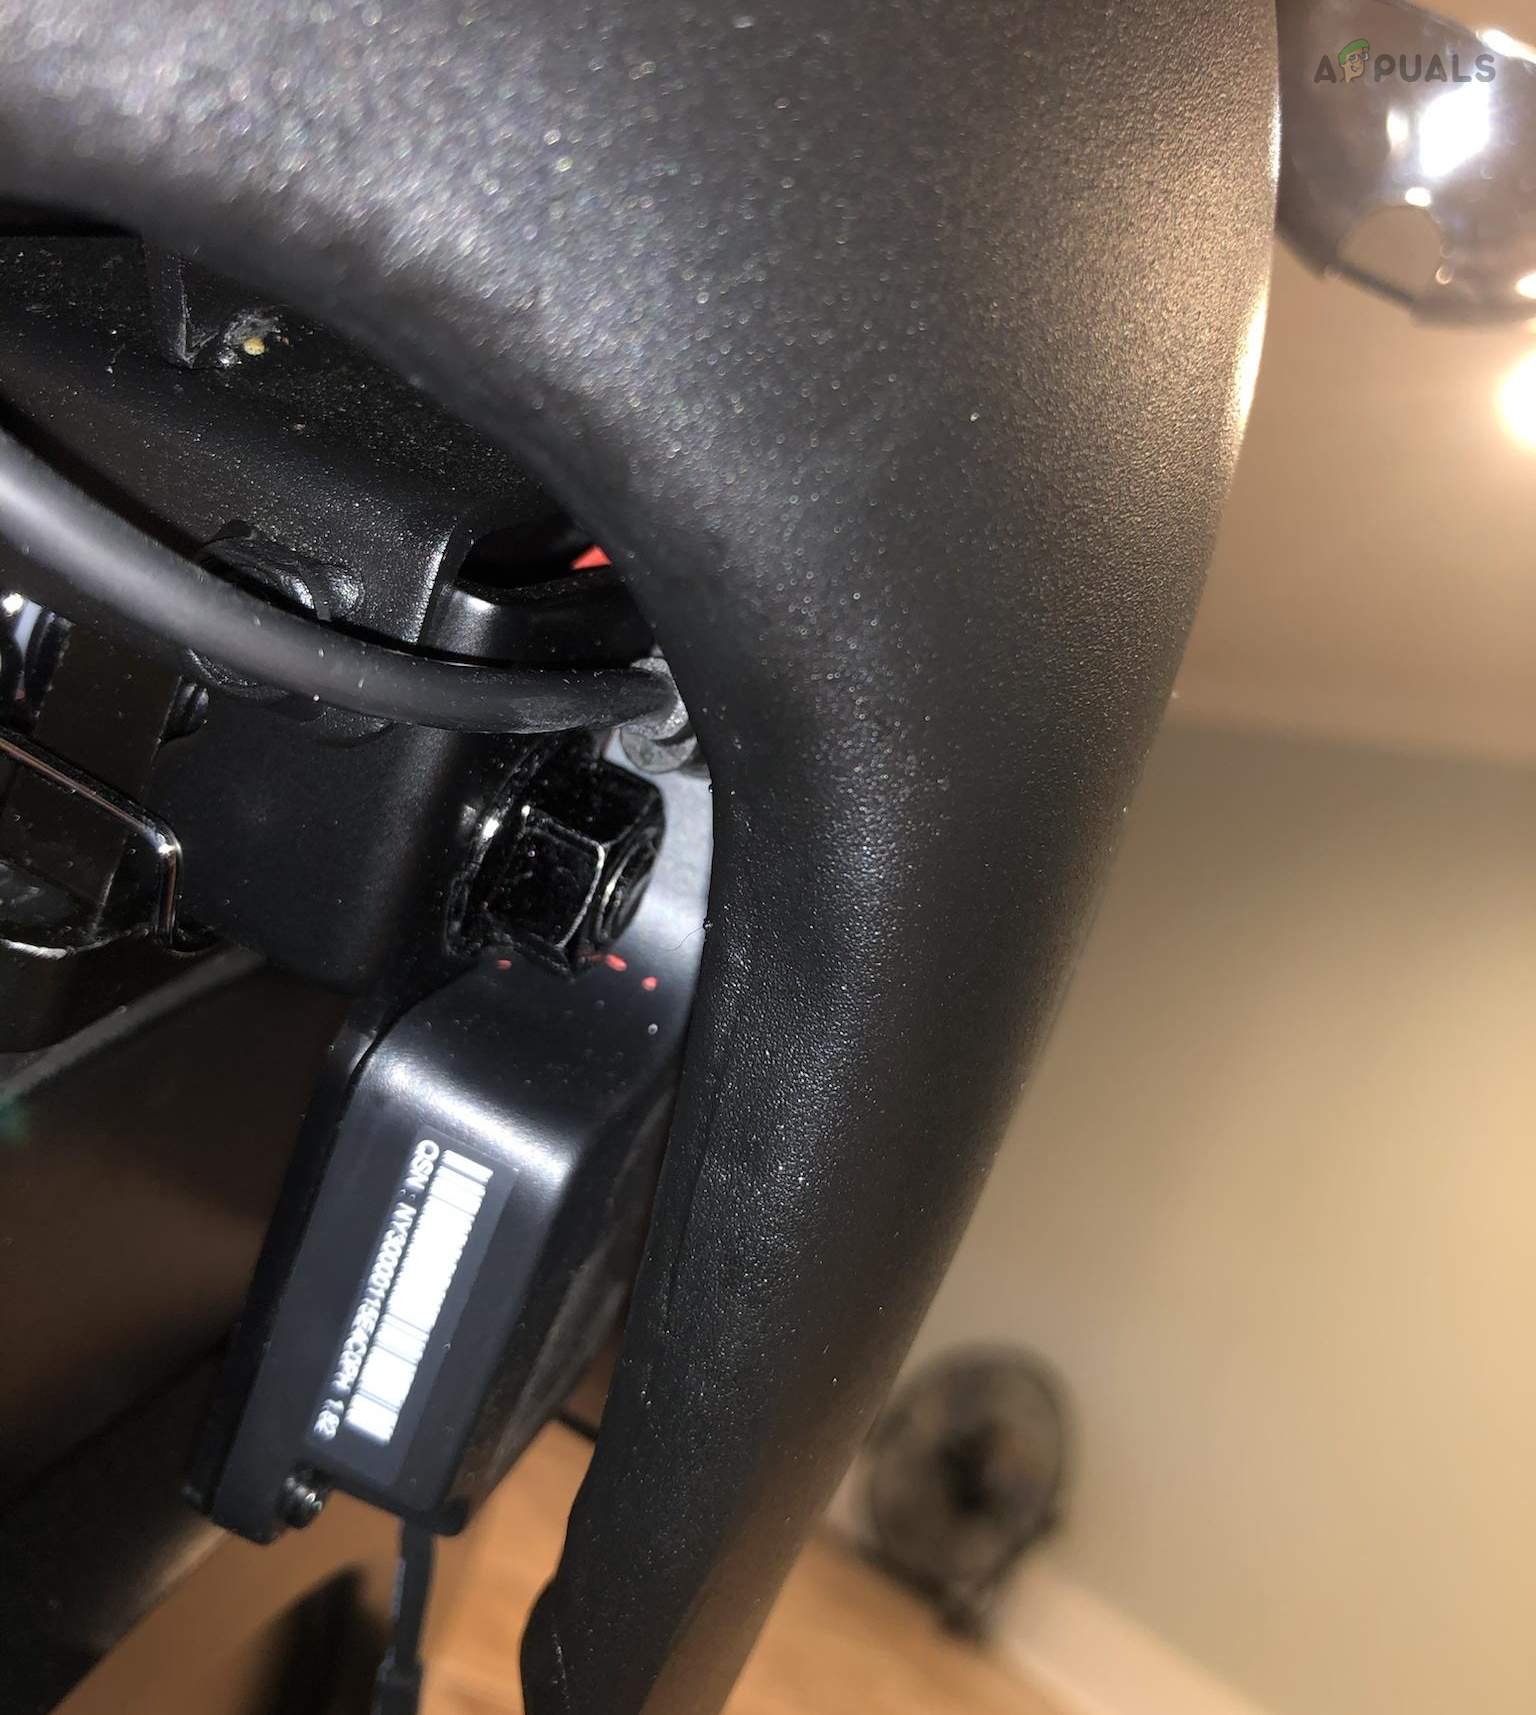
Verify and Secure Tablet Connection
- Reseat the tablet connections and turn on the product.
Check Connections of the Screen on the Peloton - See if the issue is resolved.
Review Back or Bottom Connections
- Reseat the connections on the back or bottom of the product.
- Power on the product and check if it has turned on.
Reseat Magnetic Area Connections
- Remove the Sweat Guard (the plastic cover on the magnets).
Properly Seat the Cables Around the Magnet of the Peloton - Reseat the USB cable into the port and see if the issue is resolved.
Check the Connection Near the Water Bottle Holder
- Locate the cable near the water bottle holder.
USB Connection Under the Water Bottle Holder - Make sure it is properly seated in the port on both sides. Verify if the problem is solved.
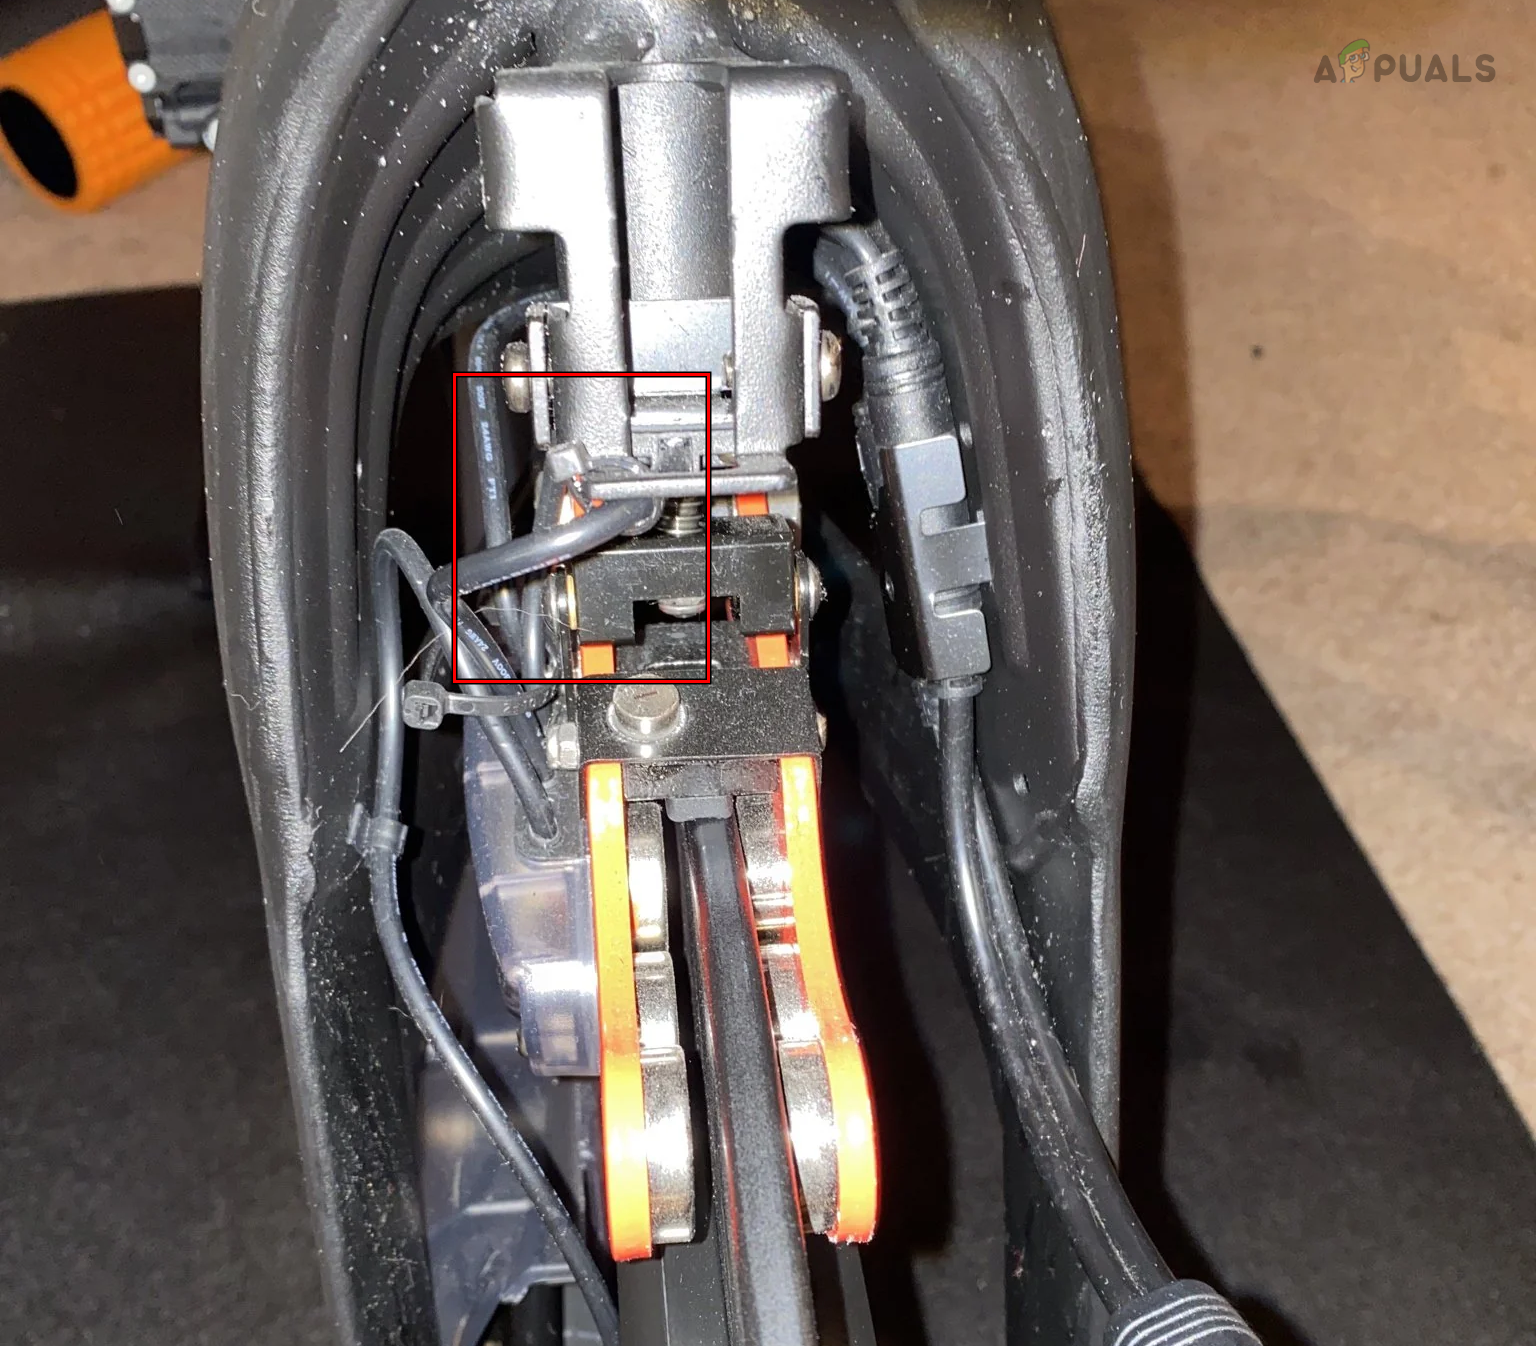
Reconnect the Cable Behind the Flywheel (Bike Only)
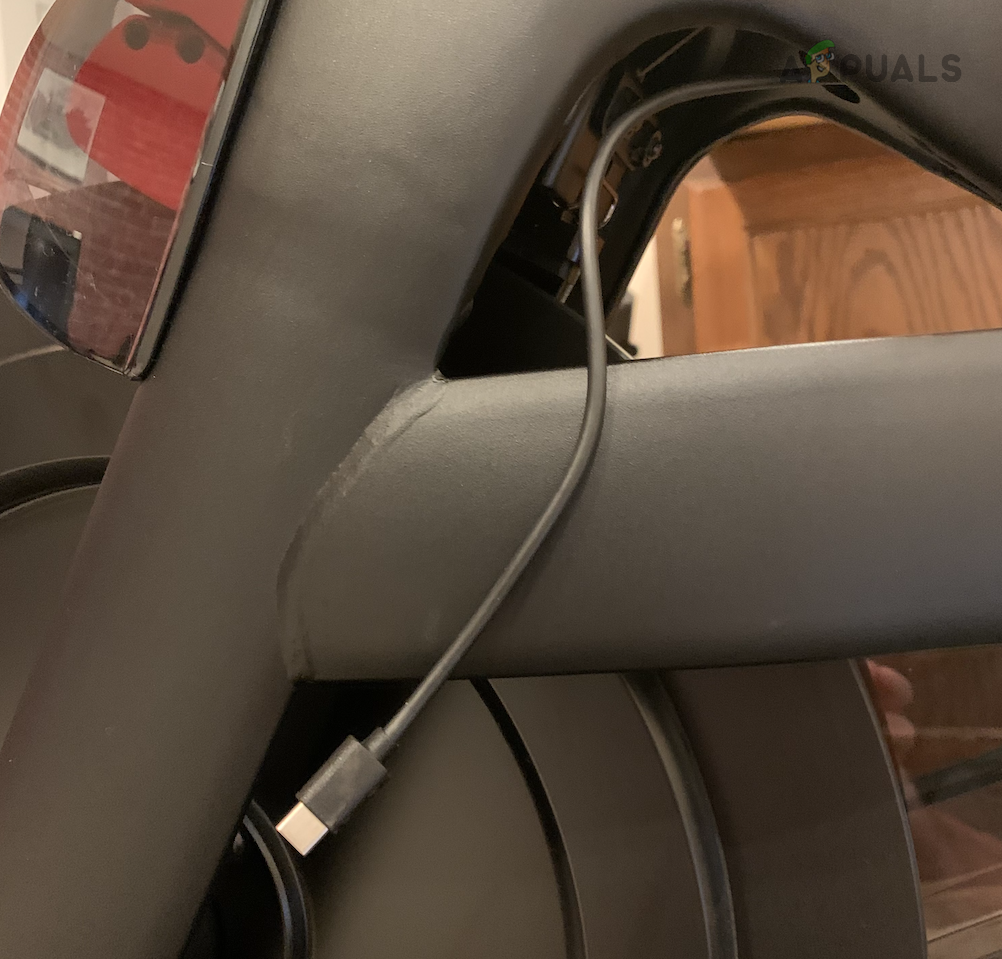
- Get on the floor next to the cycle and look behind the flywheel.
- Locate the cable running from inside the frame to the power unit.
Properly Seat the Cables Around the Magnet of the Peloton - Reset the cable on both ends and check if the bike has turned on.
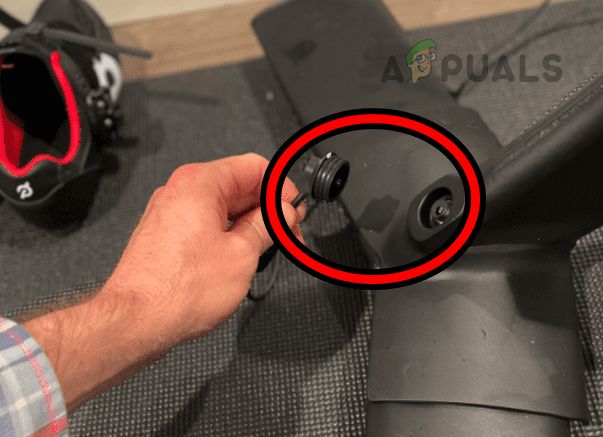
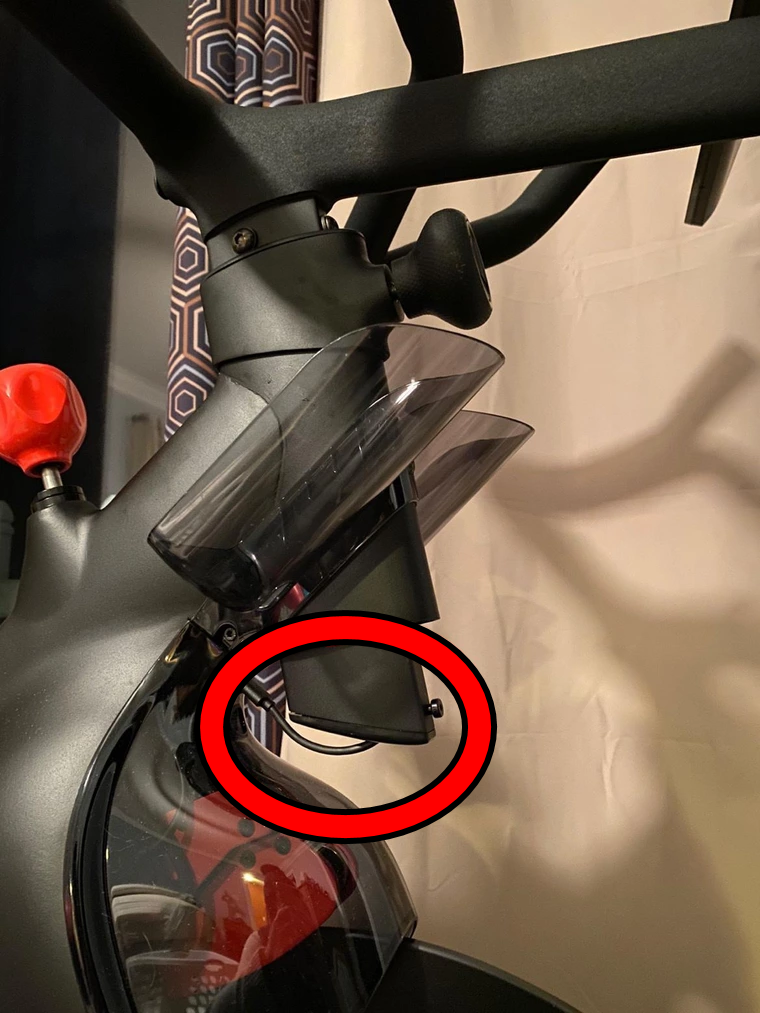
Inspect the Connection Under the Red Knob (Bike Only)
- Locate the red knob on the rider’s right side of the cycle and find the power connection under it. The space will be shaped like a triangle.
Reconnect the Cable on the Bike’s Right Side - Reseat this connection and see if the Peloton product has turned on.
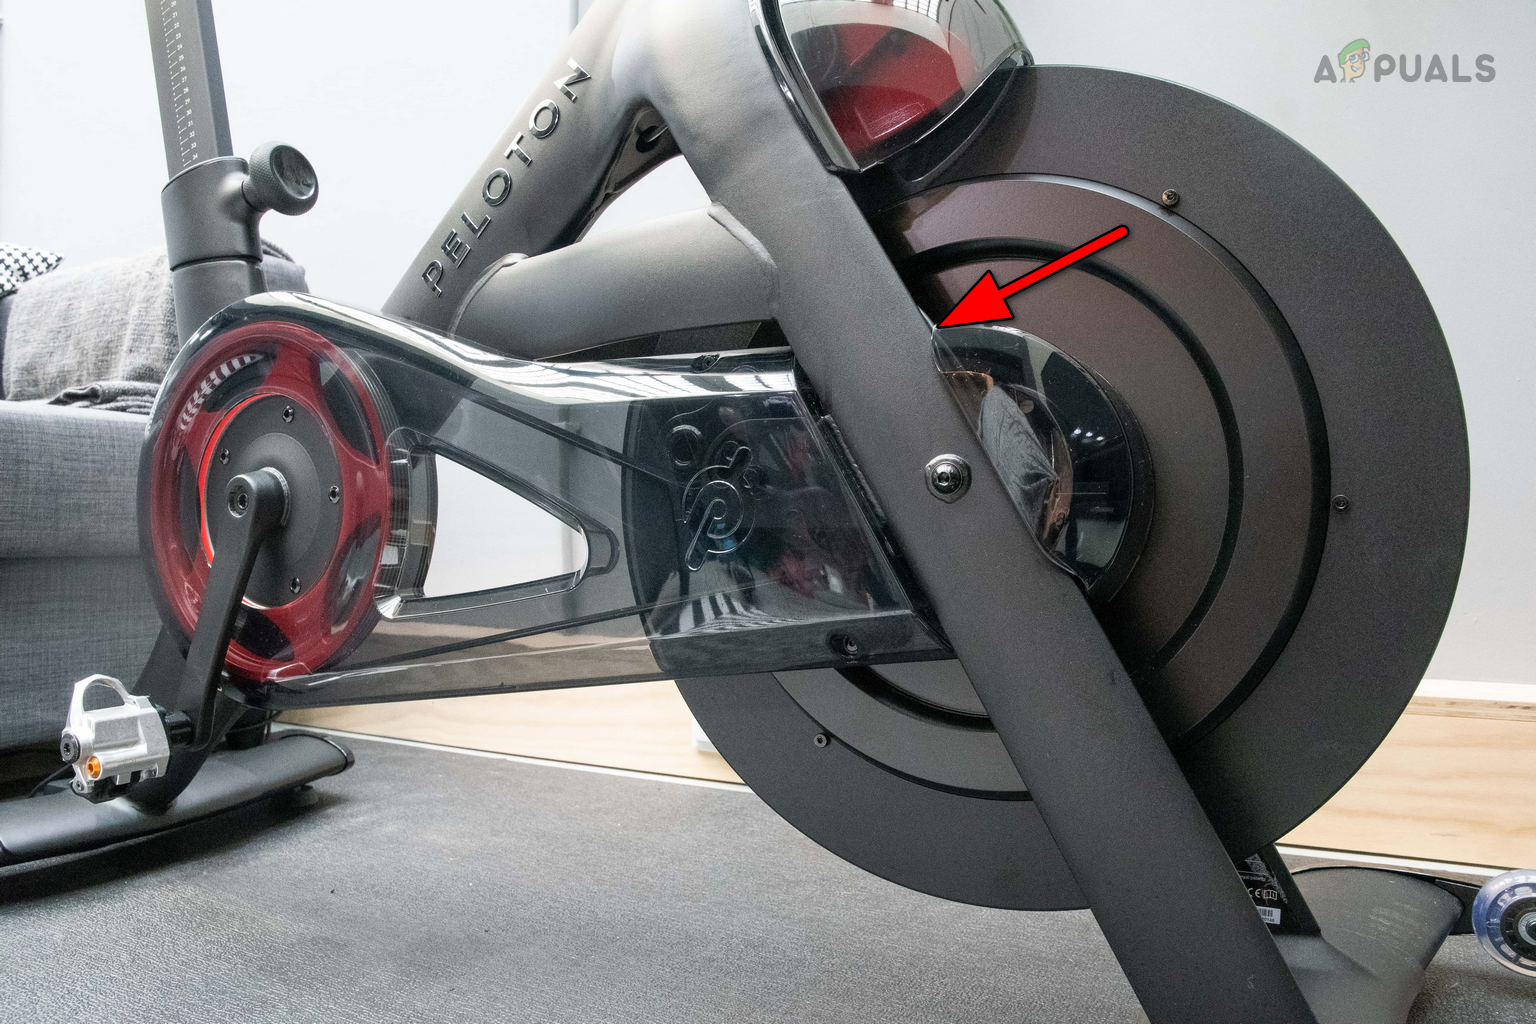
Reseat the Cable in the Frame
- Locate the cable in the frame and reseat it on both ends. The cable may be hidden and you may need to locate it.
Reconnect the Cable Coming from the Frame - Press the power button and check if the product has powered on.
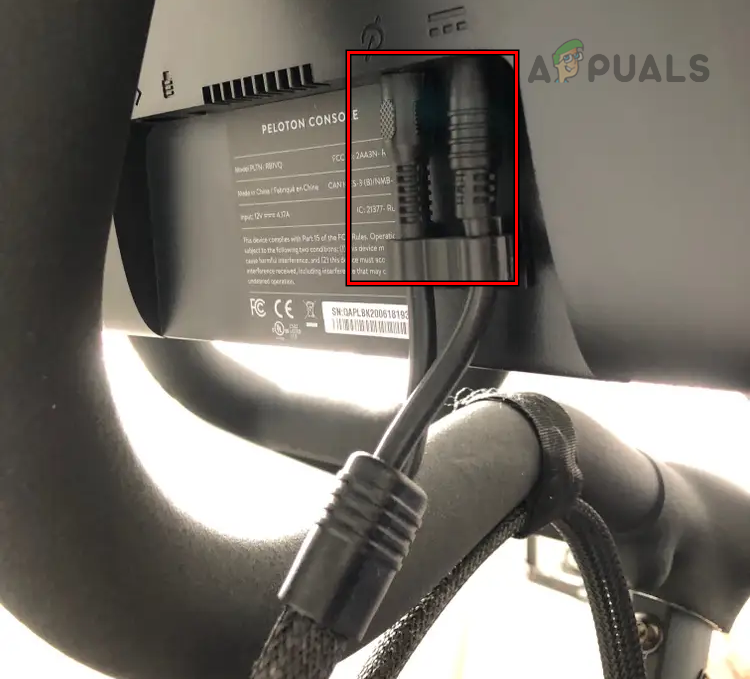
Reconnect All the Cables of the Product
- Starting from the power cable, reseat each cable and then the next cable in the connection. Go through each cable. If you have packing of the product available, you may find cable locations on it or visit the Peloton website.
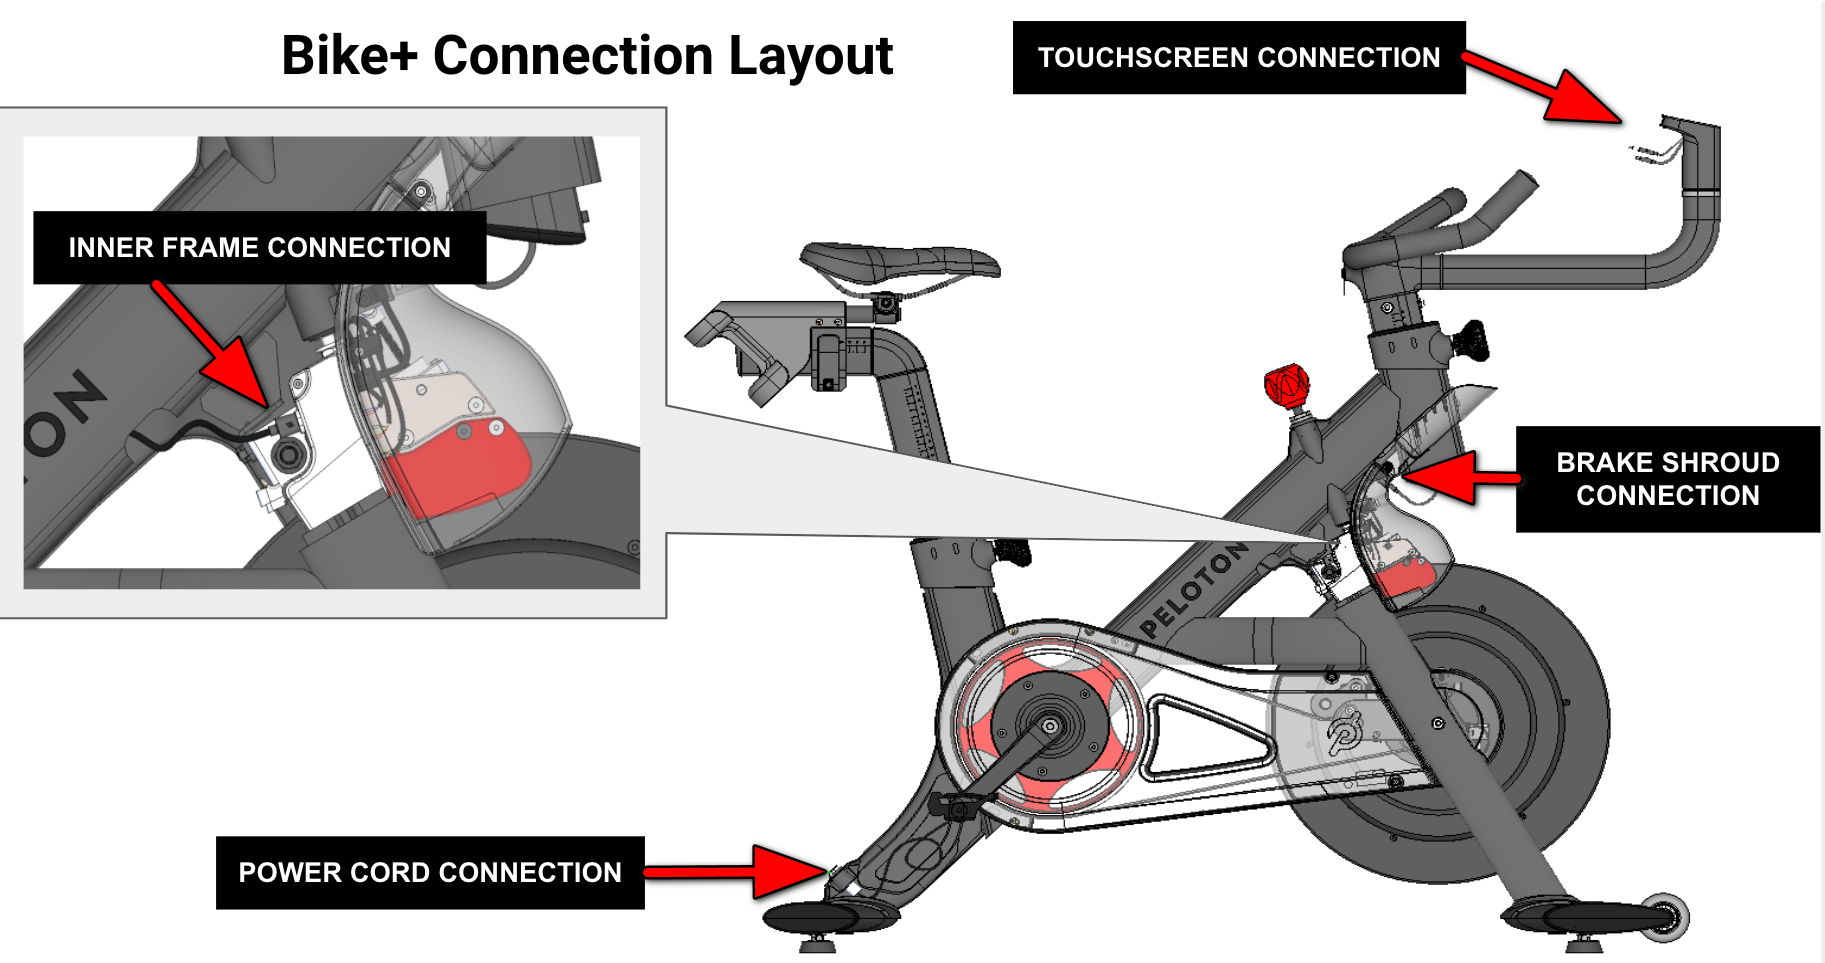
Bike+ Connection Layout - Make sure each cable is inserted into the relevant port and seated properly. Check if this solves the problem.
Connect Power Directly to the Screen
- Disconnect the power cable from the Peloton product and connect it directly to the screen.
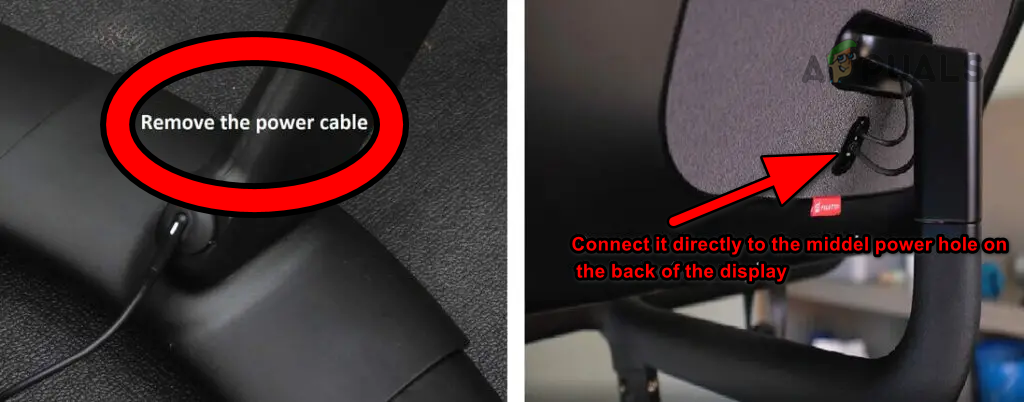
Connect the Power Cable Directly to the Back of the Display - Check if the screen turns on. If it does, it indicates that either a connection is loose or there may be a problem with the mainboard/frame of the product.
- If the screen shows an error message, try searching for the specific error on the Internet to find information about the problem and potential solutions.
- In some cases, the screen may attempt to update its firmware. If this occurs, allow the update to complete and then check if the issue is resolved.
Try Alternate Cable
If you can pinpoint the specific cable causing the issue, replacing it with a compatible cable should resolve the problem. Keep the cable’s wattage in mind before trying.
- Identify the class and type of the cable e.g., pin to pin, pin to socket, etc.
- Replace the problematic cable and check if the Pelton product has turned on.
If you are unable to identify the problematic cable, you can try a process of elimination by replacing each cable individually with a known working cable, such as a USB-C cable (make sure it supports the required wattage) from your laptop. By systematically replacing the cables, you can determine if any particular cable is causing the issue and replace it accordingly. This method can help narrow down the source of the problem and potentially resolve the issue with the Peloton product not turning on.
5. Use Another Power Brick
You will not be able to turn on the Peloton product if its power brick is faulty and as a result, the brick fails to provide the required current to the product. In such a case, trying another power brick will solve the problem.
- Arrange another power brick and connect the product to that power brick. You can use a 30-watt USB-C iPhone charger, MacBook charger, etc.
Try Another Power Brick with the Peloton - Press or toggle the power button, and hopefully, the product will turn on.
If the previous troubleshooting methods do not resolve the issue, it is advisable to contact Peloton Support for further assistance. If your Peloton product is still under warranty, you may be eligible for a replacement part or even a new one. The Support team may guide you through specific tests or diagnostics to help identify the problematic component or issue.
The post How to Fix a Pelaton Bike That’s Not Turning ON? appeared first on Appuals.
]]>The post Your Nest Thermostat Stopped Cooling? Don’t Worry, Try this! appeared first on Appuals.
]]>
Common Scenarios when the Nest Thermostat Does not Cool
Firmware update: A problem is observed across various generations and variants of Nest thermostats, where the thermostat or app may indicate cooling or precooling, but instead, hot air is being released from the unit. This issue can be triggered by a firmware update, causing a previously functional Nest thermostat to stop cooling.
Air conditioning option not shown: Some people may find that only the heating option is available on the thermostat, and the AC unit is not shown as a cooling choice. This problem is not limited to specific types of equipment, as it occurs with various manufacturers, including heat pumps, AC units, gas or electric systems, and forced air systems.
Only the heating option works or the thermostat goes offline: Interestingly, in certain cases, the heating option functions correctly despite the cooling problem. Customers have reported instances where the AC power turns on briefly and then switches off. Additionally, there are occurrences where the thermostat goes offline. The problem may arise with both new installations and previously well-functioning thermostats. Some people have experienced this issue after switching the thermostat from heat mode to cool mode after a season change.
Troubleshooting Pre-requisites
- Make sure none of the circuit breakers in your setup has tripped.
- Check if increasing or decreasing the temperature impacts the cooling.
How to Fix Nest Thermostat Not Cooling?
If you are indeed experiencing a hardware problem and your device is non-functional, you will have to ultimately either claim a warranty or get it replaced. In case of bugs & glitches that might be limiting your cooling, here are some steps you can take.
1. Restart the Nest Thermostat and Equipment
The Nest thermostat will not send a required cooling signal to the cooling unit if the thermostat modules are in an error state. Resultantly, the cooling unit will not power on and thus will not cool the air. To address this issue, restart the Nest Thermostat and your equipment.
- Press and hold the ring on the Nest thermostat.
Restart the Nest Thermostat - Wait till the screen turns off (it may take around 10 seconds) and release the ring.
- Wait for a minute and press the ring again.
- Once the Nest logo disappears from the thermostat screen, check if the cooling problem is solved.
- If not, manually restart your cooling system and check if that solves the problem.
2. Verify the Wiring Configurations
If the wiring configurations on the Nest thermostat are not properly verified, the thermostat won’t be able to authenticate whether it can control the cooling unit. As a result, it will not send the necessary powering-on signal to activate the cooling system.
In such a case, verifying your wiring configurations on the thermostat will do the trick.
- On the Nest thermostat, go to Settings > Equipment > Pro Setup.
- On the warning screen, tap on Continue and check if a wire is showing a yellow wedge.
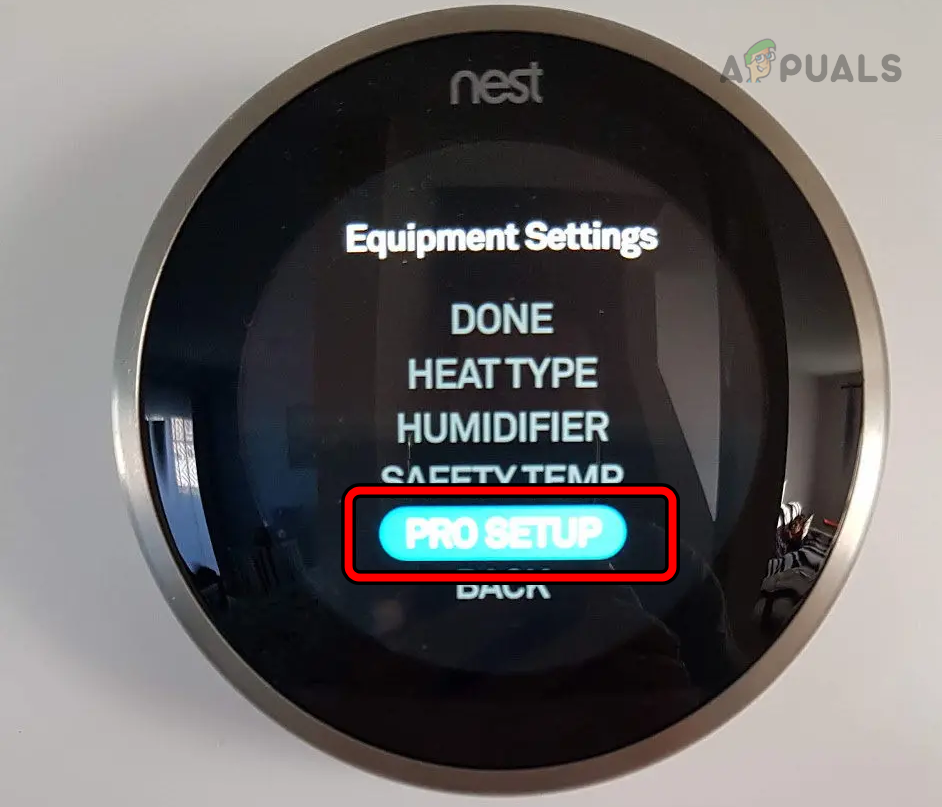
Open Pro Setup in the Nest Thermostat Settings - If a wire is showing a yellow wedge, select that wire on the thermostat and verify the wire connection is correct. It will turn green from yellow. Check each wire and make sure no wire is showing a yellow wedge.
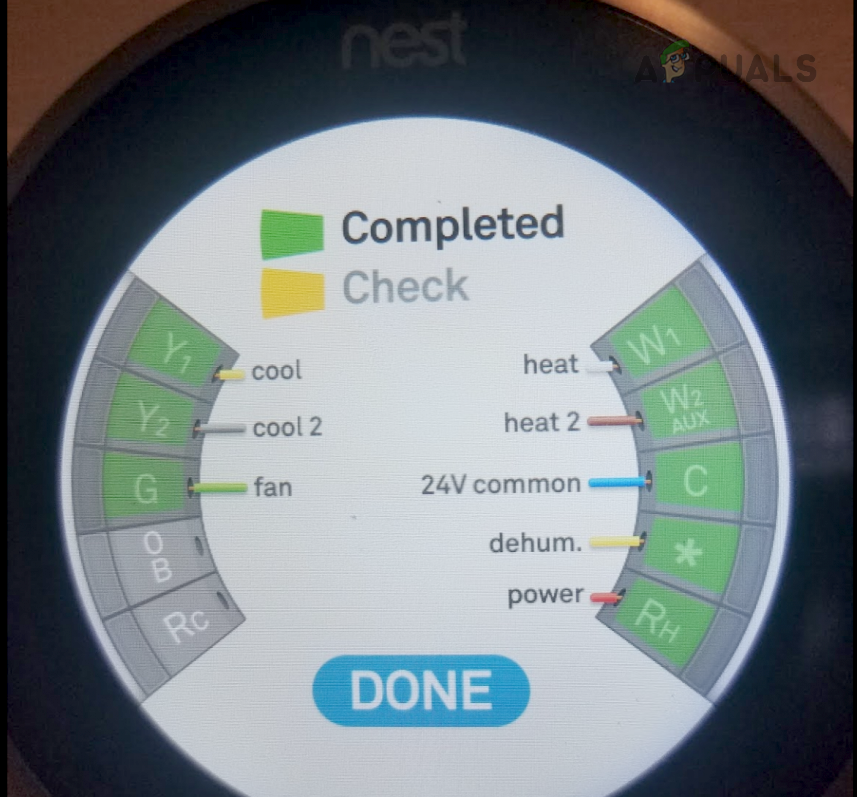
Verify Wiring on the Nest Thermostat - Once done and all the wires are showing green wedges, exit the Pro Setup and check if the cooling problem is solved.
- If the problem persists, ensure that you have correctly selected the type of heat or cool source on your thermostat, whether it’s electric or gas.
3. Change the Orientation Settings of the Heat Pump
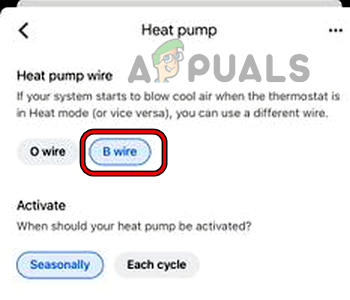
The heat pump utilizes a reversing valve to alternate between hot and cool modes. The OB setting, also known as the Orientation setting, allows you to configure the heat pump type on the thermostat. If your cooling system is blowing out warm air when you’ve set the Nest thermostat to cool, it indicates an incorrect orientation setting.
Here, changing the orientation setting on the Nest thermostat will rectify the issue.
- On the Nest thermostat, launch Settings and go to Equipment.
- Tap on Continue and select Heat Pump.
- If the O setting is selected, tap on B and if the B setting is selected, tap on O. You can also change these settings on the Nest app.
Change the Heat Pump Orientation in the Nest App - Check if the cooling problem is solved.
4. Reset Your Schedule to the Defaults
If the learned or manually created schedule of the thermostat becomes invalid, it will be unable to send the cooling signal to the cooling system, resulting in the cooling issue at hand. In this situation, resetting the schedule back to its default settings will solve the problem.
- On the Nest thermostat, go to Settings > Reset.
- Select Schedule and once done, create a new schedule. Verify if the problem is solved.
Reset the Schedule on the Nest Thermostat
5. Disable Home-Away Assist
The Home-Away Assist feature enables the thermostat to cool the area when you are present or about to arrive, and it reduces cooling when you are away to save energy. However, if there is a malfunction in the location modules of your phone, the thermostat will not detect your presence at home and consequently fail to activate the cooling.
To address this issue, disable the Home-Away Assist feature. This way, the thermostat won’t rely on your phone’s location and will follow a different cooling pattern.
- Launch the Nest app and go to Settings > Home-Away Assist.

Disable Home-Away Assist in the Nest App - Disable it and see if the problem is solved.
- If so, then enable back the feature, and under Home-Away Assist, open What Decides If You’re Home.
- Disable the Nest Thermostat under Products and tap on your current device (such as your phone).
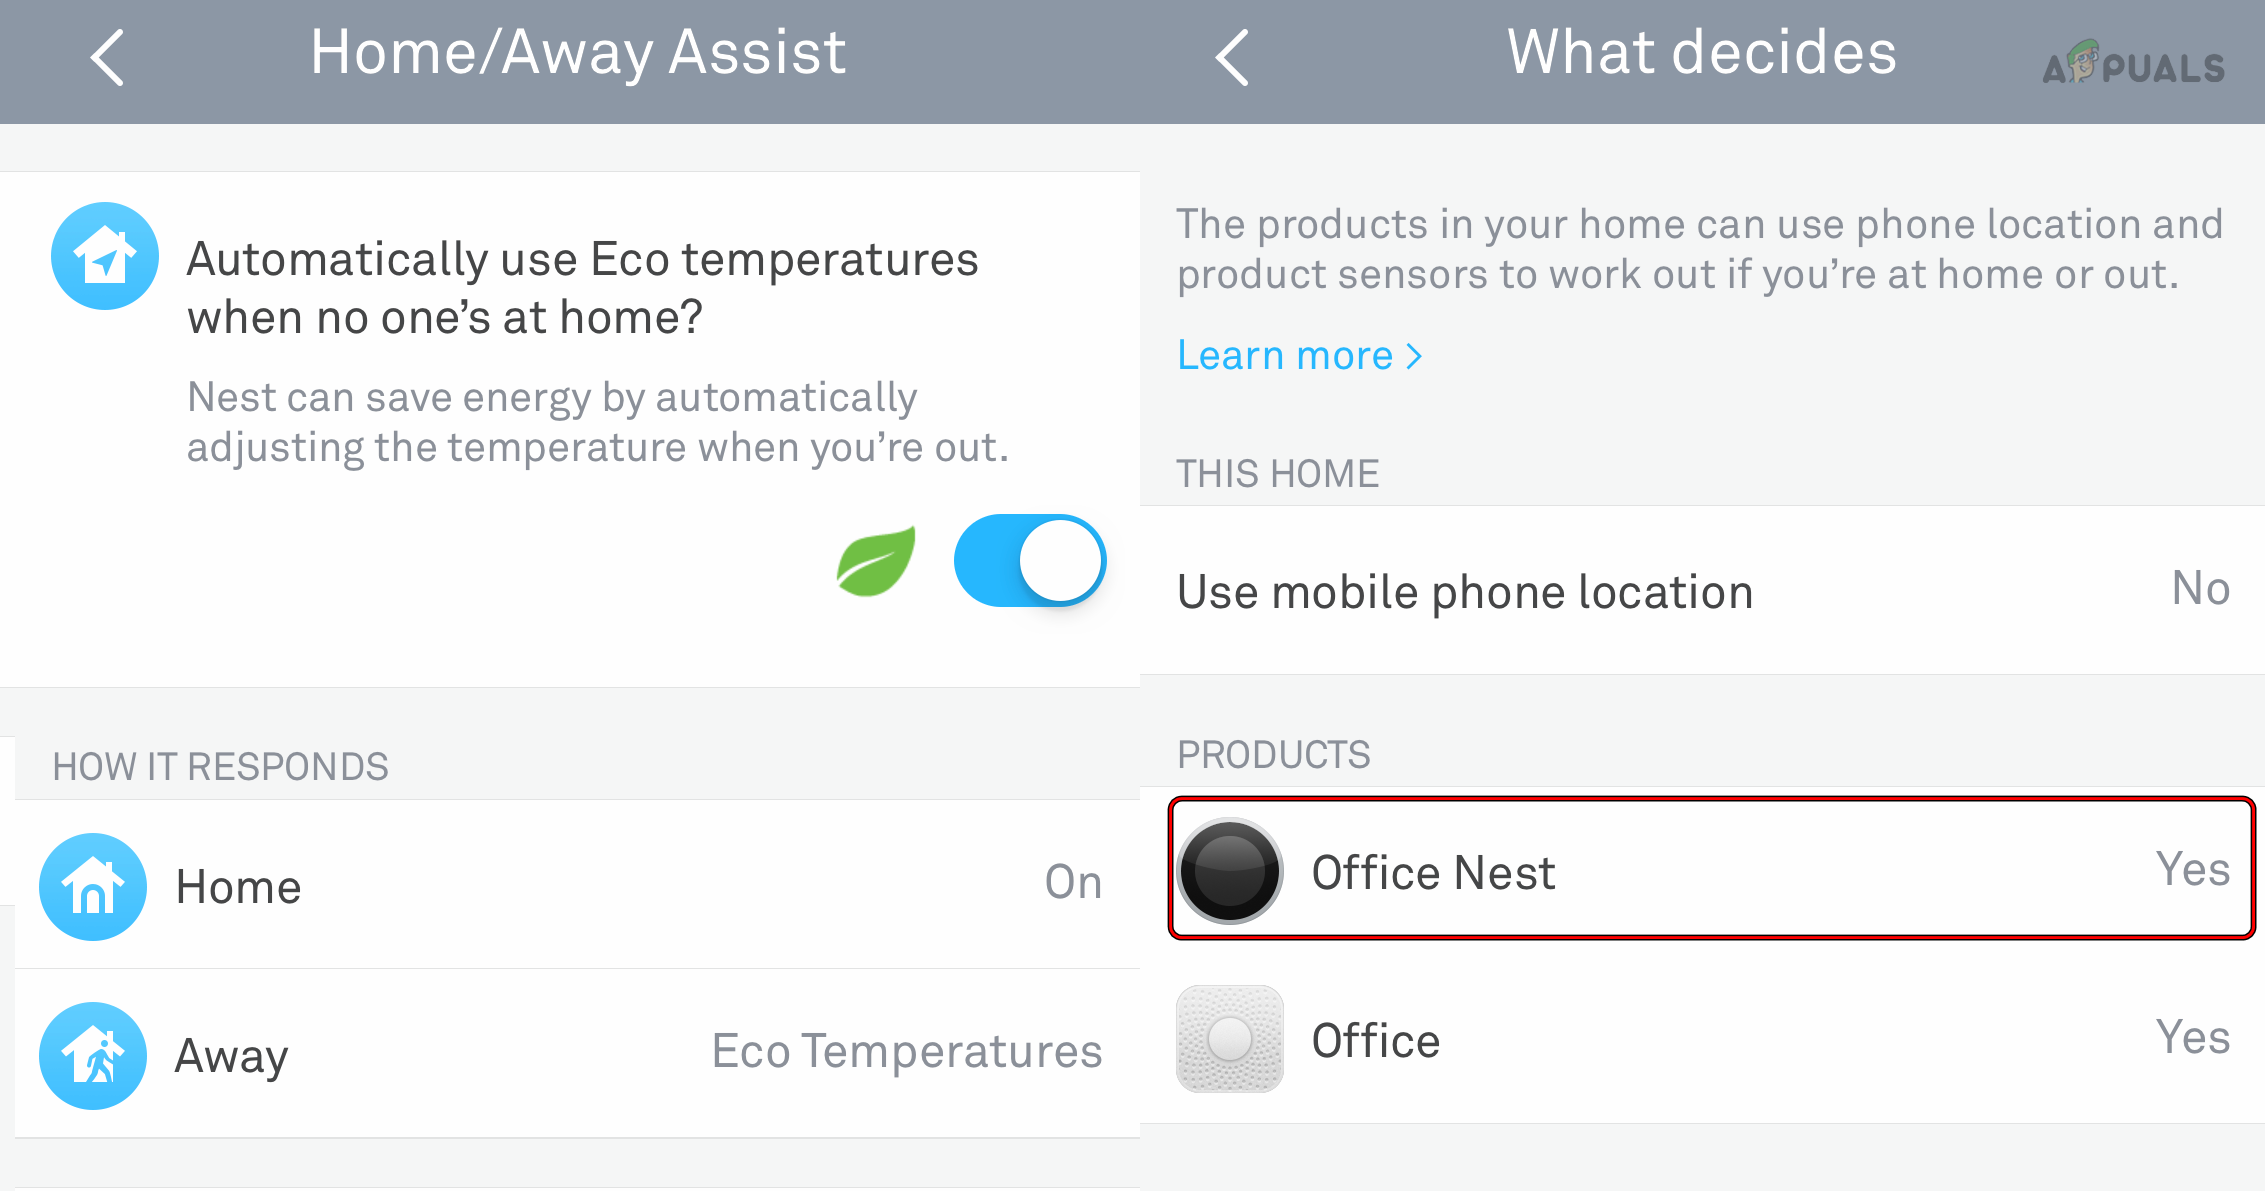
Disable the Nest Thermostat Under Home/Away Assist Products - Set the Location permission to Always and see if the issue does not return. If it does, then you may disable the Home-Away Assist till the problem is solved permanently. Also, you can manually switch your location to the Home in the app setting if you do not want to disable Home-Away Assist.
6. Disable Auto-Schedule
The Nest thermostat utilizes the Auto Schedule feature to automatically cool down your home based on your daily routine. However, if you deviate from your regular schedule or the Auto Schedule feature malfunctions, the cooling system will cease to function properly.
This can be fixed by disabling Auto Schedule.
- Launch the Nest app and select the problematic thermostat.
- Go to Settings > Auto-Schedule.

Disable Auto Schedule on the Nest Thermostat - Disable it and see if the cooling problem is solved.
7. Disable Safety Temperature
To prevent your home pipes from freezing or your home from overheating, the Nest thermostat comes equipped with the Safety Temperatures feature. This feature ensures that the thermostat will activate or deactivate cooling or heating, even if the thermostat is off when your home reaches a specific temperature threshold.
However, we’ve seen issues where this safety feature fails to initialize property and as a result, cooling doesn’t happen. To solve this problem, disable the Safety Temperature feature on the thermostat.
Disabling the Safety Temperatures feature can make your cooling system vulnerable to extreme temperatures. This may lead to the freezing of pipes or overheating of your home. Proceed with caution and understand the risks involved before disabling this safety feature.
- On the Nest thermostat, launch Settings and go to Safety Temp. You can also do these steps on the Nest app.
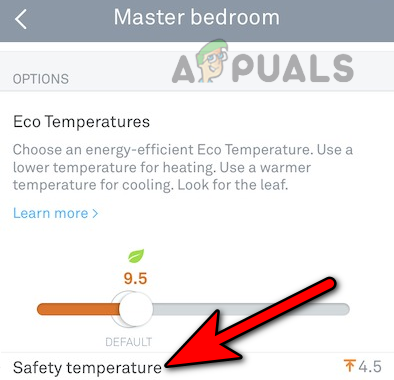
Disable Safety Temperature on the Nest Thermostat by Using the Nest App - Set it to off and observe if the cooling operation starts to work correctly.
- If the cooling appears to be functioning properly after disabling Safety Temp, wait for one to two hours, and then re-enable the Safety Temp feature.
- Monitor the cooling system for any recurring issues. If the problem does not occur again, you can continue using the thermostat with the Safety Temp feature enabled.
8. Reset the Nest Thermostat to the Factory Defaults
If the core firmware modules of the Nest Thermostat are damaged, the unit will be unable to initialize cooling, leading to a lack of cool air from your cooling system. To rectify this issue, perform a factory reset on the Nest Thermostat.
Be aware that this action will erase any learned patterns or schedules that the thermostat has accumulated. If you wish to preserve the current configurations or wiring, access the thermostat’s Settings and navigate to Equipment to make a note of them beforehand.
- Launch the Nest app and open its menu.
- Go to Settings > Security.
- Remove the Nest thermostat in question.
- On the Nest thermostat, launch Settings and go to Reset.
- Select All Settings and wait till the process completes.
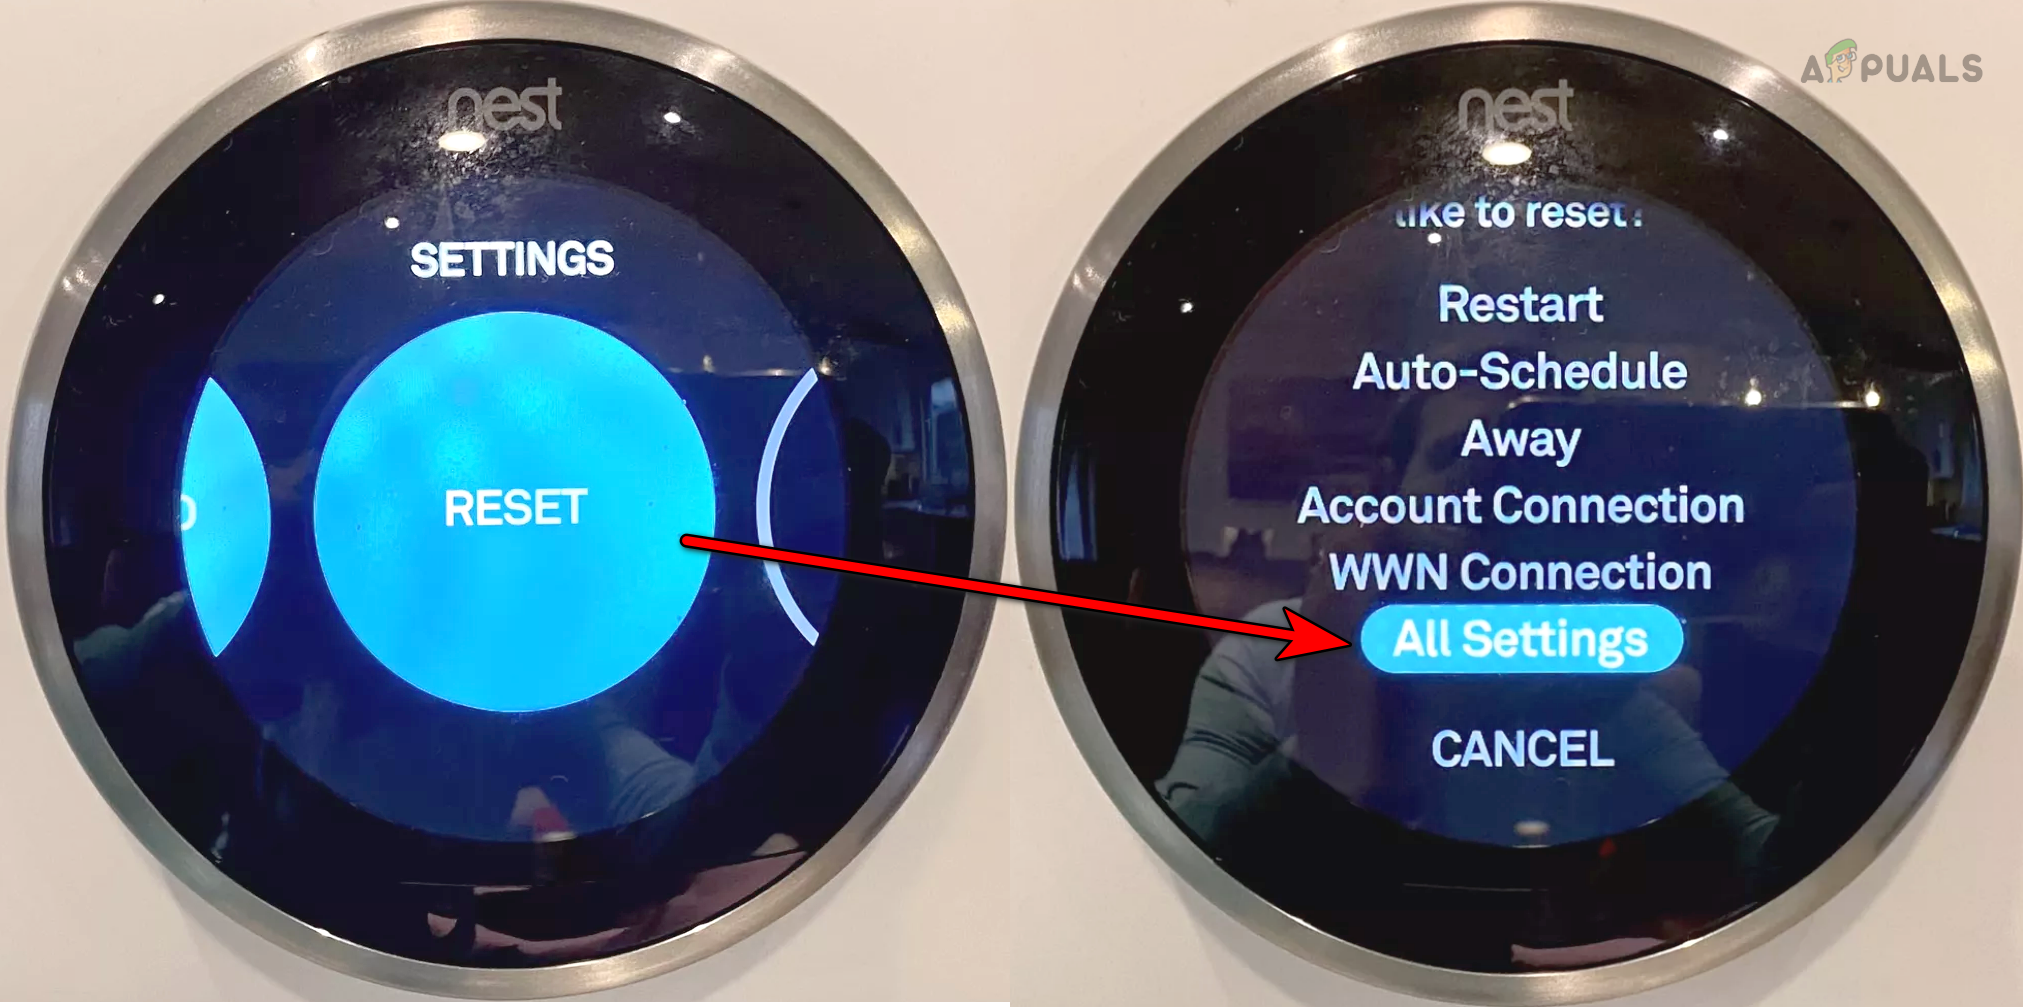
Reset All Settings on the Nest Thermostat - Set up the thermostat as you have done the first time and see if the problem is solved.
9. Reinstall the Nest or Google Home App
The Nest thermostat is tightly linked to the Nest app. If the latest update installation has damaged the core components of the app, the app will fail to convey the required commands to the thermostat properly and thus cause the issue.
Reinstalling the Nest app after resetting the Nest thermostat will get the job done.
- Reset the Nest thermostat after removing it from your account (as discussed above).
- On Android, go to Settings > Applications > Google Nest app or Google Home app. Uninstall it. For iOS, tap and hold the app’s icon and select Remove App.
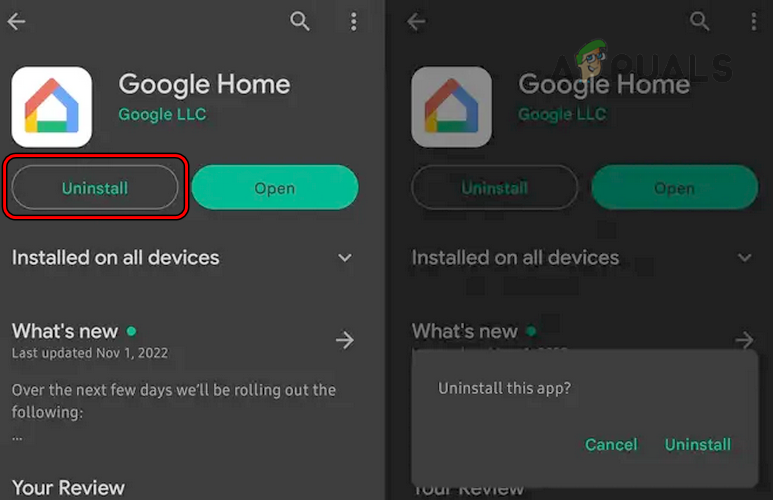
Uninstall the Google Home App - Restart your phone and reinstall the Nest app.
- Launch the app and use another Google account with the app.
- Configure the Nest thermostat but disable the following settings during the process:
Early on Cool to Dry Eco Mode
- Save the configurations and see if the thermostat is working correctly.
10. Connect the C or Common Wire
Until now, we were trying to solve the problem on a software basis but now, we have to get our hands dirty. The last step in troubleshooting a cooling issue when using a Nest thermostat is checking and correcting its wiring. But as that is too specific in each case, we will just be limited to connecting the C or common wire.
We will exclusively focus on providing general guidelines for connecting the C wire, as they can vary depending on the specific products and equipment involved. To ensure successful implementation in your unique scenario, you may need to conduct further research and dig deeper into the details.
Try at your own risk as wrong wiring may damage your cooling/heating system, your house/office wiring, the Nest thermostat, or cause unforeseen issues.
- Make sure to connect the C or common wire on both ends, i.e., at the thermostat and the cooling/heating system. While some may consider the C wire unnecessary, not connecting it has often been identified as the main cause of the issue in many instances.
In some cases, you may need to use a C-wire adapter. You can also charge the thermostat if a C wire is not available in your configurations.
Connect C Wire in the Nest Thermostat - Once done, hopefully, the Nest thermostat will be operating correctly.
If the issue is still there and another thermostat is available with you, replace the problematic Nest thermostat with it and see if the cooling problem is solved. If the cooling starts to work, then the thermostat is faulty, otherwise, the issue lies in your equipment.
If you identify that the problem is related to the thermostat but it is out of warranty, check its terminals for any visible damage. If it is under warranty, contact Google Support and request a replacement. The support may guide you on the wiring and you may need to ensure your setup meets those instructions.
If the issue is equipment related, then there can be various causes for this, such as a blown capacitor in the fan unit, a blocked drainage pipe, converter issues in the HVAC unit, or problems with pressure within the unit, etc. and you will need the help of repair service to identify and rectify it. If the issue is due to pressure in the unit, make sure there is no leakage in your cooling or heating system before refilling it.
The post Your Nest Thermostat Stopped Cooling? Don’t Worry, Try this! appeared first on Appuals.
]]>