In simple terms, driver-based frame generation is a universal solution to generate frames within frames without requiring support from game developers.
The post Fix: CRC Error When Installing NVIDIA Drivers (7-Zip Extraction Failed) appeared first on Appuals.
]]>
Several factors can cause CRC and extraction failures, including incomplete or corrupted downloads (sometimes reported more frequently with browsers like Edge), hardware issues such as unstable CPU cores on newer Intel processors, disk read/write errors or insufficient storage space, incorrect temporary folder paths, and viruses or malware that may alter downloaded files, especially when obtained from unofficial sources. These issues ultimately corrupt the archive, preventing proper extraction and installation.
Below we look at solutions to resolve this issue.
1. Install the Driver Using the NVIDIA App (GeForce Experience)
If manual extraction of the driver archive keeps failing, try installing the drivers through the NVIDIA App (GeForce Experience). This tool downloads and installs drivers directly without requiring manual extraction, which helps avoid CRC errors caused by corrupted archives or failed 7-Zip extractions.
- Open your browser and go to the official NVIDIA GeForce Experience download page.

- Download and install the NVIDIA App by following the on-screen instructions.

- Launch GeForce Experience and sign in (or create an account if required).
- Go to the Drivers tab and click Check for updates.
- Once a new driver is found, click Download and then Express Installation.
This method uses NVIDIA’s own installer system, reducing the risk of corrupted extractions and ensuring a cleaner installation process.
2. Use Chrome & Install the Driver Manually
Incomplete or corrupted downloads are one of the most common causes of CRC errors. Switching to Google Chrome for downloading the driver can help, as Chrome’s download manager handles large files more reliably than some Microsoft browsers. This reduces the risk of broken or partially downloaded archives, ensuring the file remains intact for extraction and installation.
- Launch your browser.

- Visit the Google Chrome official website.

- Select your operating system and click the Download button.

- Install Google Chrome by following the on-screen instructions.
- After installation, launch Google Chrome.
- Go to the official NVIDIA Driver Download page and download the drivers.

- Create a new folder on your PC.
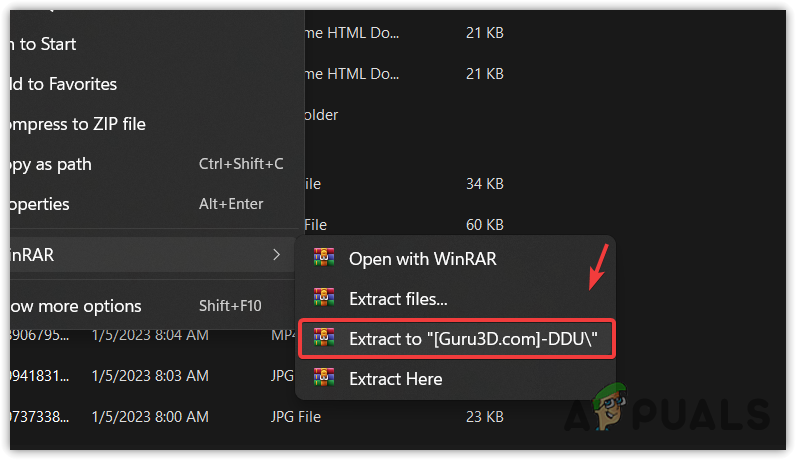
- Right-click the downloaded .exe file and select 7-Zip.

- Extract the file to the newly created folder.
- Run the “setup.exe” located in that folder.
3. Limit CPU Cores
On some multi-core Intel processors, unstable or misbehaving cores can cause corruption when performing CPU-intensive tasks like file extraction. Temporarily limiting the number of active CPU cores forces the system to use fewer, more stable cores, which may prevent CRC errors during extraction and installation.
Warning: Limiting cores will reduce system performance. Always revert these settings after completing the installation to restore full performance.
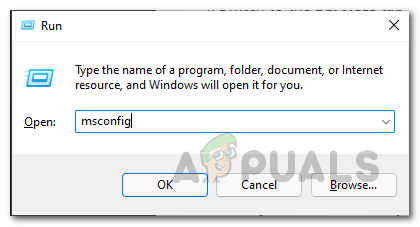
- Press Windows + R on your keyboard to open the Run dialog.
- Type “msconfig” and press Enter.

- Click the Boot tab > Advanced options.

- Check the box next to “Number of processors”.
- Select 1 or 2 from the dropdown.

- Restart your PC (Windows will now use fewer cores).
- Run the NVIDIA setup file again.
- Once installed, revert these settings to restore normal CPU usage.
4. Change the Temp File Path
Windows’ default temporary directory often uses long file paths and may have permission restrictions that can interfere with installer operations. These limitations sometimes cause CRC errors when handling large archives. Changing the temporary directory to a short, simple path (such as C:\Temp) creates a cleaner, more accessible, and installer-friendly location for 7-Zip and similar programs.
Warning: Before making changes, note your current TEMP and TMP values so you can restore them later if needed.
- Press Windows + R to open the Run dialog.
- Type “sysdm.cpl” and press Enter.

- Go to the Advanced tab and click Environment Variables.

- Under User Variables, select TEMP and click Edit.
- Change the variable value to:
C:\Temp

- Repeat the same process for TMP and set it to the same path.

- Create the C:\Temp folder if it doesn’t exist.
- Click OK to save changes.
- Restart your PC.
- Try extracting the NVIDIA drivers again using 7-Zip and run the setup.
The post Fix: CRC Error When Installing NVIDIA Drivers (7-Zip Extraction Failed) appeared first on Appuals.
]]>The post How to Safely Overclock Your GPU? appeared first on Appuals.
]]>
This guide will go over the required checks and steps to take when dialing up the clocks on your GPU. It’ll cover different scenarios and indicators to understand the entire procedure, including when to stop or identify when your GPU has hit its limit, something that is especially important for first-time overclockers.
What Tool to Use?
While many GPUs come with manufacturer-specific tools for one-click overclocking, these solutions often leave untapped performance potential and may not guarantee stability. In some cases, they can even cause stutters, visual glitches, screen artifacts, or sudden crashes. 
For this guide, we’ll use MSI Afterburner—a free, user-friendly, and widely trusted tool for GPU overclocking. It offers precise control to maximize performance (think extra frames per second!) while letting you test and ensure your settings are stable.
To stress-test your overclocked settings, download one of these benchmarking tools:
- Unigine Heaven: A continuous stress test that helps spot visual glitches or instability.
- 3DMark: A popular benchmark for testing performance gains and stability under load.
These tools will help you push your GPU safely while avoiding crashes or long-term damage.
How Much to Overclock?
A common mistake beginners make is copying pre-set overclocking values from online guides. The problem? No two GPUs are identical—even if they’re the same model from the same brand.
Your GPU’s overclocking potential depends on the “silicon lottery”—a term for the natural variation in chip quality during manufacturing. Higher-quality silicon can handle faster speeds and lower voltages, but there’s no way to tell this just by looking at your GPU.
A word of caution: Pushing your GPU’s clock speeds too high will generate more heat. If your PC’s cooling isn’t robust or your room temperature is already warm, dial back your overclocking goals. This ensures stability and helps your hardware last longer.
The Procedure
To begin, open MSI Afterburner. You’ll see five sliders, each labeled with its specific function (e.g., Core Voltage, Power Limit). Below these, the interface displays real-time GPU and memory clock speeds, along with temperature readings.
Next, launch Unigine Heaven and configure your graphics settings (resolution, quality presets) based on your display and system specs. For high-end GPUs, consider using 2560×1440 resolution (if your monitor supports it) to push the card harder. For mid-range systems, 1920×1080 is sufficient.
- In Afterburner, move the Power Limit slider to the maximum (far right). Set a reasonable Temperature Limit (e.g., 85°C). If successful, skip to Step 5.

- If the sliders are grayed out, click the gear icon to open Afterburner’s settings.

- Under the General tab, check these boxes under Compatibility Properties:
- Unlock voltage control
- Unlock voltage monitoring
- Force constant voltage

- Restart MSI Afterburner and set the Power Limit (%) to maximum.
- Increase the Core Clock by 10-15MHz increments, then click Apply.

- Switch to Unigine Heaven and monitor for frame drops, stutters, or visual artifacts (glitches).
- If the benchmark crashes, reduce the clock speed to the last stable value and rerun the test.
- Repeat Steps 5-7 for the Memory Clock.
Once you’ve finalized your overclock, run the 3DMark benchmark to measure performance gains and monitor your GPU’s temperature. Test your settings further by playing graphically intensive games to stress-test your GPU. If you notice crashes or instability, reduce the clock speed slightly.

If your GPU runs hot but the fans aren’t ramping up sufficiently, adjust the fan curve for better cooling. Check out Appuals’ in-depth guide to optimize your GPU’s fan settings. If overheating persists, dial back your overclock slightly to ensure stability.
The post How to Safely Overclock Your GPU? appeared first on Appuals.
]]>The post How to Fix Nvidia App Auto Tuning Interrupted Error? appeared first on Appuals.
]]>
Now that we’ve identified the potential causes, let’s explore the solutions to resolve this issue.
1. Close All Unnecessary Processes
The error frequently arises when other programs or processes interfere with the overclocking tool’s ability to scan and apply optimal settings. To avoid this, it’s recommended to close all unnecessary background processes before proceeding with overclocking. This ensures that the tool can operate without interruptions.
- Right-click the taskbar and select Task Manager.
- In the Processes tab, identify non-essential applications (e.g., browsers, Discord, media players).
- Right-click each non-essential process and select End Task.

- Once all unnecessary processes are closed, restart the overclocking tool and attempt the scan again.
2. Reinstall Drivers
The tuning process can be interrupted if your GPU drivers are corrupted or outdated. Corrupted drivers may cause instability, while outdated ones might lack compatibility with the latest overclocking features. Reinstalling the GPU drivers can resolve issues when overclocking your GPU using the NVIDIA app.
- Download Display Driver Uninstaller (DDU) from the provided link.
- Once the download is complete, extract the ZIP folder using WinRAR or 7-Zip.

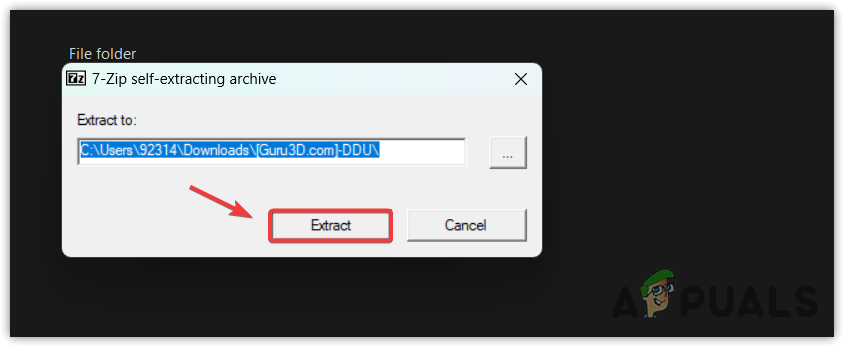
- Navigate to the extracted folder and double-click the DDU 7-Zip file.
- Click Extract and open the extracted folder.
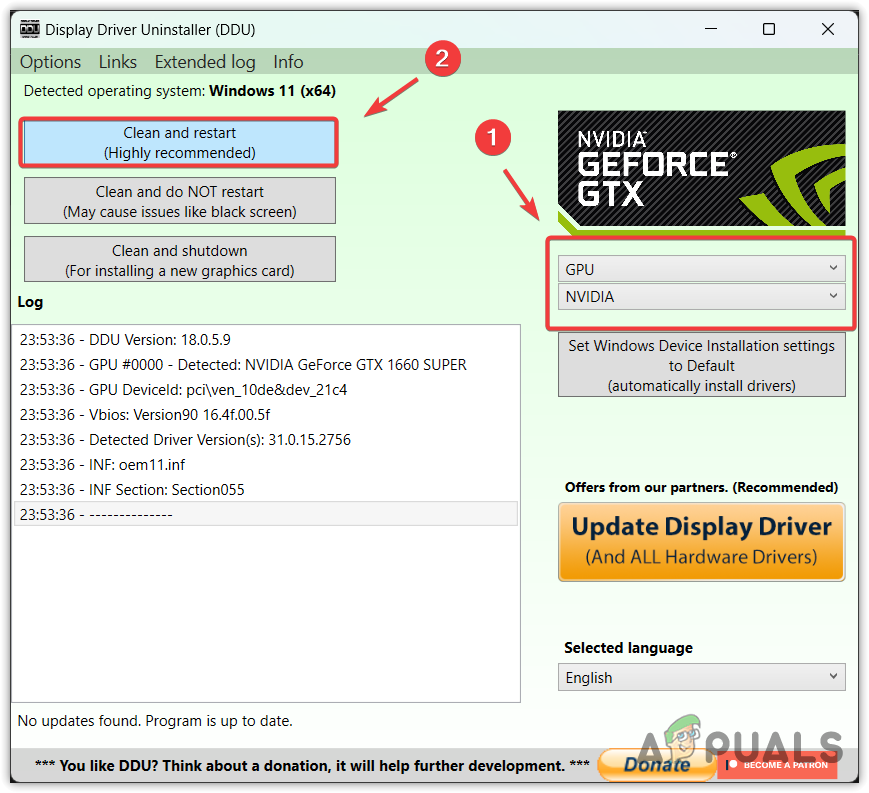
- Run the Display Driver Uninstaller application.

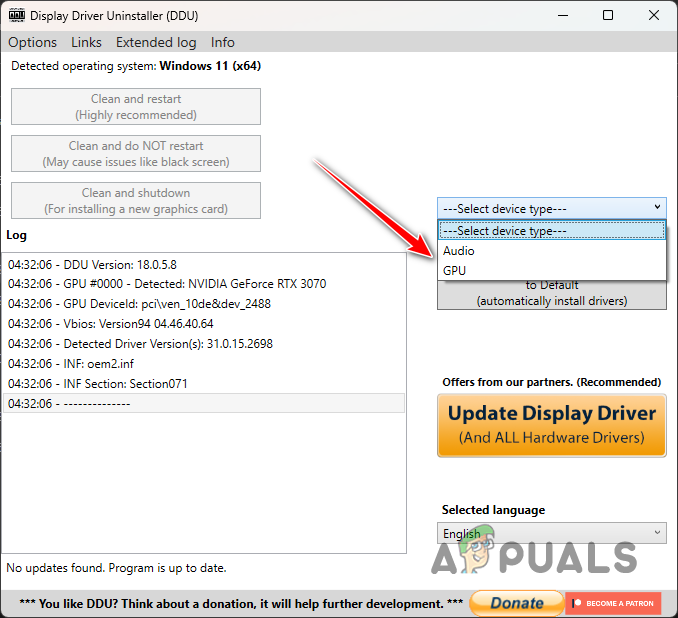
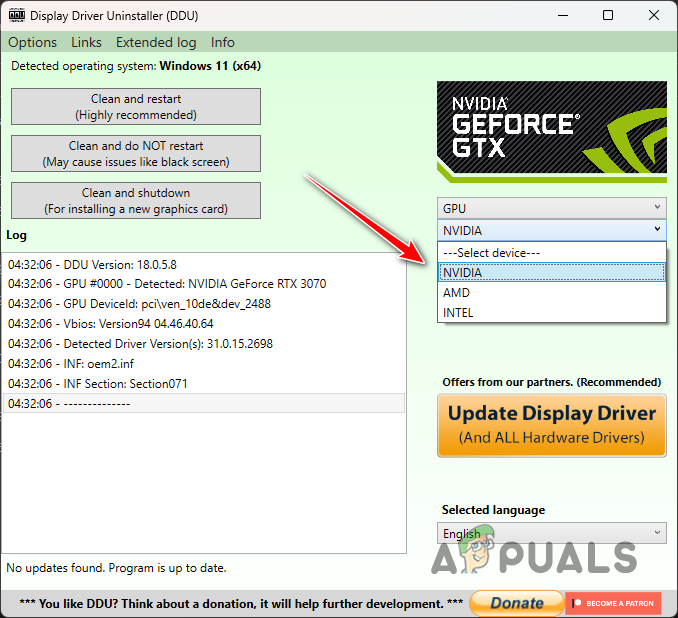
- Select your GPU from the device type and choose the GPU manufacturer from the options below.
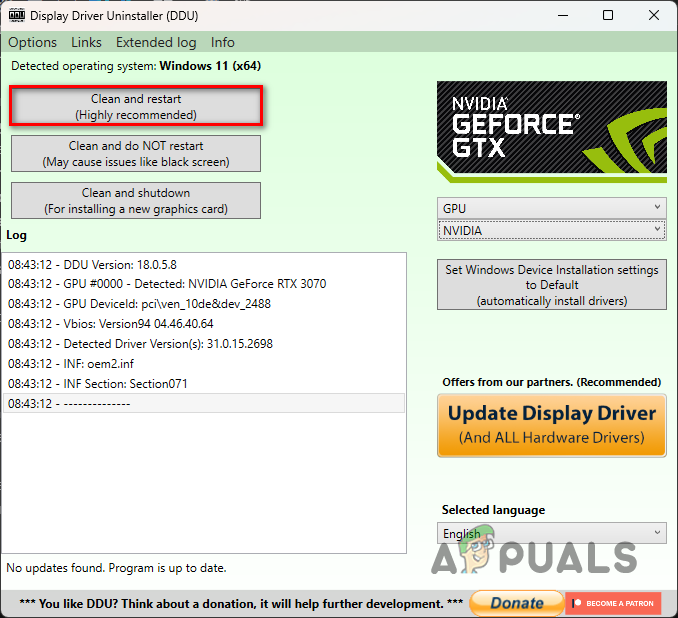
- Click Clean and Restart to begin the uninstallation process.

- Download the NVIDIA App from the official website.
- Once the download is complete, install the driver. Go to the Drivers section and follow the on-screen instructions to complete the installation.
- After the driver is installed, restart your computer and attempt the tuning process again.
3. Delete Configuration Files
Corruption in the GeForce Experience or NVIDIA app folder can interfere with the auto-tuning process, preventing it from running correctly. This corruption may occur due to incomplete updates, file conflicts, or system errors. Deleting the folder forces the application to regenerate the necessary files, which can resolve the corruption and potentially fix the error.
- Press the Windows + R keys simultaneously to open the Run dialog box.
- In the input box, type appdata and click OK to open the AppData folder.

- Navigate to Local > NVIDIA Corporation. Here, locate and delete the GeForce Experience or NVIDIA App folder.

- Once done, restart your computer and attempt the auto-tuning process again.
4. Ensure GPU Stability
If your GPU temperature is too high or unstable, the auto-tuning process may fail. If the issue persists after trying the previous methods, use a tool like HW Monitor to check your GPU temperature. If the temperature exceeds 85°C, take steps to reduce it by cleaning your system, improving airflow, or adding additional cooling solutions.
If you’ve applied custom overclock settings, consider reverting to the default settings, as overclocking can increase heat output. For more advanced users, reapplying thermal paste or upgrading your cooling system can also help lower temperatures.
The post How to Fix Nvidia App Auto Tuning Interrupted Error? appeared first on Appuals.
]]>The post How to do a Clean Installation of Nvidia Drivers? appeared first on Appuals.
]]>
You don’t need to do a clean install every time your driver updates, as usually, all you need to do is just update the driver and everything is okay. However, sometimes you have to do a clean install to prevent conflicts and issues that a corrupted driver might cause.
A clean installation is also recommended when you have replaced your graphics card, as the old graphics drivers might interfere with the performance of the new graphics card.
Now that you know about clean installation and its uses, let’s move on to how to clean install a driver.
STEP 1. Download New Drivers
- Download the latest drivers from Nvidia’s Official Driver Webpage.
- Choose the specific model of your Nvidia graphics card and download the latest driver version.

Now, once your driver is downloaded, we will uninstall the existing driver.
STEP 2. Uninstall the Existing Driver
There are two ways to perform a clean install of an Nvidia driver:
- Using the built-in “Perform a clean installation” checkbox.
- Using “DDU (Display Driver Uninstaller)” – A well-known and reputable program specifically designed to remove all residual files and configurations.
Usually, the first method works fine for most users. However, in some cases, using DDU may be necessary to ensure no residual files and settings conflict with your current driver.
Note: Clean installation will remove all the settings and configurations. So, be prepared to reconfigure your graphics driver once you follow the methods mentioned below.
Now that we know about both methods, let’s check the step-by-step procedure of both methods.
Method 1. Clean Installation Through Nvidia Installer:
- Launch the setup file of the downloaded driver.
- Select the directory where you want to extract the drivers and wait for the process to complete.

- The setup will perform a system check to ensure compatibility and correct GPU connection.
- Click ‘Agree and Continue’ to proceed.

- Choose ‘Custom (Advanced)’ and click ‘Next’.

- Check the ‘Perform a clean installation’ box and click ‘Next’.

- Wait for the installation to complete. Note: If your screen flickers during the installation process, it’s completely normal and expected, so don’t worry about it.
- Follow the prompts to restart your PC.

- After the restart, the driver installation will continue. Click ‘Close’ once the installation is complete.

- After the drivers have been installed, click on Close.
Now, test and check if everything is working properly and reconfigure your settings and configurations. If anything is wrong, you can follow the procedure using DDU below.
Method 2. Clean Install using Display Driver Uninstaller (DDU):
- Go to the DDU download page.
- Download and extract the file using a zip file extracting tool such as 7zip or WinRAR.
- Launch the “DDU v*****” file, select a directory to unpack the installer, and then press the “Extract” button.
 Note: “v******” corresponds to the version number of DDU, as it might be different at the time you view this article. We mentioned it like that for your understanding.
 - Once extracted, go to the directory (where you unpacked the installer) and launch the “Display Driver Uninstall.exe” file.
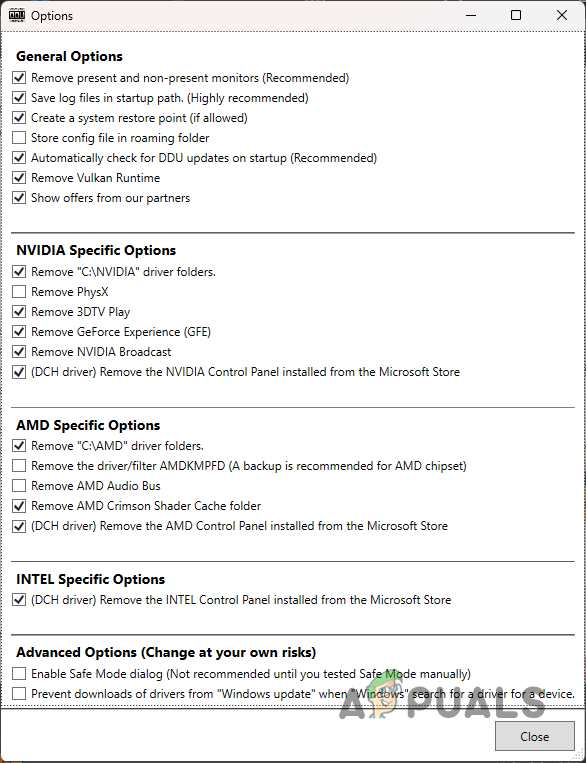
- Once the program opens, press “OK” and check all boxes under ‘Nvidia Specific Options’. Then press Close.

- Choose ‘GPU’ for the device type and ‘Nvidia’ for the manufacturer.

- Click ‘Clean and Restart’. If installing a new graphics card, select ‘Clean and Shut Down’ instead, install your graphics card, and then turn ON your computer again.
Now your computer will boot up again and it might have a weird low-resolution mode. Do not be alarmed by that, as it’s completely normal for Windows to boot your computer in low-resolution mode if it doesn’t find any driver installed for your graphics card.
At this point, it might be necessary to pause Windows updates for 1-2 hours, as it may try to install Nvidia drivers automatically. This can ruin the installation process, as it’s been reported many times that Windows updates install older or buggy drivers that aren’t usually compatible with your graphics driver properly.
This is especially the case with laptops, as their manufacturers tend to customize the Nvidia driver before deploying it to better optimize the driver for that specific hardware.
To stop Windows updates temporarily:
“Select Start > Settings > Windows Update. Next to Pause updates, in the dropdown list, select Pause for 1 week, then click Pause for 1 week.”
You can learn more about this on the official Dell support article.
Once paused, we can continue with the installation process. Installation steps are the same as those mentioned in the first method, so just follow those steps and you should be good to go.
The post How to do a Clean Installation of Nvidia Drivers? appeared first on Appuals.
]]>The post How to Fix an Empty DXCache Folder in Windows? appeared first on Appuals.
]]>
Various reasons can cause this issue, but mainly it happens due to problems with the graphics driver. Additionally, the recent change in the location of the DX cache folder might be the reason you cannot see any file or DX cache folder in the location where you used to see it.
1. Verify the Shader Cache Settings in the Nvidia Control Panel
If the shader cache option is not enabled, your GPU driver won’t create shader cache files even if you play the game for several hours; you will find the DX cache folder empty. Therefore, ensure that the shader cache option is turned on in the Nvidia Control Panel.
- Hold the Shift key, right-click the desktop, and select Nvidia Control Panel.

- Go to Manage 3D settings from the left.
- In the right pane, find the Shader Cache option listed under Settings and make sure it is turned on.

- Once done, click Apply and check if the files are being created under the cache folder.
2. Verify the DX Cache Location
Recently, the location of the DirectX cache folder has been moved from the Local folder to LocalLow, which might be why you are unable to see it in the location where you used to.
- Press the Win + R keys simultaneously and type Appdata in the input box.
- Click OK to navigate to the folder.

- Navigate to LocalLow\NVIDIA\; here, you should see the DX cache folder listed. If you cannot see it, you can also check the Local folder. If it still cannot be found, proceed to the following methods to fix the issue.

3. Use DDU to Reinstall the Driver
The DX cache folder files might not be created due to a problem with your GPU driver. Reinstalling the GPU driver using DDU (Display Driver Uninstaller) will remove all the traces of the previous driver, which might be corrupted, resulting in this issue.
- Download the Display Driver Uninstaller using the link.

- Once downloaded, extract the folder using WinRar or 7zip.

- Now, navigate to the extracted folder and run the DDU 7zip file.
- Click on the Extract option and navigate to the extracted folder once done.
- Then, run the Display Driver Uninstaller application.
- Select the GPU from the device type and the GPU vendor.
- Then, click Clean and Restart.
- Once done, install the GPU Driver from the official manufacturer’s site.
- Once done, restart your computer.
- Then, launch the game and see if the problem is resolved.
4. Manually Create DXCache Folder
Manually creating the DXCache folder directory in the right location will help the games access and create the necessary cache files. Sometimes, issues with the profile usernames and incorrect driver installation prevent the applications from saving the cache files. Therefore, manually creating the folder might resolve the issue.
- Press the Win + R keys simultaneously to open the Run window.
- Type AppData in the input box and click OK.

- Now, navigate to the following directory and create a folder with the name DXCache.
AppData\LocalLow\NVIDIA\PerDriverVersion\

- Once done, see if the issue is resolved or not.
5. Verify the Game Permissions
Another reason could be a lack of permissions, which could prevent the game from storing the shader cache. To address this, try running the game as an administrator and verify that you have full control over the DXCache folder to create the necessary files.
Running the game as an administrator will ensure that the application has all the necessary permissions to perform the required actions.
- Right-click the game and select Run as administrator.
- If you find the issue is fixed, then configure the game or application to always run with administrator privileges.

- Again, right-click the game, go to Properties from the top, then go to Compatibility and tick Run this program as an administrator.

- Once done, click Apply and click OK.
- Then, check if the issue is fixed or not.
Lastly, if none of the solutions work, you can try using the system restore utility to revert Windows to a previous state. This requires having a restore point from before you encountered the issue. If you don’t have any restore points, resetting the PC without losing data might be the best solution.
The post How to Fix an Empty DXCache Folder in Windows? appeared first on Appuals.
]]>The post How NVIDIA Plans on Doing Driver-Based Frame Generation appeared first on Appuals.
]]>With AMD’s AFMF setting a new standard for a simple ‘Click and Play‘ frame generation utility, will NVIDIA too follow AMD’s steps and implement a universal, driver-based frame generation solution? Let’s find out.
Table of Contents
Will NVIDIA Make a Driver-Based Frame Generation Solution?
Before we talk about the topic at hand, let’s go over how Upscaling and Frame Generation work and a few important-to-understand terminologies.
DLSS stands for Deep Learning Super Sampling and was introduced by NVIDIA in 2018 as a part of its RTX lineup of GPUs. Put simply, DLSS scans and collects data from the past frames and uses this data to fill in the missing pixels in the new frame. With a hint of AI, you receive an upscaled image with enhanced performance.

AMD’s FSR or Fidelity FX Super Resolution on the contrary can work on almost every GPU. It uses a special open-source spatial upscaling algorithm to upscale the game from a lower to a higher resolution. It is far more applicable than DLSS, since it is not hardware-dependent.
READ MORE: NVIDIA DLSS 3.0 Frame Generation Modded To Work With RTX 2000 & RTX 3000 GPUs ➜
A Few Important Terms and an Introduction to Frame Generation
With the RTX 40 lineup came along DLSS 3.0 and NVIDIA Frame Generation. What exactly is the meaning of ‘generating frames’? Frame Generation is at its simplest, inserting a frame within two other frames. This process is called Interpolation. It has been a popular technique with TVs to increase the framerate of the displayed content to match the TV’s refresh rate.
Upscaling simply improves the image quality and increases performance. Meanwhile, Frame Generation or FG for short creates an entirely new frame within two existing frames, displays them, and guesses the next frame, all the while managing an acceptable latency.

This tech-wizardry requires the understanding of 2 core concepts in this field: Optical Flow Analysis and Motion Vectors. Let’s go over them one by one:
1) Optical Flow Analysis
This technique takes a series of images and estimates what the next iteration of the image could look like. This estimation is done by analyzing the velocity, color, and brightness of objects in the image. Instead of a clear-cut result, you obtain a mere approximation.

Consider a ball rolling on the floor towards the right. The ball reaches its destination in 5 discrete steps. Assume its motion to be almost linear and in a straight line and you could determine its final destination beforehand. If you’ve studied Analytical Geometry, you must have come across the 2-point form:
y - y1 = (x-x1)(y2-y1) / (x2-x1)From just two points, we can determine the equation of the given line. Since the slope is constant, predicting the next position of the image/point is not tricky. Do note that the actual technology is much more complicated than this.
Most importantly, Optical Flow Analysis does not require access to the game engine’s data. It can be implemented on the driver level, wherein the driver interpolates (inserts) frames by predicting motion on the screen. In simple terms, Optical Flow Analysis does not interact with the game engine.
The disadvantage is that the driver is unable to distinguish between UI and the actual 3D environment, so unforeseen artifacts may occur. Moreover, the output will never be as refined since it uses the raw frame data.
2) Game Engine Motion Vectors
Motion vectors are directional vectors that indicate the displacement of objects from one frame to another. They are a game engine component and represent objects’ transformation and animation. This is a more robust way of representing motion than simply ‘guessing’ the object’s position.

If you were wondering, motion vectors are a crucial part of Frame Generation. Only that there needs to be some correspondence with the driver and the game engine to share this data. Achieving this correspondence requires implementation from the game developers.
Therefore, while being a superior option to Optical Flow Analysis, motion vectors are greatly limited in their scope and scalability since not every game will have this option. If you were to play an old title from the 2010s, motion vector-powered FG solutions (DLSS FG, FSR 3 FG) are very likely not to be present.
READ MORE: What is Resizable BAR & Should You Enable it? (Guide) ➜
DLSS Frame Generation vs FSR Frame Generation
Now let’s see how the current frame generation tech from both Team Green and Team Red stack up against each other.
 NVIDIA:
NVIDIA’s version of Frame Generation uses a combination of motion vectors and optical flow analysis. The Optical Flow Accelerator with RTX 40 GPUs analyzes two frames. It then determines the information the game’s motion vectors do not include, such as particles, reflections, shadows etcetera. In the example below, Optical Flow Analysis allows for accurate tracking of the shadow.

The Motion Vector part on the contrary tracks the 3D environment and the scene geometry. In the same bike example, motion vectors can pinpoint the accurate future position of the biker or the road mathematically. However, they cannot determine the shadow for which Optical Flow Analysis is used. Thus, these two must work in tandem to produce an accurate image.

- Requires game developer support
- Uses a combination of Optical Flow Analysis and Motion Vectors
- Is hardware locked on RTX 40 GPUs
- Cannot be implemented on the driver-level
AMD:
FSR 3 Frame Generation is very similar to NVIDIA’s DLSS Frame Generation. Apart from a few naming changes, this technology also incorporates a combination of Optical Flow Analysis and Motion Vectors. For reasons obvious, both technologies require support from game developers.

- Requires game developer support
- Uses a combination of Optical Flow Analysis and Motion Vectors
- Can be enabled on RX 5000/6000 and RTX 20/30/40 Series GPUs
- Cannot be implemented on the driver-level
READ MORE: What is a Teraflop? Understanding The New Graphics Buzzword ➜
The Anomaly: AMD Fluid Motion Frames (AFMF)
The closest thing we have to a driver-level frame generation utility is AMD Fluid Motion Frames. AFMF does not interact with the game in any way whatsoever. It is purely based on Optical Flow Analysis, or a prediction of the next frame.
This allows it to work with almost every DirectX 11/12 title since no software support is required. AFMF does not actually increase the framerate, rather it makes the game appear smoother as you will see more frames on your screen.

So, what’s the catch? Well, AFMF is not even close to matching DLSS FG or FSR FG. Moreover, the glitches introduced in the UI are also something users have to tackle with. However, since it works on the hardware level, it is a pretty neat option if you are willing to deal with the errors that may occur.
- Does not require game developer support
- Uses only Optical Flow Analysis
- Only supports RDNA2 or newer GPUs
- Works purely on the driver level
READ MORE: AMD is Preparing its Own Video Upscaler for YouTube and VLC ➜
Will NVIDIA Respond to AFMF?
The clear answer is ‘We don’t know‘, because NVIDIA is still yet to make any statement regarding such an option. AMD’s Aaron Steinman asserts that their move will push NVIDIA to develop something like AFMF soon.
“I would be curious to know if Nvidia feels now they have to match what we’ve done in making some of these solutions driver-based”
Aaron Steinman, to PC Gamer
It’s quite interesting how we haven’t seen NVIDIA’s version of AFMF since it was once proudly said that the RTX 40 lineup has a better Optical Flow Accelerator as compared to Ampere (RTX 30). This was the very reason, why NVIDIA FG (Using Optical Flow + Motion Vectors) can only be enabled on Ada Lovelace.
On the other hand, NVIDIA may need to train another model from scratch for this project, which requires significant overhead.
Is it Even Viable?
Frame Generation using both Optical Flow Analysis and Motion Vectors isn’t flawless. The input latency introduced by these features makes them highly unappealing to gamers. On the flip side, the driver-based AFMF isn’t any better as it eats away at your FPS due to interpolation, while being inconsistent and prone to graphical glitches and bugs.
A better question would be, ‘Shouldn’t NVIDIA improve DLSS Frame Generation first?’. Given that AI tends to improve with time, the latency issue should be resolved, to a great extent. Unless NVIDIA is strictly bound by its data models, making a driver-level FG solution shouldn’t be tricky, but is it worth the hassle?
Would it be Pointless?
Hypothetically, where would you use NVIDIA’s variant of AFMF? NVIDIA would probably restrict it to RTX 40 or higher GPUs, which by themselves are powerful enough to run old titles at great framerates. Newer games more often than not, do feature DLSS 3 FG / FSR 3 FG support.
Mobile GPUs are a different case, but a driver-level approach would be very useful for older architectures such as Pascal, Maxwell, Kepler and Fermi. Sadly, due to technical reasons, it would be almost impossible to extend this feature to those GPUs. They lack Tensor Cores, meanwhile, CUDA can only do so much. Even AFMF only works with RDNA2 or newer architectures.
Hopes for RTX 50 ‘Blackwell’
As per rumors, the RTX 50 lineup will debut in Q4 2024. Expect a large number of announcements, which may or may not include a universal Frame Generation solution. Despite the expected hardware lock to the RTX 40/50 lineup, it is not like NVIDIA to get left behind in any department. This is just pure speculation, however, and no rumors indicate such plans from NVIDIA.
READ MORE: HDMI 2.1 vs DisplayPort 1.4 – Which is Better in 2024? ➜
Conclusion
While AI has seen unprecedented levels of growth, you need adequate hardware for AI Inference and Acceleration. If your GPU’s cores aren’t fast enough, it is simply not possible to interpolate frames in real time. You can offload this processing to a server, but that’d require a subscription and abysmal latency numbers. It is pertinent for GPU manufacturers to strike a balance. What are your thoughts on this matter? Tell us in the comments.
FAQs
What is Driver-Based Frame Generation in simple words?
If it ever launches, will NVIDIA limit its ‘driver level’ FG solution to RTX 40 or higher GPUs?
Most likely, yes. Since DLSS 3 FG requires RTX 40 series GPUs due to the new ‘Optical Flow Accelerator’ in them, expect official driver-based solutions to see similar requirements.
Will the RTX 50 lineup revamp Frame Generation as we know it?
There are no concrete rumors regarding this matter. Only time will tell since most of us were unaware of Frame Generation before NVIDIA announced it 2 years back.
The post How NVIDIA Plans on Doing Driver-Based Frame Generation appeared first on Appuals.
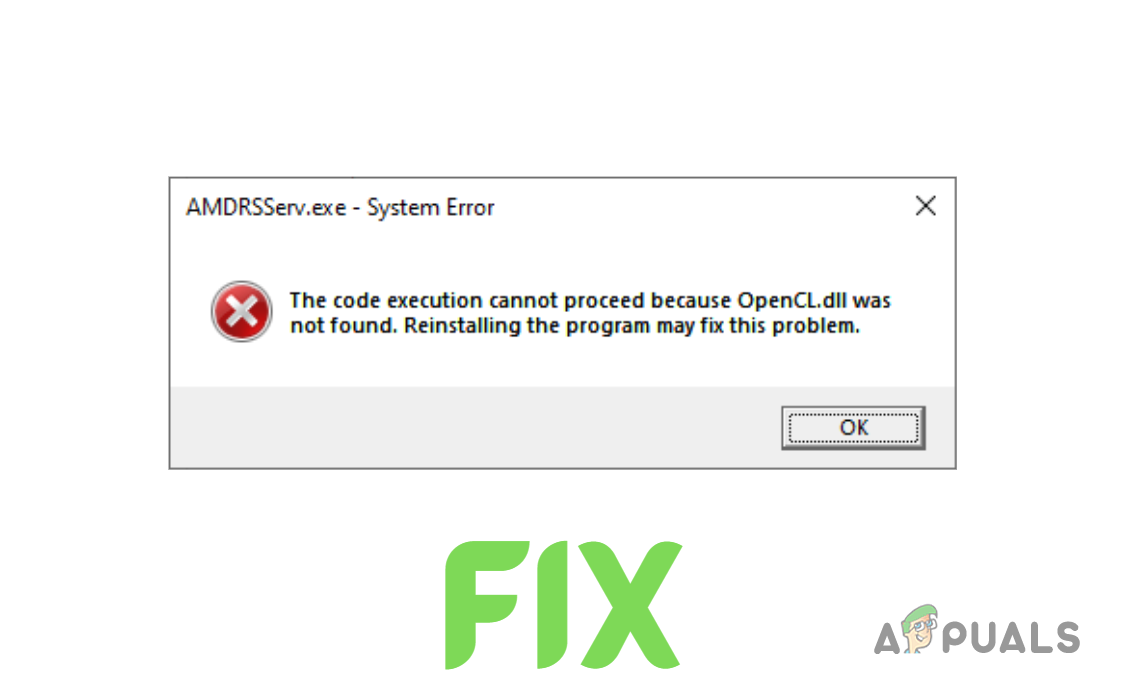
]]>The post How to Fix AMDRSServ.exe System Error in Windows? appeared first on Appuals.
]]>
This mostly happens if the AMD graphics driver wasn’t installed properly, but old leftover files from past installations or antivirus programs can also cause it.
Now that you know the causes, let’s discuss the solutions.
1. Reinstall GPU Drivers
Rather than just installing new drivers over the old ones, it’s best to completely uninstall your current drivers first. Doing this helps avoid conflicts between the new and old driver files. You can uninstall your drivers using Display Driver Uninstaller (DDU) or the AMD Cleanup Utility.
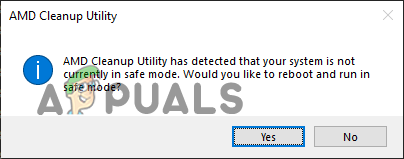
- Go to this page and download the AMD Cleanup Utility.

Downloading AMD Cleanup Utility - Once downloaded, double-click the file and select “Yes” to reboot the system into Safe Mode.
Rebooting the system into Safe Mode - Wait for your system to restart.
- After your system restarts, press “OK” to confirm the removal of AMD driver files when prompted.
- Wait while the utility removes the driver files. Your screen may flicker or temporarily go black during this process—don’t worry, this is normal.
- When the driver removal is complete, press “Finish”, then select “Yes” to let your system restart one last time.
Once your computer restarts, all previous GPU drivers will be removed. Next, you’ll need to install new drivers—just make sure you know your exact GPU model. If you’re unsure which graphics card is installed, follow this guide.
- Go to the AMD driver download website and search for your specific GPU model.
- Click the SUBMIT button.
- Select the correct operating system for your computer.
- Download the latest AMD Software (Adrenalin Edition).
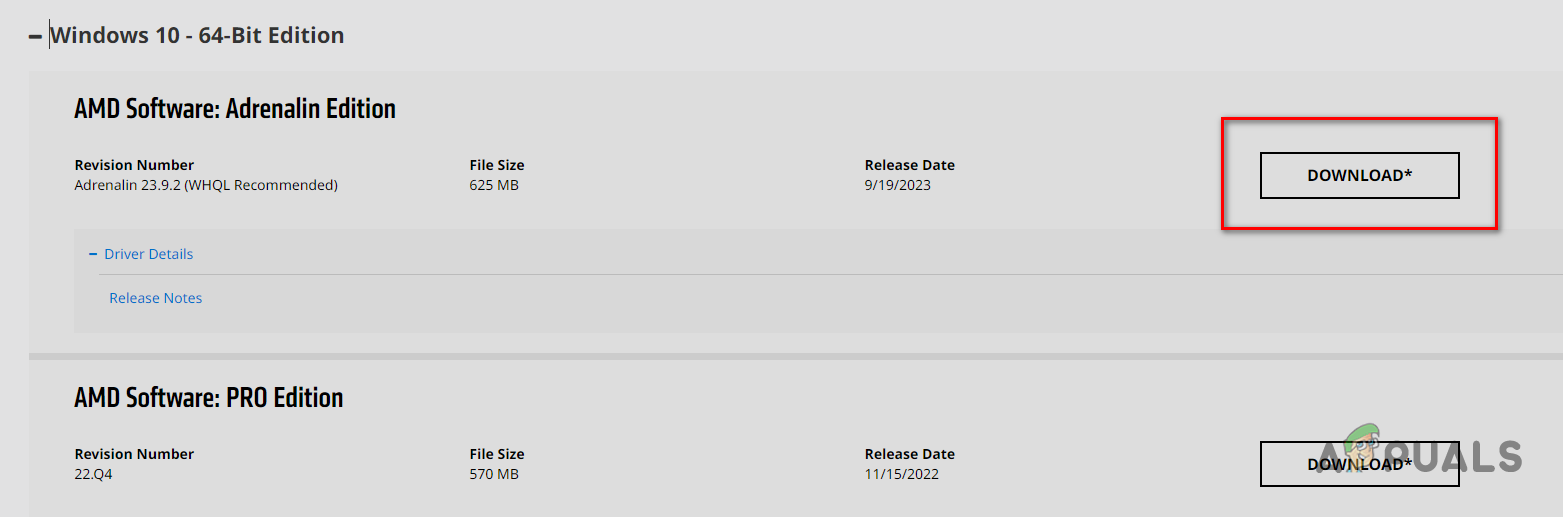
Downloading AMD Software – Adrenalin Edition - When the download completes, double-click the file to run the installer.
- Select where to install the AMD Software and wait for it to finish.
- When the software opens, it will detect your GPU and suggest the latest drivers. Click to download the latest driver and wait for the installation to finish.
Downloading the Latest GPU Drivers - After the drivers are installed, restart your computer.
Once your computer boots up, check if the error is gone. If you still see it, try the next method.
2. Run SFC and DISM Scan
Running SFC and DISM scans can help identify and repair missing or corrupted system files—like Dynamic Link Library (.dll) files. If they find damaged or missing files, these scans will automatically attempt to restore them from your system’s backup (SFC scan) or download them through Windows Update (DISM scan).
Since the error mentions a missing OpenCL.dll file, these scans can often fix the problem.
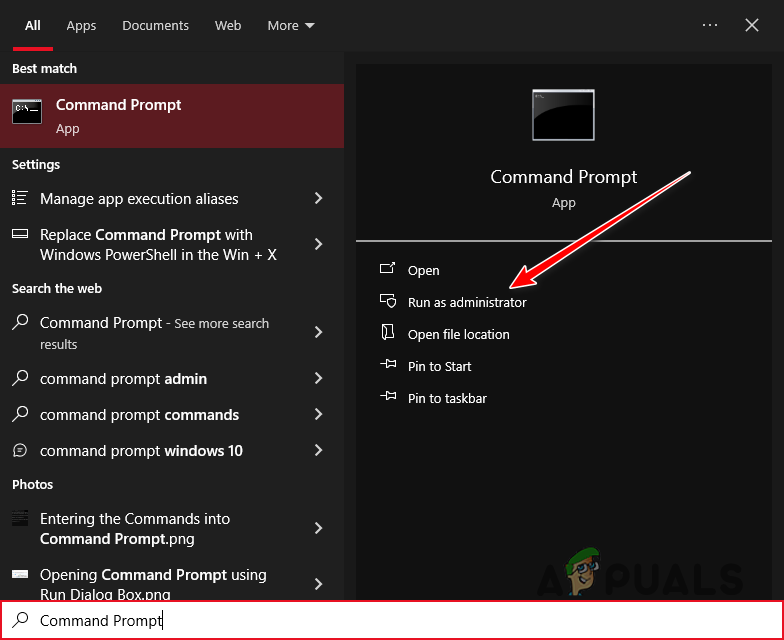
- Press the Windows Key, type Command Prompt, then click “Run as administrator.”
Opening Command Prompt as an Administrator - Type this command and press Enter:
sfc /scannow
- Let the scan finish.
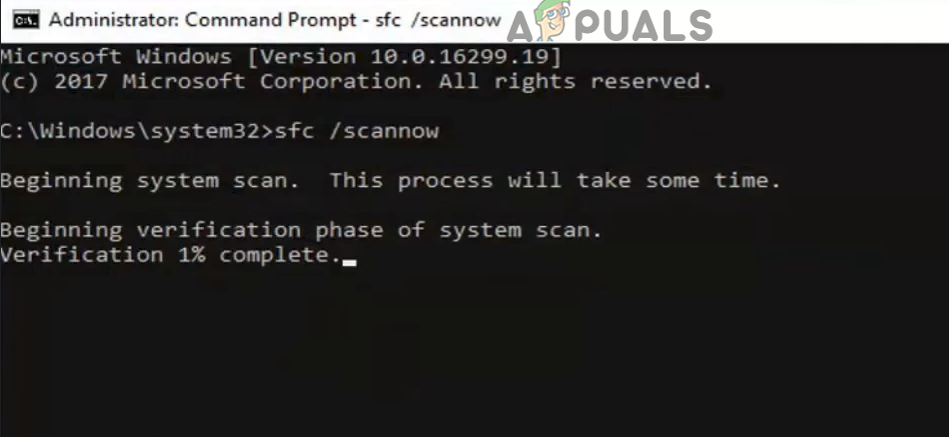
Performing an SFC Scan
When the scan is done, it will tell you if it found and fixed any issues.
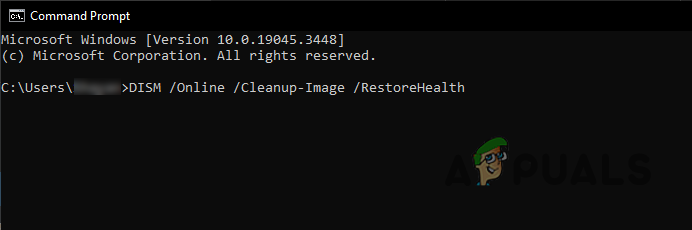
For a deeper check, the DISM scan can fix things the SFC scan might miss. To run the DISM scan, type this command in Command Prompt and press Enter:
DISM /Online /Cleanup-Image /RestoreHealth
Note: Make sure your computer is connected to the internet before running this scan.
Restart your computer after the scan and see if the error is resolved.
3. Manually Install the OpenCL.dll File
If the SFC and DISM scans couldn’t replace the missing file, you can add it manually. System DLL files are stored in the System32 folder. Download the missing file and place it there.
First, check if your system is 32-bit or 64-bit. Press Windows Key + I, then go to System > About. Look for System Type under Device Specifications.

Then, follow these steps:
- Go to this website and download the right version of the file for your system (32 or 64-bit).
- Save the ZIP in a new folder, right-click it, and select “Extract/Unzip here.”

Extracting the ZIP File - Right-click the extracted OpenCL.dll file and choose “Cut.”
- Paste this address into File Explorer’s address bar:
C:\Windows\System32
- Paste the file into this folder.
- Restart your PC.
4. Scan Your System for Malware
If installing the DLL file doesn’t work, your system may be infected with malware that’s causing the error.
Run a scan with a reputable antivirus program. If you already have one installed, open it and start a malware scan.
We recommend Malwarebytes for a thorough scan. For help using it, check out our step-by-step guide.
5. Renaming the AMDRSServ.exe File
If none of the previous solutions have fixed the AMDRSServ.exe system error, you can try renaming the AMDRSServ.exe file. This trick stops Windows from loading the troublesome file at startup. It’s only a temporary fix, but it may help until AMD releases an official update.
- Open File Explorer by pressing Windows Key + E. Navigate to the folder with the AMDRSServ.exe file:
C:\Program Files\AMD\CNext\CNext
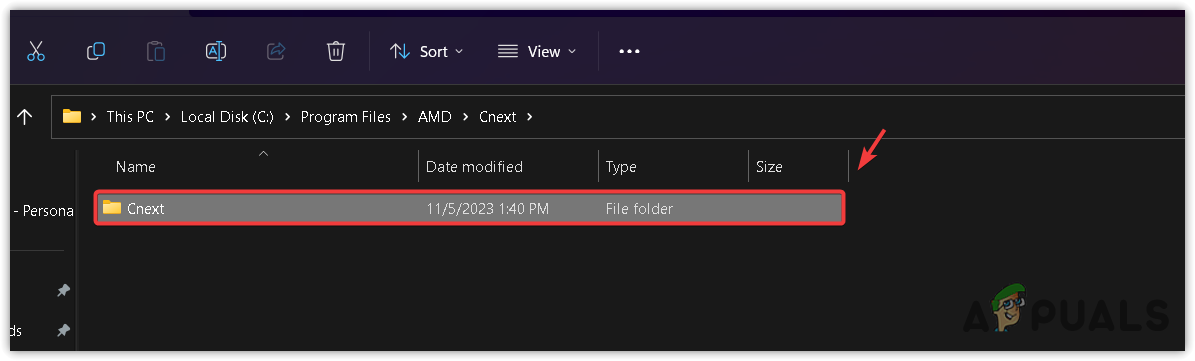
- Find AMDRSServ.exe. Make sure no AMD-related programs are running.
- Right-click on AMDRSServ.exe and select Rename.
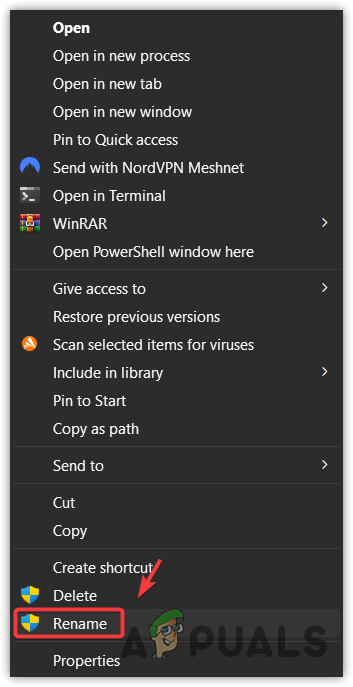
- Add any letter or number to the filename (for example, rename it to FAMDRSServ.exe). This prevents Windows from recognizing and running it.
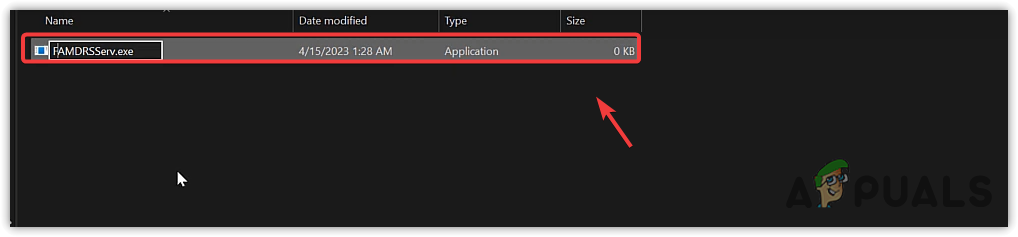
- Press Enter to confirm the new name.
- Restart your computer.
Now, Windows shouldn’t run AMDRSServ.exe at startup, which should stop the error message. Remember, this is just a workaround and may disable some AMD software features, like Radeon ReLive. If AMD releases an update to fix this error, rename the file back to its original name before updating to avoid any issues.
6. Contact AMD Customer Support
If you’ve tried everything above, including renaming the AMDRSServ.exe file, and the error still isn’t gone, it’s time to contact AMD Customer Support. Their team can help with more complex problems that these solutions haven’t fixed.
- Visit the AMD Support website.
- Select your preferred language and wait for the form to load.
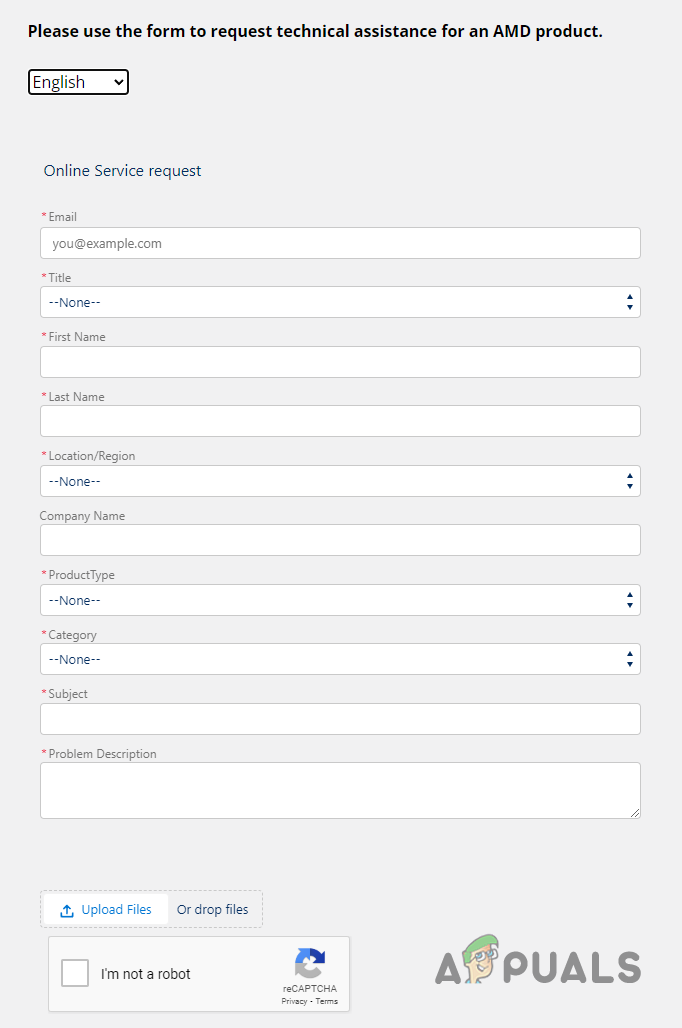
Filling out the Support Form - Fill in all the required details.
- Select “Graphics” as your Product Type.
- For Subject, enter “AMDRSServ.exe System Error (OpenCL.dll file missing)“.
- In the Problem Description box, describe your issue in as much detail as possible.
- Press the Upload Files button and attach a screenshot of the error alert.
- Complete the reCaptcha and click Submit.
Note: In the Problem Description box, give as many details as possible. Be sure to mention:
- The complete error message you see.
- When the error started and how often it appears.
- Your system specifications.
- Any changes made to your system just before the error appeared.
- All troubleshooting steps you’ve already tried.
The post How to Fix AMDRSServ.exe System Error in Windows? appeared first on Appuals.
]]>The post How to Fix Driver Download Failed Error in GeForce Experience? appeared first on Appuals.
]]>
Before diving into the solutions, ensure that your Windows is up to date with all the latest updates installed. This can sometimes resolve compatibility issues that may be causing the GeForce Experience errors.
Many users on forums, such as Reddit, have reported success by performing a clean installation of both GeForce Experience and the NVIDIA drivers. This approach often resolves errors that occur due to corrupt installations or conflicts with previous driver versions.
1. Running GeForce Experience as an Administrator
One common solution to address the “Driver download failed” error in GeForce Experience is to run the GeForce Experience with administrative privileges. This helps ensure that GeForce Experience has the necessary permissions to carry out driver installations. Here’s how to do it:
- Close GeForce Experience if it’s currently running.
- Open your computer’s Start Menu and search for “GeForce Experience.”
- Right-click on the GeForce Experience icon and select “Run as administrator.”

Running GeForce Experience as Admin - If prompted by the User Account Control (UAC), click “Yes” to grant administrative privileges.
- Launch GeForce Experience and check if you can now download and install the driver without encountering any issues.
2. Disabling Your Antivirus Program
The “Driver download failed” error in GeForce Experience can sometimes be triggered by your antivirus software. These security programs are designed to protect your system, but they can occasionally interfere with the normal operation of applications like GeForce Experience. To address this issue, you may need to temporarily disable your antivirus program. Here’s how to do it:
- First, identify the antivirus software you have installed on your computer. Common examples include Windows Defender, McAfee, Norton, or third-party security suites.
- Specific instructions may vary depending on your antivirus software:- Windows Defender: To disable Windows Defender, open the “Windows Security” settings. Under “Virus & threat protection,” click “Manage settings” and toggle off “Real-time protection.”- Third-party Antivirus: For other antivirus programs, open the software’s settings or control panel and look for options like “Disable” or “Turn off real-time protection.”
- With the real-time protection temporarily disabled, launch GeForce Experience and attempt to download and install the drivers again.
- Once you’ve successfully downloaded and installed the drivers, it’s important to re-enable your antivirus program’s real-time protection to keep your system secure.
3. Manual Driver Installation
If you are unable to download the graphics drivers via the GeForce Experience app, manually installing the drivers can be a reliable alternative. To do this, you’ll need to identify your graphics card model and your Windows operating system version (e.g., Windows 10 or Windows 11). Follow these step-by-step instructions:
- Open your web browser and go to the official NVIDIA Drivers page by clicking here.
- On the NVIDIA Drivers page, use the drop-down menus to select your graphics card model under “Product Series” and “Product.” Choose your Windows version under “Operating System.” If you are unsure about your graphics card, visit our guide on how to identify your GPU’s model.
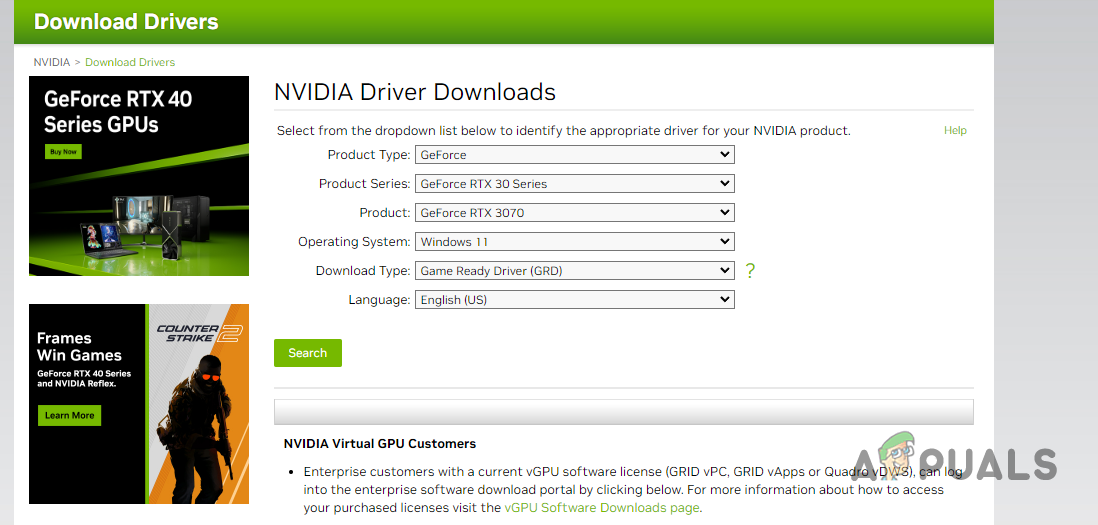
Searching for NVIDIA Driver - Click the “Search” button to view the available drivers compatible with your graphics card and Windows version.
- Then, click the Download button.
- Once the driver has been downloaded, Run the downloaded driver file and follow the on-screen prompts to complete the installation.
- After the installation is complete, restart your computer to ensure the changes take effect.
Manually installing graphics drivers ensures that you have the latest driver version tailored to your specific hardware and operating system. This can be a helpful workaround if GeForce Experience encounters difficulties.
4. Reinstalling GeForce Experience
If you’ve encountered the “Driver download failed” error and suspect that your GeForce Experience installation is causing the issue, a fresh reinstallation can often resolve the problem. This is particularly useful when your current installation is corrupted or outdated. Follow these detailed steps to reinstall GeForce Experience:
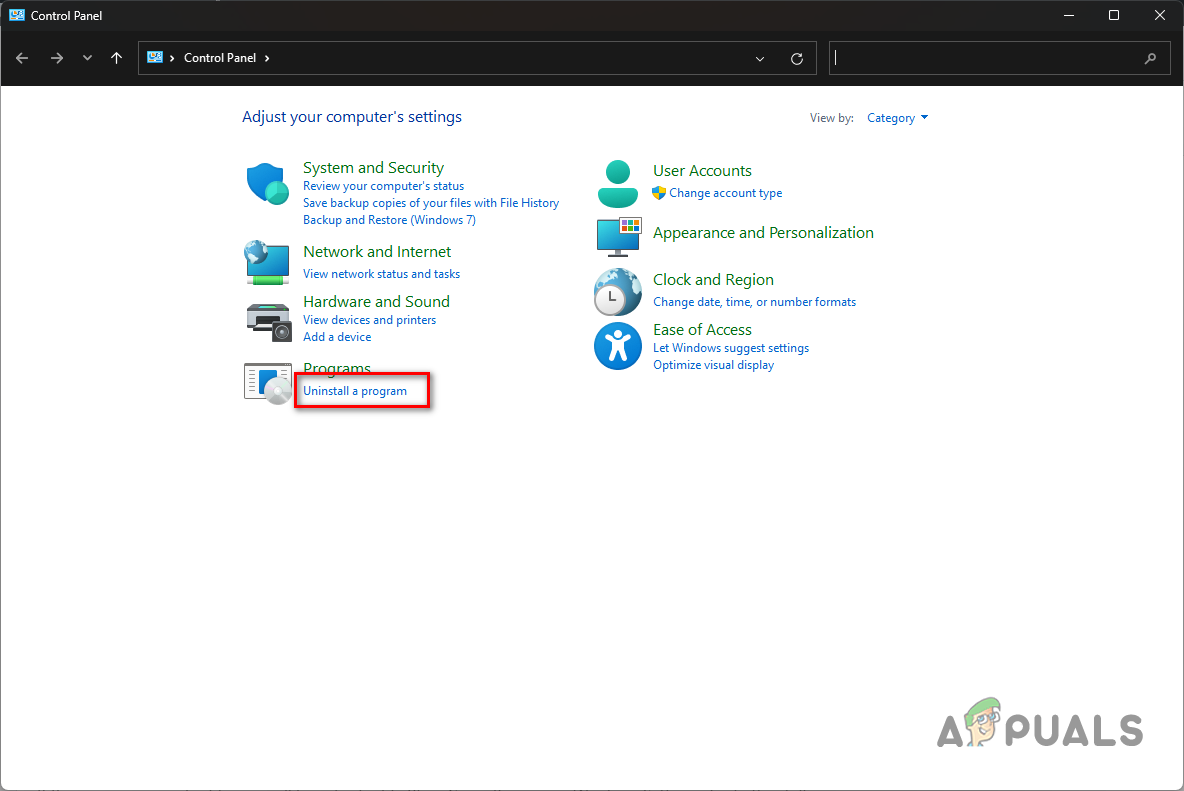
- Begin by opening your computer’s Start Menu and searching for “Control Panel.” Open the Control Panel.
Opening Control Panel - In the Control Panel, click on the “Uninstall a program” option.
Navigating to Uninstall a Program - You’ll see a list of installed programs. Locate “GeForce Experience” from the list.
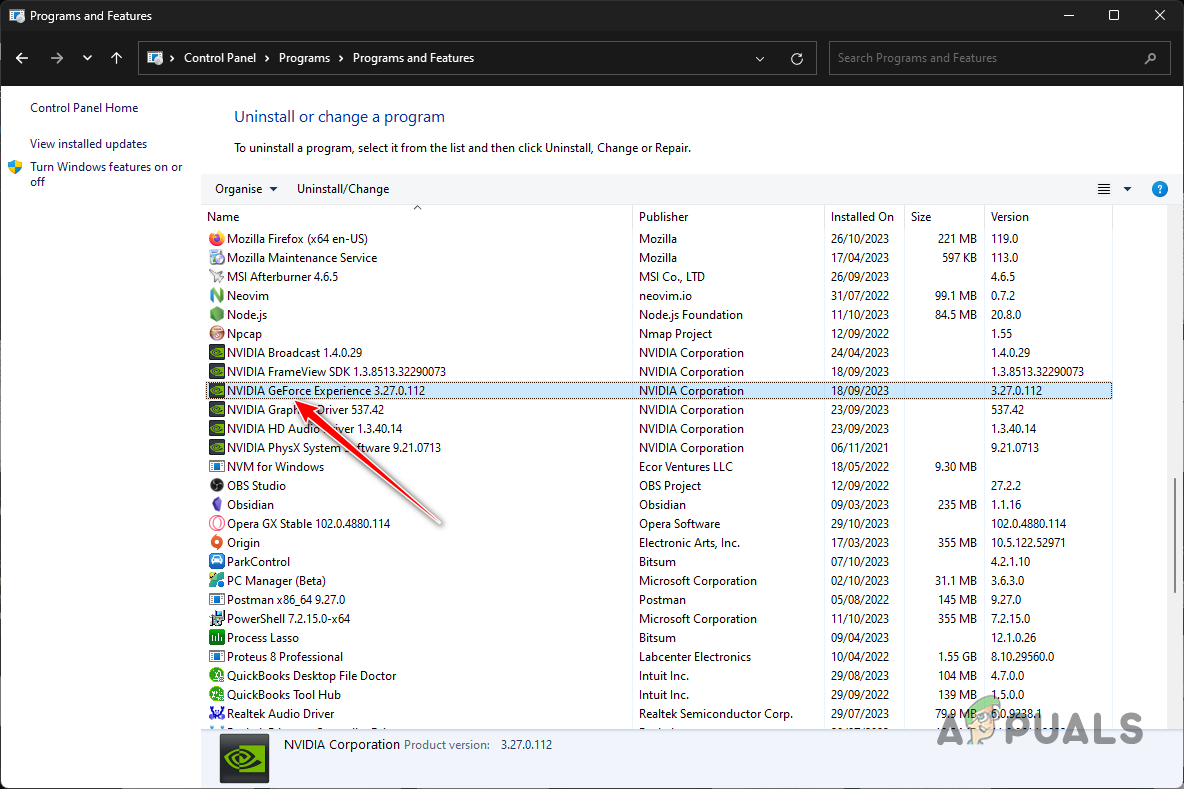
Uninstalling GeForce Experience - Double-click on “GeForce Experience” to initiate the uninstallation process.
- Follow the on-screen instructions to complete the uninstallation. This will remove GeForce Experience from your system.
- After successful uninstallation, go to the official GeForce Experience website. You can find it by clicking here.
- Download the latest version of GeForce Experience from the official website.
- Run the installer and follow the on-screen prompts to install GeForce Experience on your computer.
- Once the installation is complete, launch GeForce Experience and check if you can now download and install the driver without encountering the error.
5. Clean Installing NVIDIA Drivers
Sometimes, the “Driver download failed” error in GeForce Experience can be attributed to corrupted or problematic graphics drivers.
In such cases, performing a clean install of graphics drivers is a recommended solution to ensure a fresh and error-free installation. Here’s a step-by-step guide on how to do it:
- Download the Display Driver Uninstaller (DDU) utility from its official website. DDU is a third-party tool that assists in completely removing existing graphics drivers from your system.
- Once the DDU utility is downloaded, extract the file.
- Open the folder and run the tool via the Display Driver Uninstaller.exe file.
- When the DDU utility opens, you’ll be presented with options. Click “Continue” to proceed.
DDU Options Screen - In the device type menu, select “GPU.”
Selecting GPU - In the “Select device” menu, choose “NVIDIA” since we’re dealing with NVIDIA graphics drivers.
Selecting NVIDIA - Click “Clean and restart” to initiate the removal process. This action will completely remove your current NVIDIA graphics drivers, ensuring a clean slate for the new installation.
Uninstalling NVIDIA Drivers - Once your computer restarts, visit the official NVIDIA Drivers page to download the latest graphics drivers for your specific graphics card model and Windows version.
- Download the latest drivers and install them.
- See if the installation proceeds without any issue.
6. Clean Boot your PC
If none of the previous solutions have resolved the “Driver download failed” error, it’s possible that a third-party program or service is interfering with the driver installation process.
To identify and isolate this interference, you can perform a clean boot, which allows Windows to start with only essential system services running, blocking third-party services and startup applications that may be causing conflicts.
- Press the Windows key + R on your keyboard to open the Run dialog.
- Type “msconfig” and press Enter.
Opening System Configuration - In the System Configuration window, navigate to the “Services” tab.
- Check the box labeled “Hide all Microsoft services.” This ensures that only third-party services are displayed.
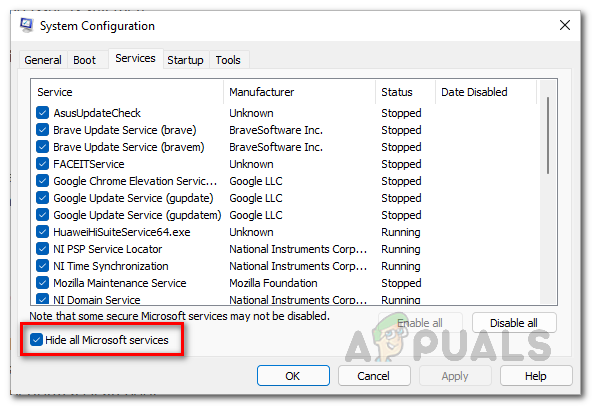
Removing System Services from the List - Click the “Disable all” button to disable all third-party services.
- Click “Apply” to save the changes and then click “OK.”
- You’ll be prompted to restart your computer. Click “Restart” to initiate the clean boot.
Opening Task Manager
After your PC reboots, it will start with minimal services and applications. This allows you to test if the “Driver download failed” error still occurs. If the problem disappears, it’s likely that a third-party program was causing the interference. You can then enable services and applications one by one to pinpoint the culprit.
These solutions should allow you to get around the driver download failed error in GeForce Experience. In case you are still not able to update to the latest version available, we recommend reaching out to the NVIDIA support team for further guidance regarding the problem.
The post How to Fix Driver Download Failed Error in GeForce Experience? appeared first on Appuals.
]]>The post What is Resizable BAR & Should You Enable it? (Guide) appeared first on Appuals.
]]>
Resizable Bar, or rBAR, is another attempt by NVIDIA that promises to provide additional frames in the games you play. This comes at no additional cost and can be activated with just a few mouse clicks. It may sound too good to be true, but it is indeed real.
What is Resizable Bar?
You are probably wondering, ‘What exactly is Resizable Bar, and how does it improve the performance of games?’ The answer to these questions is really straightforward. Resizable Bar essentially uses an advanced feature of PCI Express technology that allows for improvement in in-game performance.
When you are playing a game, you move around the game world, forcing the game to load textures and shaders for the new locations. These textures are transferred to the graphics card through the GPU memory or VRAM via many small CPUs. Modern games often have larger assets, which ultimately results in more transfers of the textures to the GPU.
The number of transfers can often have a negative impact on the performance of the game. This is because these transfers queue up and wait for the former to finish before proceeding. With Resizable Bar, you are able to allow the CPU access to the entirety of the GPU frame buffer.
Normally, the processor on your system is limited to accessing only 256MBs of GPU memory. This creates a bottleneck on modern graphics cards that offer a larger size of VRAM. In addition, it also results in a longer wait time for the game assets to arrive via the CPU to the graphics card to be rendered.
Resizable Bar tackles this problem and instead of only limiting your processor to the mere 256MB of GPU memory, it allows it to access the entire frame buffer. This, as a result, allows the CPU to send in bigger assets quickly since it is able to send in more assets at a time. Thus, by removing this cap from the processor, the performance of games can improve.
Smart Access Memory: AMD’s Counterpart
While Resizable Bar is from NVIDIA, AMD has been quick to come up with its own name for the same technology, known as Smart Access Memory or SAM. The underlying concept of both remains the same. You will be able to use SAM on AMD graphics cards, while Resizable Bar works for NVIDIA GPUs.
This can give rise to the question, does Resizable Bar work on all NVIDIA graphics cards? To answer this, let us have a more detailed look at the support and compatibility of Resizable Bar.
Resizable Bar Requirements
As it turns out, you cannot use Resizable Bar on all NVIDIA cards. To be able to take advantage of the Resizable Bar technology, you need to have an RTX 30 series or newer graphics card along with a compatible processor and chipset.
Intel Support for Resizable Bar
On Intel, the following or newer generations are able to use Resizable Bar.
Intel Chipsets
- Intel 10th Gen: Z490, H470, B460, H410
- Intel 11th Gen S: All available 11th Gen chipsets as of March 30th, 2021.
- Newer
Intel CPUs
- Intel 10th Gen: i9-10xxx CPUs, i7-10xxx CPUs, i5-10xxx CPUs, i3-10xxx CPUs.
- Intel 11th Gen S: i9-11xxx CPUs, i7-11xxx CPUs, i5-11xxx CPUs.
- Newer
AMD Support for Resizable Bar
On AMD, the following or newer generations are able to use Resizable Bar.
AMD Chipsets
- AMD 400 Series (on motherboards with AMD Zen 3 Ryzen 5xxx CPU support)
- AMD 500 Series
- Newer
AMD CPUs
- AMD Zen 3 CPUs: Ryzen 3 5xxx, Ryzen 5 5xxx, Ryzen 7 5xxx, Ryzen 9 5xxx.
- Newer
Resizable Bar Impact on Game Performance
Resizable Bar is a technology that has good potential to improve even further in future. At this current moment, there is a small but visible change in game performances. Technologies like DLSS can often a significantly better improvement in performance than Resizable Bar.
- According to NVIDIA’s official charts, a 12 percent increase in game performance can be achieved with Resizable Bar.
In addition to that, it is also important to note that Resizable Bar will not impact every game on your computer. This is because not every game is able to support the technology and thus enabling it does not impact the performance of the game.
How to turn on Resizable Bar?
With all of that out of the way, we can now focus on enabling the feature on your computer. Before proceeding, make sure that you meet the requirements above, i.e. you have a compatible chipset and processor.
Once you are set there, you can follow the instructions below to enable Resizable Bar.
- First of all, you will need to update your BIOS firmware. This is because the feature cannot be accessed on older versions of BIOS and was only made available through updates.
- To update your BIOS, head to your motherboard manufacturer’s website and download the latest available BIOS. Use the instructions provided by your manufacturer to update your BIOS.
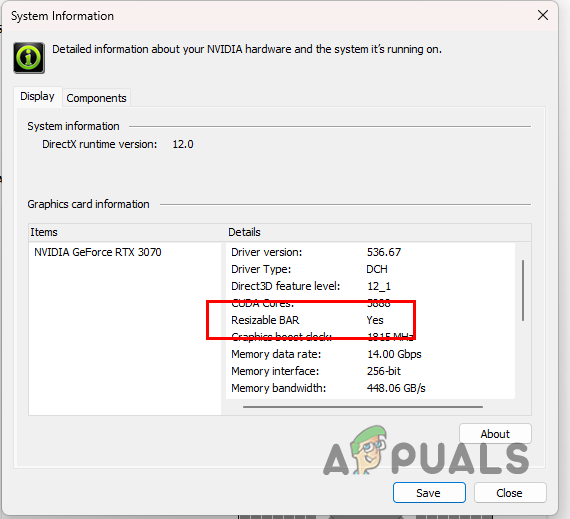
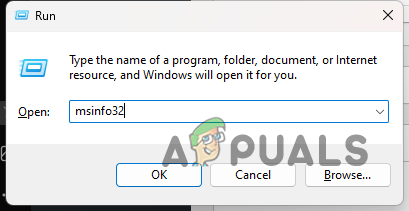
- If you are unaware of your motherboard details, press the Win key + R on your keyboard.
- Type in msinfo32 and hit Enter in the Run box.
Opening System Information window - Then, in the System Information window, look for the BaseBoard Manufacturer and BaseBoard Product options. This will reveal your motherboard model and brand.

Motherboard Info - After updating your BIOS, restart your computer and boot into your BIOS.
- In some cases, you will find an easy Resize Bar option in your BIOS menu to enable Resizable Bar.
- Click on the Resize Bar option, if available, to enable it.
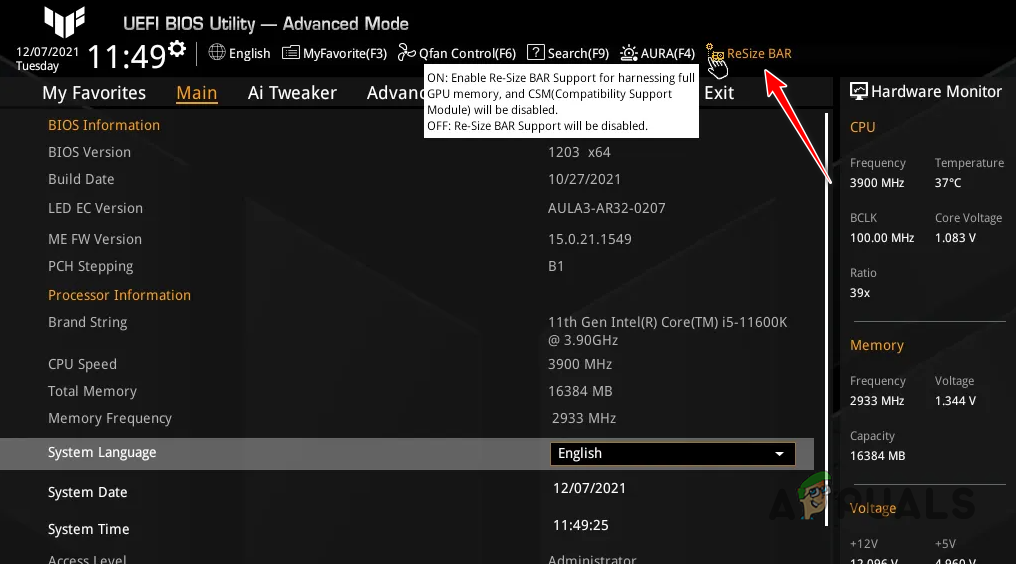
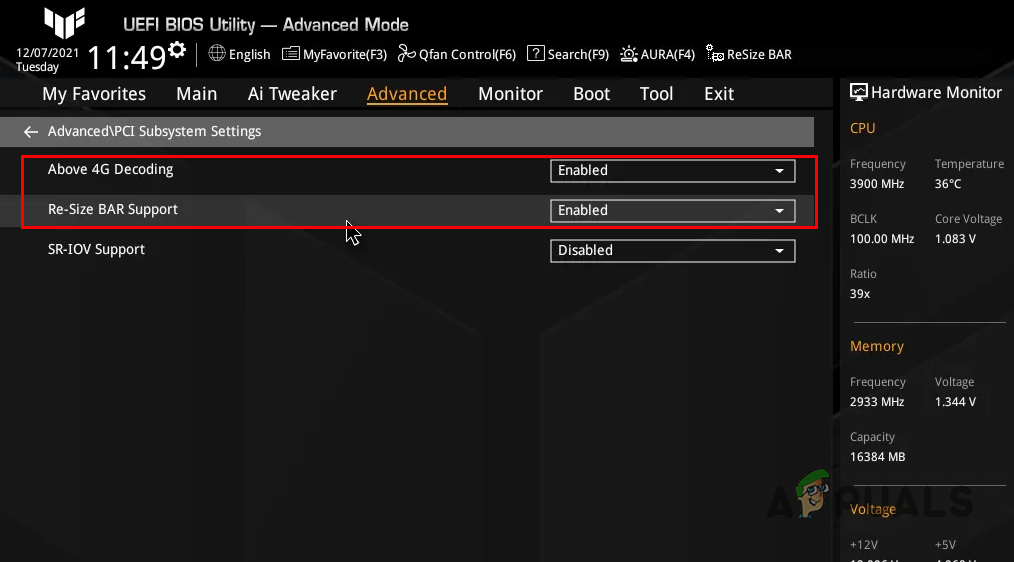
Enabling Resize Bar via Quick Option - In case you do not have the quick Resize Bar option, you will have to navigate to your PCI Subsystem Settings. This will be located under the Advanced tab.
- Then, you will need to enable the Above 4G Decoding and Re-Size BAR Support options. The exact wording can vary slightly depending on your motherboard manufacturer.
Enabling Resize Bar Manually - After that, you will need to disable Compatibility Support Module (CSM) in your BIOS as well.
- You can find this option under the Boot menu.
- Save the settings and exit the BIOS menu.
With that, you should be able to turn on Resizable Bar on your computer, if supported.
Resizable Bar - FAQ
Is Resizable Bar supported on all NVIDIA graphics cards
No, Resizable Bar is not supported on all NVIDIA cards. You need to meet the requirements mentioned in the article above to enable Resizable Bar on your computer.
Does Resizable Bar improve performance in all games?
No, Resizable Bar does not improve performance in all games. Only a list of supported games is able to take advantage of the Resizable Bar technology, which includes Red Dead Redemption 2, Assassins Creed Valhalla, and more.
Is Resizable Bar worth it?
Sure. Enabling Resizable Bar does not have any negative impacts and it can give you a performance boost in some games on your computer which is never a bad thing. There are other technologies like DLSS that you can use on most of the games to gain extra frame rates and they provide a better result. However, enabling Resizable Bar is still not a bad choice, because who does not like extra frames?
The post What is Resizable BAR & Should You Enable it? (Guide) appeared first on Appuals.
]]>The post Fix: Windows Update Automatically Replaced AMD Graphics Driver appeared first on Appuals.
]]>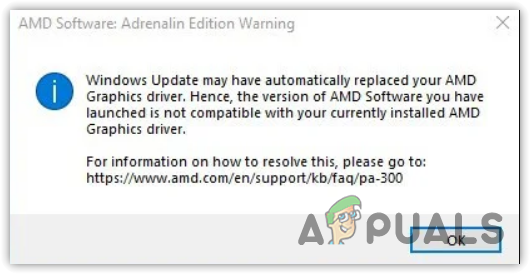
This simply means that the Windows update utility has detected an update for your graphics driver from its server, which ended up replacing the compatible AMD graphics driver.
AMD Radeon Software needs to communicate with the compatible driver to do various tasks, such as providing access to the latest features, performance reports, driver updates, and more.
According to the reports, the screen automatically goes black and starts flickering when users encounter this error message. Thus, it is essential to fix this problem as it is related to the graphics driver.
1. Roll back the graphics driver
The simple and basic solution to this issue is to roll back the AMD graphics driver. It is recommended to start troubleshooting by rolling back the graphics driver. When you update the driver, Windows automatically backs up the old driver, which can be installed later if the user experiences issues with the latest driver.
Since Windows has automatically updated the graphics driver, the Roll Back Driver option will be available. To roll back the AMD graphics driver, follow the steps:
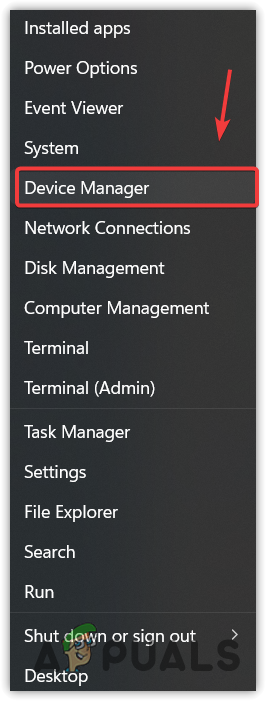
- Right-click the Start Menu button and select Device Manager to open it.
- Now expand the Display adapters and right-click the graphics driver.
- Select Properties and go to Driver.
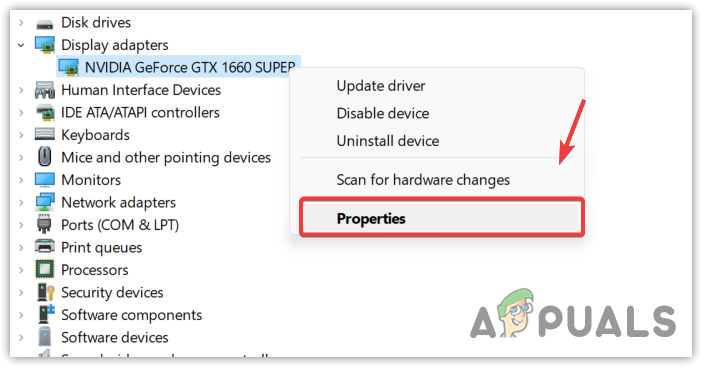
- Here click Roll Back Driver.
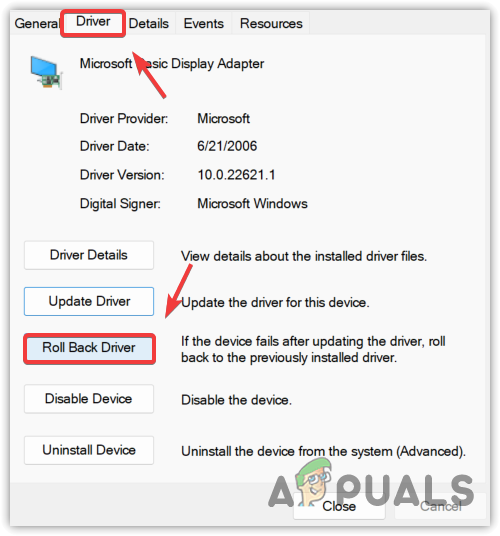
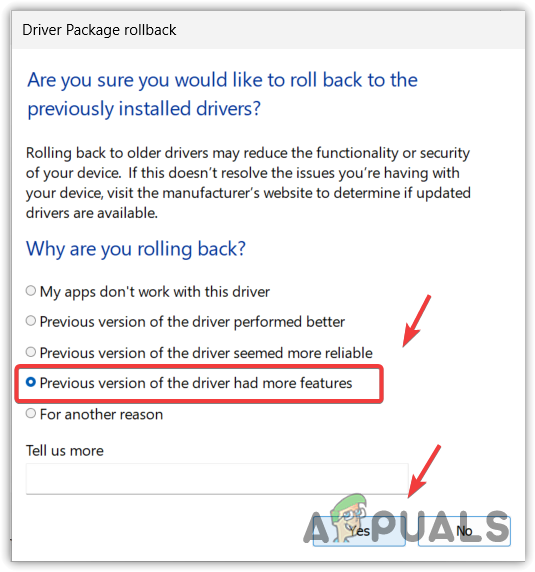
- Select any reason why you are rolling back. Then, click Yes to install the previous driver.
- If the Roll Back Driver option is disabled, then click Update driver.
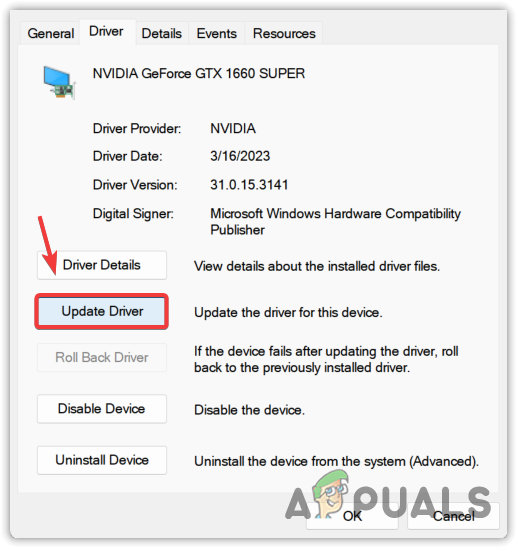
- Select Browse my computer for drivers and select Let me pick from a list of available drivers on my computer.
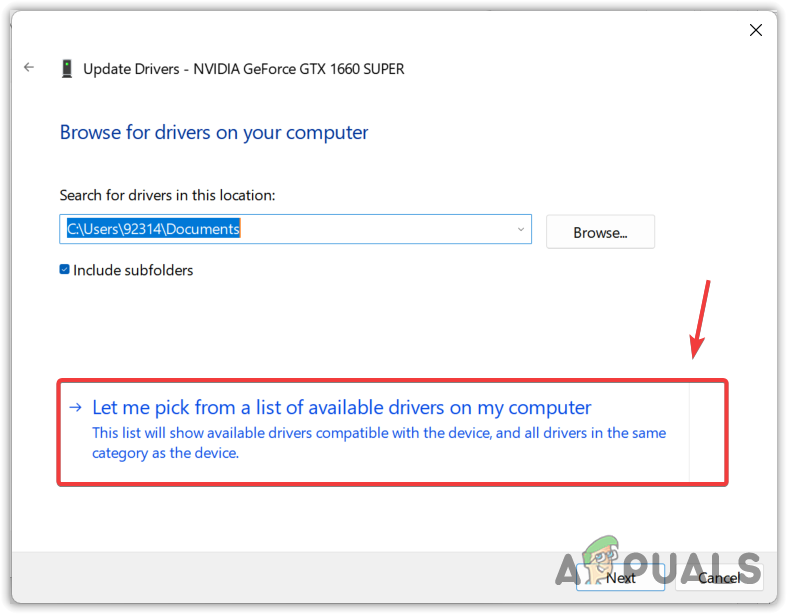
- Tick Show compatible hardware and select the old driver.
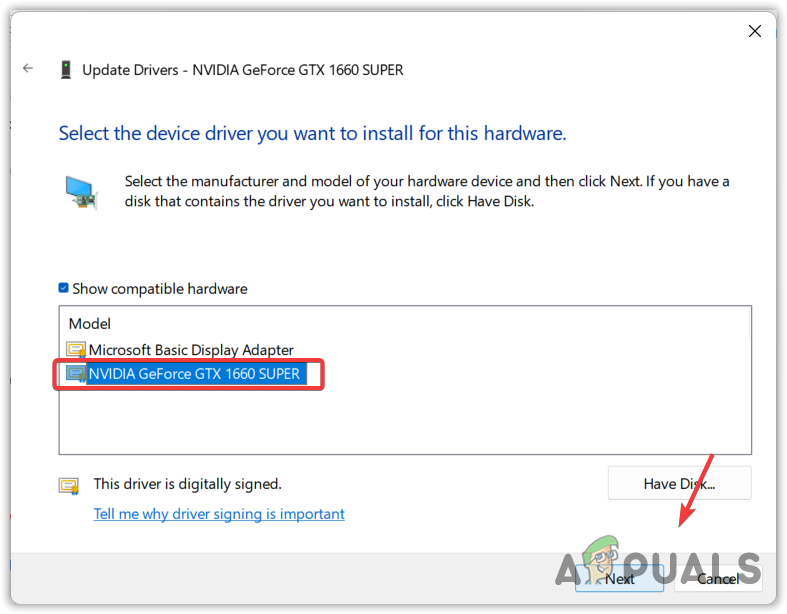
- Then, click Next to install the driver. If that does not work for you, move on to the following methods.
2. Download the AMD graphics driver
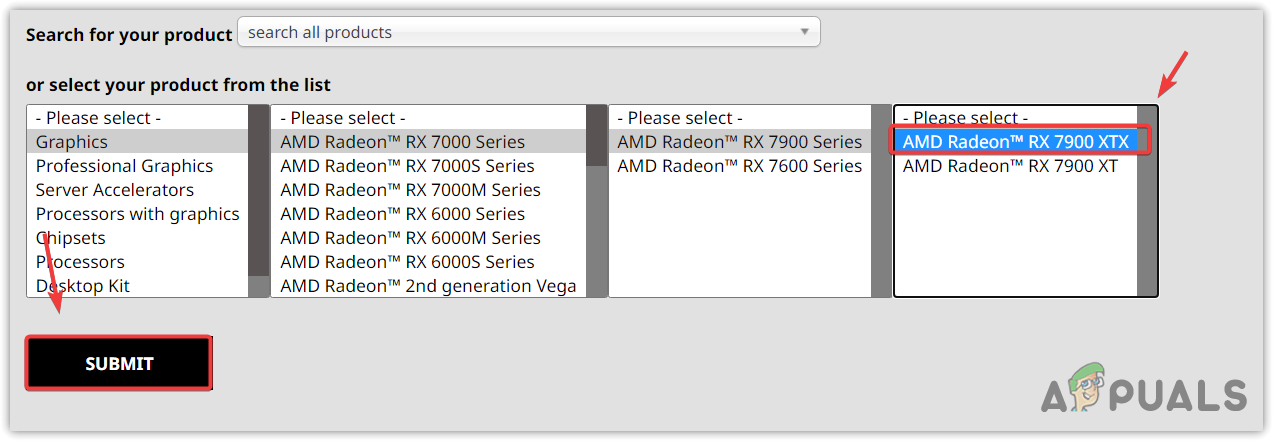
Since the Windows update has replaced the AMD graphics driver with the incompatible one, you can try downloading the compatible AMD driver from the official site, which could fix this error. To do so, follow the steps:
- Head to the official AMD site.
- Select the graphic card and click Submit.
- Then, select the Operating System and click Download.
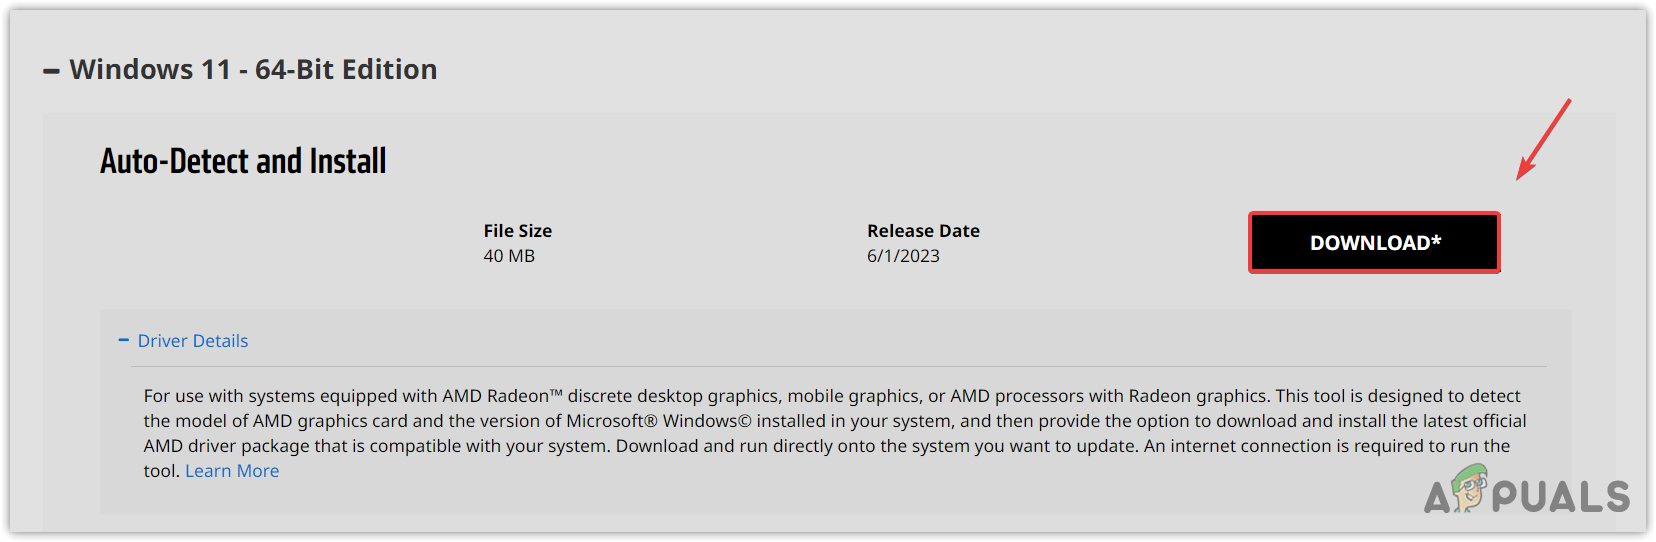
- Once the installer is downloaded, simply run it to install the graphics driver.
- Once done, restart your computer and try launching AMD Radeon Software.
3. Use DDU to reinstall the graphics driver
If the error still persists, then you need to reinstall the graphics driver completely from the system. This can be achieved by using the Display Driver Uninstaller (DDU) application. DDU allows users to remove the drivers with their associated registry files, which ensures a clean uninstallation without any file leftover behind. To use the DDU to reinstall the drivers, follow the steps:
- Download Display Driver Uninstaller by navigating the website through the link.
- Once you downloaded it, you will have to extract the folder. For that, you can use WinRar or 7Zip to extract the folder.
- Open the extracted folder, and run the DDU 7Zip file to extract the DDU folder.
- Now navigate to the extracted folder and run the DDU application.
- Select the Device and the Device type.
- Then, click Clean and restart.
- Once done, follow the 2nd method to download the latest driver from the official manufacturer’s suite.
4. Disable Windows MPO
Windows Multiplane Overlay is a part of the display driver, and it is designed to reduce the CPU and GPU load. When this feature was introduced to Radeon Setup Tool, it started causing this error along with several problems, such as flicker or stutter. Therefore, try disabling the MPO feature by following the instructions.
- Download the Disable MPO registry file through the link.
- Once it is downloaded, open the registry entry file.
- Click Run, and click Yes when UAC prompts.
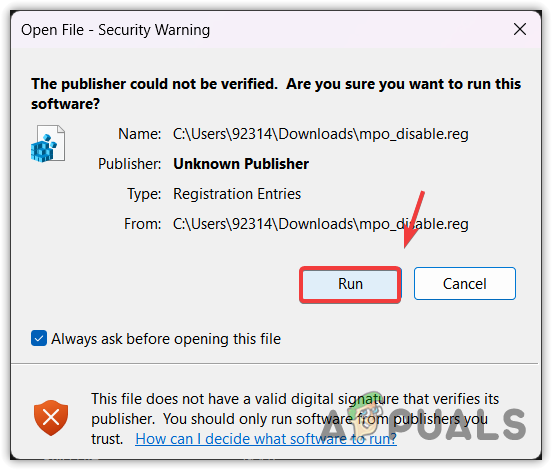
- Click Yes when it says Are you sure you want to continue?
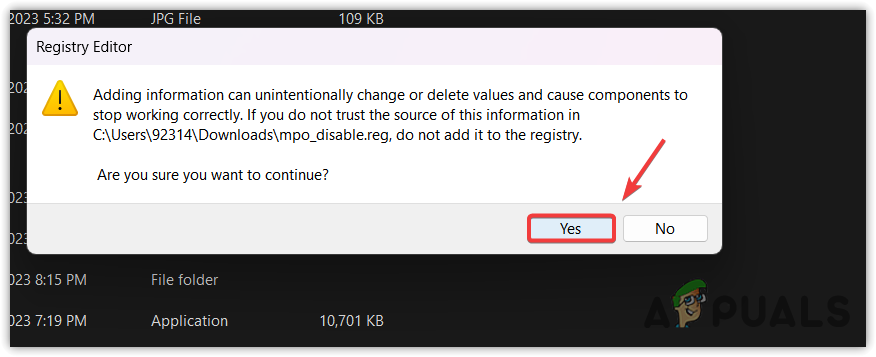
- Once done, restart your computer for the registry changes to take effect.
5. Perform a System Restore
If you are familiar with the System Restore utility, you may have created a restore point that can be used to revert to the previous version of Windows that did not have this issue. System Restore is a utility that saves the system files, drivers, and registry files into a restore point so if anything unusual happens, the user can use the System Restore utility to fix the issues.
To perform a system restore point, follow the steps:
- Click the Start Menu and type the system restore command rstrui.

- Hit Enter to run the system restore utility.
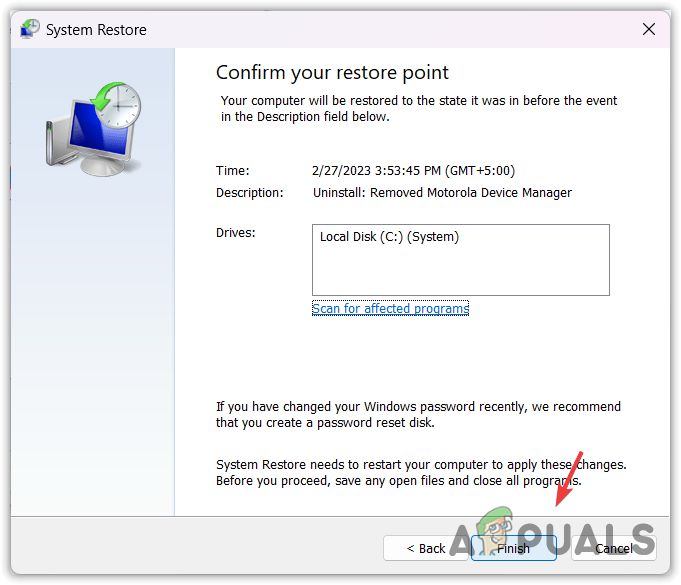
- Click Next and select a restore point.
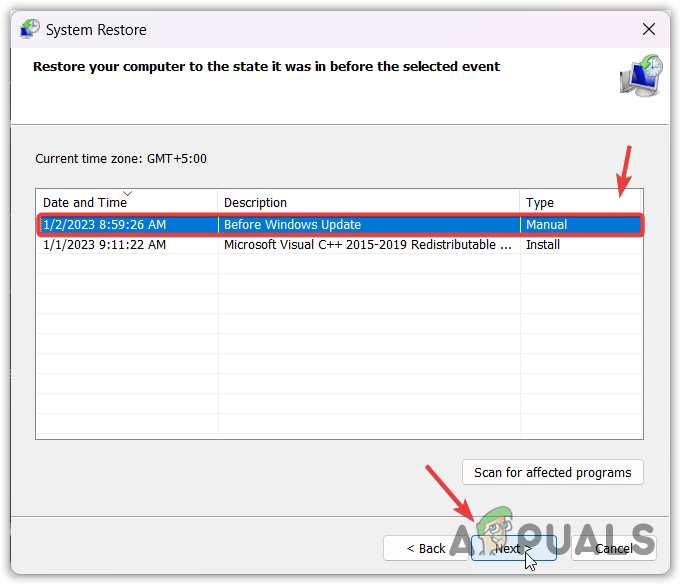
- Again, click Next and click Finish to restore the Windows to a previous state.
That’s it! this will fix your issue. However, if certain settings are not configured correctly you can face this issue again if Windows update replaces the driver. To prevent it from happening again, you have to follow the following method:
Prevent Windows Update from automatically installing the drivers
In this method, we will tell Windows not to update the drivers from it’s database. Follow the steps:
6.1 Disable driver updates through Group Policy Editor
- Click the Start Menu and type Edit group policy.
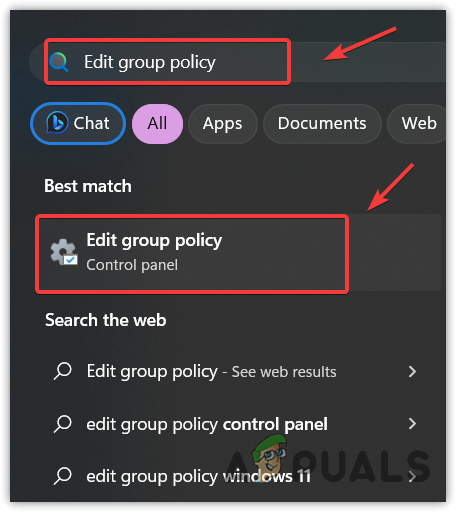
- Hit Enter to open the group policy editor.
- Navigate to the following destination using the left pane.
Computer Configuration > Administrative Templates > Windows Components > Windows Update > Manage updates offered from Windows Update. - In the right pane, double-click the Do not include drivers with Windows update.
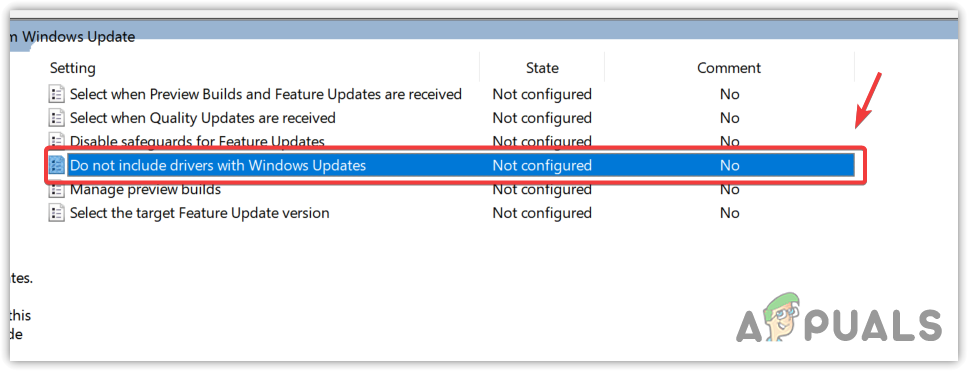
- Select Enabled, click Apply and click OK.
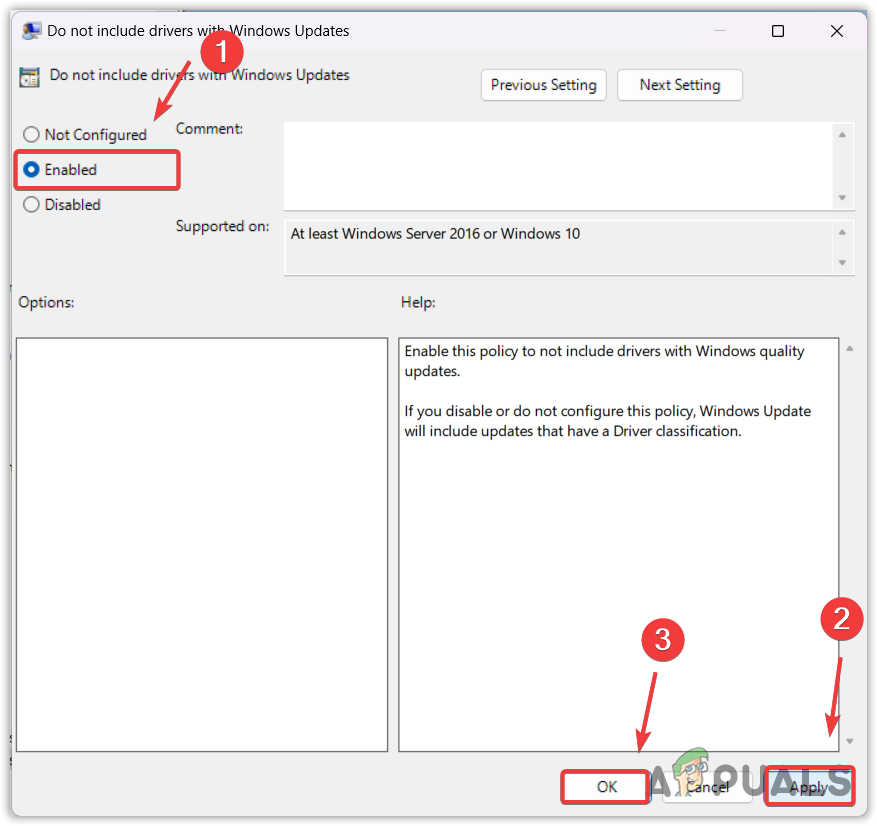
- Now your Windows will no longer include drivers in Windows updates. You can now install the latest AMD graphics driver to replace the driver downloaded via the Windows update utility to fix this error.
- In case the error persists, try disabling driver updates using the registry editor.
6.2 Disable driver updates through Registry Editor
- Open the Start Menu and type regedit.
- Press Enter and click Yes when UAC prompts appear to open the registry editor.

- Use the left sidebar to navigate to the following destination.
HKEY_LOCAL_MACHINE\SOFTWARE\Microsoft\Windows\CurrentVersion\DriverSearching
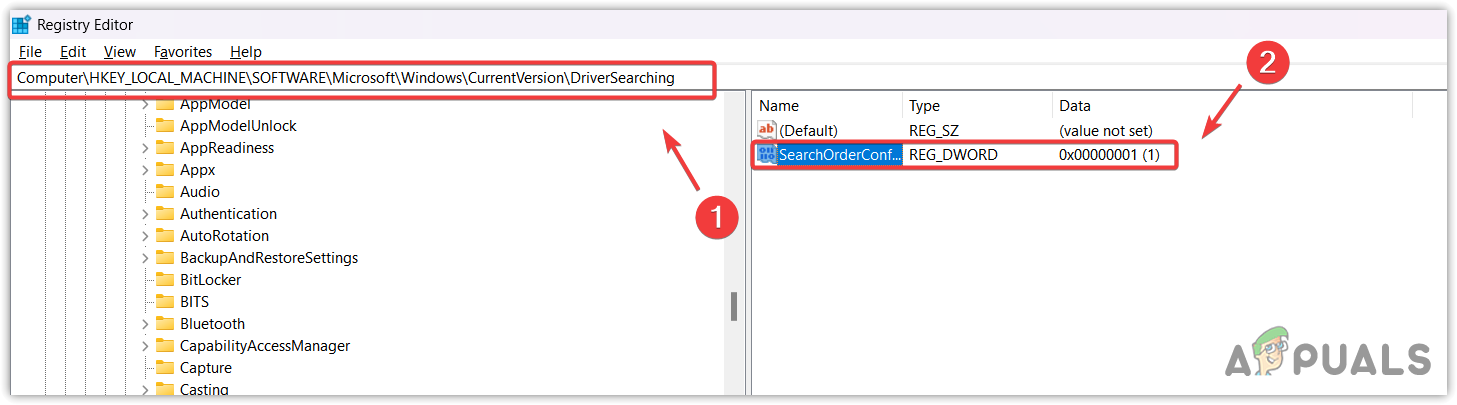
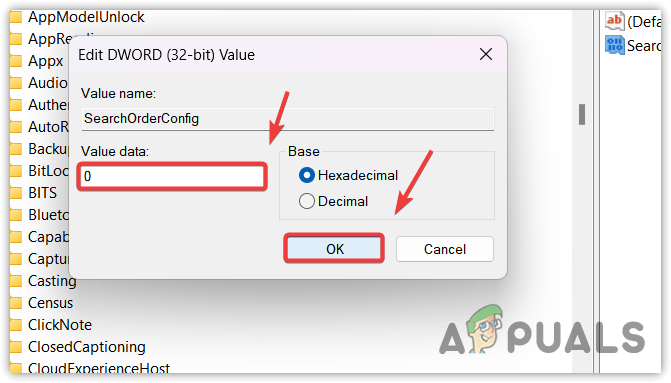
- Double-click the SearchOrderConfig and change its value data to 0 to dsiable the driver updates.
- Once done, click OK, close the registry editor, and restart your computer.
- Then, try installing the AMD graphics driver and see if the error is resolved.
In case you want to enable the Windows to update drivers from it’s database again, simply follow the steps mentioned above but this time put Value data to ‘1’ instead of ‘0’.
Windows Update May Have Automatically Replaced Your AMD Graphics Driver- FAQs
How to fix Windows Update replaced your AMD graphics driver?
Open Device Manager, right-click the graphics driver, and select Properties. Then, go to Driver from the top and click Roll Back Driver. Then, select any reason and click Next to roll back the graphics driver.
What causes Windows Update replaced your AMD graphics driver error message?
This error occurs when the AMD graphics driver is incompatible with the AMD Radeon Software. This often happens when the Windows update installs the graphics driver from the server. To fix this error, you need to install the compatible AMD graphics driver and also configure Windows not to include drivers in Windows updates.
The post Fix: Windows Update Automatically Replaced AMD Graphics Driver appeared first on Appuals.
]]>