The post How to Fix Daemon Tools Conflict in Battlefield 6 appeared first on Appuals.
]]>
The game may mistakenly treat it as an attempt to bypass disc checks, resulting in the error. Even if you are not using Daemon Tools directly, its background services may still be active and trigger the message.
Now that you understand the cause of the error, let’s go through the fixes.
1. Close Daemon Tools from Task Manager
- Right-click the Daemon Tools icon in the system tray > select Exit.

- Press Ctrl + Shift + ESC to open Task Manager.
- Locate and End task for all Daemon Tools processes still running in the background.

- Once all related services are closed, relaunch the game and check if the error is resolved.
2. Disable Daemon Tools from Device Manager
If closing the program did not help, disabling or uninstalling the Daemon Tools drivers from Device Manager can resolve the error. This method also removes hidden drivers, such as sptd.sys, that may be flagged by the anti-cheat system.
- Right-click the Start button on the taskbar > select Device Manager.

- Expand Storage controllers and disable/uninstall any drivers related to Daemon Tools.

- Expand Universal Serial Bus controllers and again disable/uninstall any Daemon Tools drivers found there.

- Restart your PC and then launch the game.
3. Uninstall Daemon Tools
- Press Win + R > type appwiz.cpl and press Enter.

- In the Programs and Features window, locate Daemon Tools, right-click it, and select Uninstall/Change.

- After the uninstallation is complete, restart your PC and launch Battlefield 6 to confirm if the error is gone.
The post How to Fix Daemon Tools Conflict in Battlefield 6 appeared first on Appuals.
]]>The post How to Fix Rust Launch Errors Caused by Interception.exe appeared first on Appuals.
]]>
This detection leads to launch errors in games like Rust because anti-cheat systems do not allow drivers capable of low-level input modification to run in the background. Additionally, cheating tools can exploit Interception.exe for macros, automated inputs, or recoil scripts, making it incompatible with games that enforce strict anti-cheat measures.
If you’re encountering this error, the most effective solution is to completely uninstall the Interception driver.
Before You Begin
A few important notes before proceeding:
- Backup any important configurations: If you use macros or custom key-mapping tools that rely on Interception.exe, they will stop working after removal.
- Administrator rights are required: These steps involve system-level changes, so ensure you’re using an account with admin privileges.
- Prepare for a restart: Changes will only take effect after rebooting your system.
How to Completely Uninstall Interception.exe Using the GitHub Script
The Interception driver integrates deeply into Windows and cannot be removed by simply deleting its files. To ensure a full removal, including registry entries, use the official GitHub uninstallation script:
- Go to the official Interception GitHub repository and download the ZIP file.

- Right-click the downloaded ZIP file, select Extract All, and choose a location to extract the contents.

- Navigate to the extracted folder, open the subfolder named command line installer, and copy its full path.

- Press Windows + S, type cmd, right-click on Command Prompt, and select Run as administrator.

- In Command Prompt, type these commands one by one:
cd "C:\Users\YourName\Desktop\Interception\command line installer" install-interception /uninstall

- Once the uninstallation is complete, restart your computer to apply the changes.
This process completely removes Interception.exe from your system, eliminating its entries from Windows and preventing anti-cheat programs from detecting it.
If That Doesn’t Work: Disable Run as Administrator for Rust
Some users have reported that Rust fails to launch when its executables run with elevated privileges while anti-cheat systems are active. Running as administrator increases access permissions, which can cause anti-cheat systems to treat the program as suspicious.
- Open Steam and navigate to your Library.
- Right-click on Rust and choose Manage > Browse local files.

- Locate these two files:
RustClient.exe Rust.exe
- Right-click each file, one at a time, and select Properties.

- Go to the Compatibility tab and uncheck Run this program as an administrator.
- Click Apply, then OK to save the changes.

- Close Steam, then relaunch it and try starting Rust again.
If the error still persists after uninstalling Interception.exe and adjusting permissions, the problem may be due to corrupted or mismatched game files. In that case, performing a clean reinstall of Rust is the final step.
The post How to Fix Rust Launch Errors Caused by Interception.exe appeared first on Appuals.
]]>The post Fix: “Unsupported Match Options Provided” Error in Fortnite appeared first on Appuals.
]]>
Before You Begin
Perform these quick checks before diving into advanced fixes:
- Restart your PC and router to refresh all network connections.
- Check Fortnite server status on the official Epic Games status page to rule out outages.
- Ensure a stable internet connection using tools like Speedtest. Look for high latency or frequent drops.
- Update Fortnite & Epic Games Launcher to their latest versions.
If the problem continues after these steps, proceed with the fixes below.
1. Reset Network Configuration & Clear DNS
Resetting your network settings clears outdated or corrupted DNS entries that may prevent Fortnite from connecting to matchmaking servers. This process restores your network configuration to its default state, providing a fresh and stable connection path.
- Press Windows + S, type “cmd”, right-click it, and select Run as administrator.

- In the Command Prompt, type:
netsh winsock reset

- Press Enter and wait for confirmation.
- Then type:
netsh int ip reset

- Next, type:
ipconfig /flushdns

- Press Enter to clear the DNS cache.
- Type these commands one by one:
ipconfig /release ipconfig /renew

- Restart your computer to apply all changes.
2. Use Google DNS for Better Connectivity
Using Google DNS can improve server resolution and reduce connection timeouts or mismatches.
- Press Windows + R, type “ncpa.cpl”, and press Enter.

- Right-click your active network connection and select Properties.

- Select Internet Protocol Version 4 (TCP/IPv4) and click Properties.

- Enable Use the following DNS server addresses and set:
Preferred DNS: 8.8.8.8 Alternate DNS: 8.8.4.4
- Click OK and restart Fortnite.

3. Adjust Fortnite Matchmaking Region
A mismatch between your client’s region and the Epic Games server can also trigger this error. To fix it, select a region closest to you.
- Open Fortnite → Settings.
- Navigate to the Game tab.
- Set Matchmaking Region to the closest server to your location.
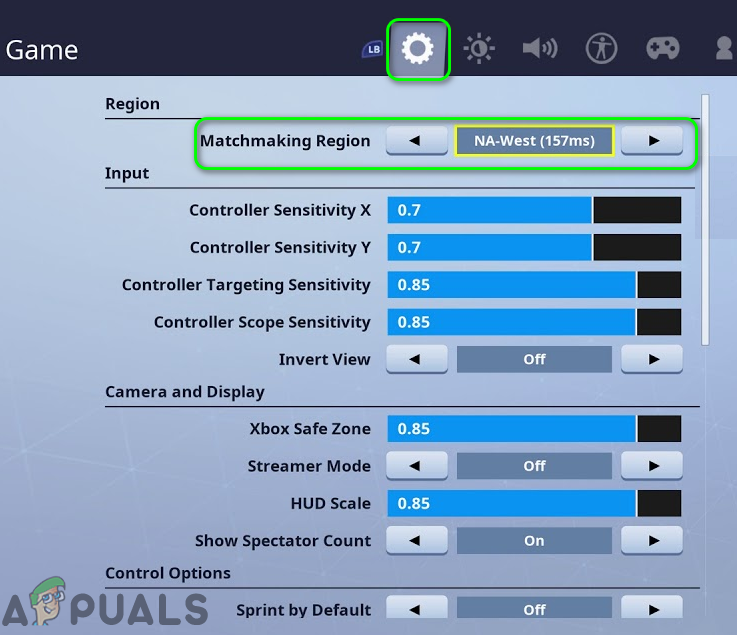
- Click Apply and restart the game.
4. Verify Fortnite Game Files
Corrupted or missing files can break matchmaking. Verifying ensures your installation matches Epic’s latest version.
- Open the Epic Games Launcher → Library.
- Find Fortnite, click the three dots, and select Manage.

- Click Verify under Verify Files.

- Wait for the scan to finish, then restart Fortnite.
5. Check Firewall & Antivirus Settings
Your firewall or antivirus may be blocking Fortnite or Epic Games Launcher. Ensure they are on the allowed list:
- Open Windows Security → Firewall & network protection → Allow an app through firewall.

- Ensure both Fortnite and Epic Games Launcher are allowed for Private and Public networks.
If all else fails, reinstall Fortnite to replace deeply corrupted files with a clean installation.
If the issue persists even after these steps, it may be account-specific or tied to ongoing server issues. In that case, contact Epic Games Support for further assistance.
The post Fix: “Unsupported Match Options Provided” Error in Fortnite appeared first on Appuals.
]]>The post Fix: “Failed to Load Steam Overlay DLL (Error Code 126)” on Windows appeared first on Appuals.
]]>
This error usually happens due to one or more of the following reasons:
- Modified Steam DLL files are missing or corrupted
- Antivirus software flags overlay-related libraries as suspicious and blocks them
- Steam overlay is disabled or improperly configured
If you encounter this issue, follow the steps below to troubleshoot it effectively.
Before You Begin
- Understand the context: This issue often occurs in games using non-standard Steam libraries or executables, which can trigger compatibility or security warnings.
- Temporarily disable antivirus software if it is blocking important files. Re-enable it once troubleshooting is complete.
- Back up your game files before making any changes to avoid data loss.
1. Restore Blocked DLL Files from Antivirus Protection History
Security software may mistakenly block or quarantine overlay-related DLLs, causing this error. Restoring these files can help if they were flagged in error.
- Press Win + S, type “Windows Security”, and open it.

- Click “Virus & threat protection”.
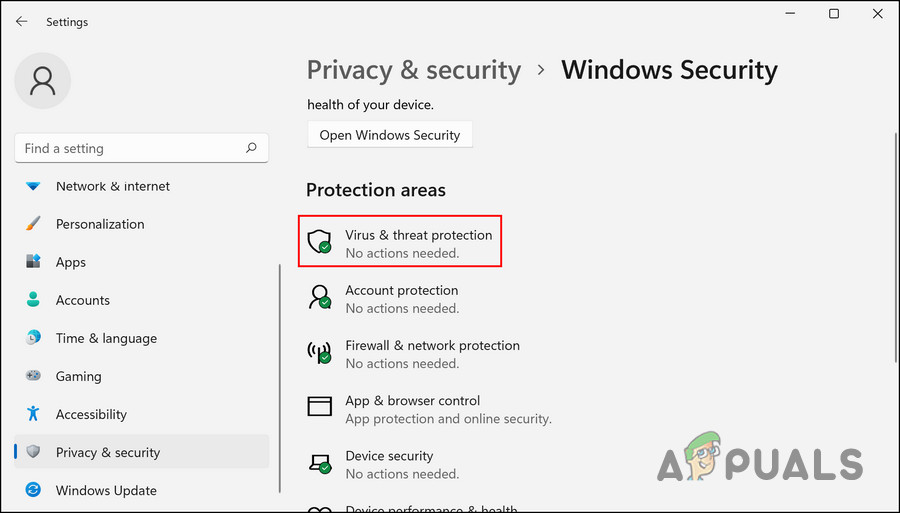
- Scroll down and open “Protection history”.
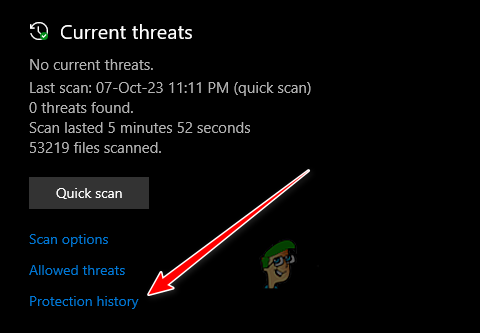
- Look for recently blocked files such as steamoverlayv.dll, SteamOverlay64.dll, or steam_api.dll.

- If found, select Actions > Restore.

- Restart Steam and relaunch the game.
2. Install Steam and Enable the Overlay
Some games using custom libraries may still require Steam’s background services. If Steam isn’t installed or the overlay is disabled, DLL loading errors may occur.
- Download and install Steam on your PC.

- Sign in to your Steam account.

- Navigate to Steam > Settings > In-Game.

- Ensure “Enable the Steam Overlay while in-game” is toggled on.

- Restart Steam and launch the game through the Steam client.
3. Reinstall or Replace Game Files
If the problem persists, the game files may be incomplete or damaged. Reinstalling the game can ensure that all required libraries are present.
- Uninstall the game.
- Reinstall it using a verified installer.
- Restart your PC and check if the issue is resolved.
The post Fix: “Failed to Load Steam Overlay DLL (Error Code 126)” on Windows appeared first on Appuals.
]]>The post Fix: Umamusume Pretty Derby Stuck on Loading Screen appeared first on Appuals.
]]> These problems can prevent the game from starting up correctly, resulting in a looped or frozen loading screen. Fortunately, there are several proven solutions that can help you rebuild necessary files, restore missing features, and repair any corrupted data, allowing the game to load normally.
Before You Begin
- Close unnecessary apps: Background applications can interfere with the game’s resources.
- Run the game as an administrator: Right-click the launcher or executable and select Run as administrator.
- Update Windows: Ensure your system has the latest updates installed.
1. Launch Umamusume Directly from the Installation Folder
Launching the game from its installation directory ensures it uses the correct files and resources, bypassing issues caused by corrupted shortcuts, misconfigured launchers, or third-party overlays like the Steam overlay.
If the game runs this way, it indicates that the issue lies in your shortcut or launcher setup.
- Make sure Umamusume Pretty Derby and related launchers are fully closed.
- Press Windows + E to open File Explorer.
- Navigate to the installation folder. By default:
C:\Program Files (x86)\DMM\Umamusume
- Locate the game’s executable (usually umamusume.exe).
- Right-click it and select Run as administrator.

- If it launches successfully, recreate a clean desktop shortcut by right-clicking the executable and selecting Send to → Desktop (create shortcut).
2. Rename the Umamusume Configuration Folder
The “Umamusume” folder contains configuration files, cached resources, and temporary data that the game uses to launch quickly and apply personal settings. Corruption in these files can cause an infinite loading screen.
By renaming this folder, you force the game to create a fresh set of default configurations on the next launch.
Warning: Game progress is stored on the server, but local preferences (graphics settings, keybindings) may reset. Always keep a backup before renaming or deleting this folder.
- Press Windows + E to open File Explorer.
- Navigate to the folder where Umamusume is installed. By default:
C:\Program Files (x86)\DMM\Umamusume
- Right-click the folder named Umamusume, select Rename, and change the name (e.g., Umamusume_Backup).

- Launch the game again. A new folder will be created automatically.
To restore: If this does not work, delete the new folder and rename your backup back to Umamusume.
3. Install Windows Media Feature Pack (For Windows N Editions)
The Media Feature Pack provides essential video and audio components required for games like Umamusume to run. Without it, the game may fail to initialize or freeze at startup.
Warning: Installing optional features requires a system restart. Save your work before proceeding.
- Press Windows + I to open Settings.
- Go to System > Optional features.

- Click View features.

- Search for Media Feature Pack, select it, click Next, then click Add.


- Restart your PC after installation.
4. Repair or Verify Game Files
If files are missing or corrupted, repairing the game can restore them to their original state. This prevents loading errors caused by incomplete or damaged files.
Warning: This process may take several minutes and use significant bandwidth if large files need redownloading.
For DMM Launcher:
- Launch Umamusume from the DMM client.
- Click the menu icon at the bottom right.

- Select Repair Data.

- Wait for the repair to finish, then relaunch the game.
For Steam Users:
- Open Steam and go to your Library.
- Right-click Umamusume → Properties → Installed Files.
- Click Verify Integrity of Game Files.

If none of the above solutions resolve the issue:
- Contact DMM Support: Visit the official support page and provide details about your system and issue.
- Reinstall on a different drive: If you have another storage drive, a clean install there may resolve stubborn issues.
The post Fix: Umamusume Pretty Derby Stuck on Loading Screen appeared first on Appuals.
]]>The post How to Fix “Login Timed Out” Error in Fragpunk? appeared first on Appuals.
]]>
Before you start troubleshooting, check the game’s server status. If the servers are undergoing maintenance or experiencing downtime, these fixes will not work. Once you confirm the servers are operational, follow the steps below to resolve the login error.
Before You Begin
Perform these quick checks first, as they often resolve temporary login issues:
- Restart your router and PC to clear temporary network glitches.
- Run Steam as Administrator to avoid permission conflicts.
- Flush your DNS cache by opening Command Prompt and typing:
ipconfig /flushdns. - Check your firewall or antivirus and temporarily disable them to see if they’re blocking Fragpunk. (Re-enable them after testing.)
1. Disable Advanced Security Features (For Eero Routers Only)
If you use an Eero router (or any router with similar advanced security features), these settings may block the game’s authentication traffic. Features like malicious site filters, threat detection systems, and auto-blockers can prevent Fragpunk from establishing a stable connection. Temporarily disabling these features can help determine whether they’re causing the login issue.
 Warning: Disabling these features may lower your network’s security and expose devices to potential threats. Only proceed if you understand the risks, and re-enable these features once troubleshooting is complete.
2. Use a VPN (For Region-Based Restrictions)
If the error is related to region-based restrictions or ISP-level blocks, using a VPN (Virtual Private Network) can help by routing your connection through another location, making it seem like you’re accessing the game from a different region.
- Choose a trusted VPN such as NordVPN, ExpressVPN, or ProtonVPN, and download the application.
- Launch the VPN and connect to a server in a stable region (e.g., USA or Europe).

- Try logging into Fragpunk. If successful, you may disconnect the VPN after authentication to reduce latency.
3. Whitelist Fragpunk in Firewall & Antivirus
Sometimes, Windows Firewall or third-party antivirus software can block Fragpunk from accessing the internet. Adding the game as an exception can help.
- Open Windows Security → Firewall & Network Protection.
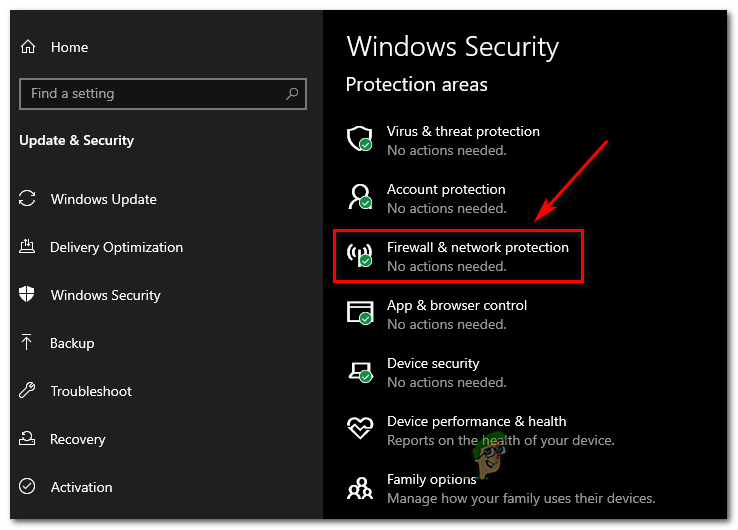
- Click Allow an app through firewall.

- Add Fragpunk.exe and allow it for both Private and Public networks.
- If using antivirus software, add the game’s installation folder to its exclusion list.
4. Verify and Repair Game Files
Corrupted or missing game files can cause login failures. Steam allows you to verify and replace these files with official versions.
- Open Steam and go to your Library.
- Right-click on Fragpunk and select Properties.

- Go to the Installed Files tab and click Verify Integrity of Game Files.

- Once complete, restart Steam and launch the game again.
5. Update Network Drivers
Outdated or corrupted network drivers can cause connectivity issues. Updating them improves network stability and connection speed.
- Right-click the Start icon and select Device Manager.

- Expand the Network adapters section.
- Right-click your active network adapter and choose Update driver.

- Click Search automatically for drivers.

- Allow Windows to install the latest drivers, then restart your PC.
If none of the above steps work, reinstalling the game can eliminate deeply corrupted files or misconfigurations that prevent successful login. Make sure to back up any personal data (e.g., screenshots or configuration files) before uninstalling.
The post How to Fix “Login Timed Out” Error in Fragpunk? appeared first on Appuals.
]]>The post FragPunk Won’t Start? Here’s How to Fix It appeared first on Appuals.
]]>
In some cases, the problem arises because FragPunk struggles to initialize under DirectX 12, suggesting that API compatibility could be a factor. Below are the most common causes of this issue and their solutions.
1. Enable AVX2 Support in BIOS
AVX (Advanced Vector Extensions) allows your CPU to process complex tasks faster, such as game computations, AI, and rendering. Many modern games require this feature for proper operation.
- Restart your computer. As it restarts, press the BIOS key repeatedly. This is usually one of the following: Delete, Esc, F2, F10, or F12.
- Open a tab labeled Advanced, Tweaker, or CPU Configuration.

- Look for options such as AVX, AVX2, or Advanced Vector Extensions. Some BIOS versions may list this under Intel Virtualization, CPU Features, or Power/Performance Settings.
- Set all AVX-related options to Enabled.

- Press the key shown for Save and Exit.
- Allow your system to reboot and then try launching FragPunk again.
2. Run as Administrator
Running the game as administrator grants it the necessary permissions to access protected system files. Without these privileges, FragPunk may fail to start.
- Go to the folder where FragPunk is installed.
- Find the game’s .exe file, right-click it, and select Run as administrator.

3. Update Graphics Driver
If your GPU driver is outdated, it may lack support for new rendering features like DirectX 12 or Vulkan. Updating ensures compatibility and prevents crashes or launch errors.
- Right-click the Start icon and select Device Manager.
- Expand Display adapters.
- Right-click your graphics card and select Update driver.

- Click Search automatically for drivers.

- Follow the on-screen instructions to install the driver.
- Restart your PC and try launching FragPunk again.
4. Launch the Game with DX11
FragPunk may fail to start with DirectX 12 or Vulkan on certain systems. Switching to DirectX 11 can improve stability and prevent crashes.
- Open Steam and go to your Library.
- Right-click FragPunk and select Properties.
- Under the General tab, find Launch Options and type:
-dx11

- Close the window and try launching the game again.
5. Update Motherboard BIOS (For Advanced Users Only)
\If you are using a newer CPU (like Intel’s 13th or 14th-gen) with an outdated BIOS, features like AVX2 may not work properly. Updating the BIOS ensures full CPU compatibility.
To do this, visit your motherboard manufacturer’s official website, download the latest BIOS version for your model, and follow their instructions to update via a USB drive.
The post FragPunk Won’t Start? Here’s How to Fix It appeared first on Appuals.
]]>The post Fix: “Skin Images Must Be 64×64 or 64×32 PNG Files” Error in Minecraft appeared first on Appuals.
]]>
Several factors can cause failed skin uploads. These include downloading skins from unofficial sources, using incorrect file formats or dimensions, or issues related to different skin types. For example, certain Minecraft versions or launchers may not support the slim (Alex) model. Additionally, temporary server issues can also prevent skin uploads.
Before troubleshooting:
Check Minecraft’s Service Status page to ensure there are no ongoing issues with skin uploads.
In this guide, we will walk you through step-by-step solutions to resolve this issue.
1. Convert the Image to PNG Format
Minecraft only supports PNG files for skins because this format preserves transparency and avoids compression artifacts. Converting your skin from JPG or other formats to PNG ensures compatibility with Minecraft’s rendering system.
- Press the Windows key, type “Paint”, and open it.

- Click File in the top-left corner, then select Open.

- Browse and select your JPG or non-PNG skin file.
- Once opened, click File again and choose Save as → PNG picture.

- Try reuploading the converted file in the Minecraft Launcher.
2. Change Skin Dimensions
Minecraft requires skins to be exactly 64×64 or 64×32 pixels. Resizing the image with a skin editor tool ensures it meets these dimensions and resolves upload errors caused by incorrect sizing.
- Right-click your skin file → Properties → Details (on Windows) to check its current dimensions. If they aren’t 64×64 or 64×32, continue with the steps below.
- Open your web browser.
- Search for a Minecraft skin editor and visit a reputable website like Skindex or NovaSkin.

- Upload the skin file from your computer.

- Edit the skin and set the layout to 64×64 or 64×32.
- Download the updated file in PNG format.
- Import the new skin into the Minecraft Launcher.
3. Disable “Only Trusted Skins” in Minecraft
Disabling the “Only Trusted Skins” setting allows you to use custom skins from non-official sources. By default, Minecraft blocks these skins, so turning this option off removes that restriction while still enforcing the required file format and dimensions.
Note: This option is available only in Minecraft Bedrock Edition (1.20.2 and later). Java Edition does not include this feature.
- Open the official Minecraft Launcher.
- Click the “Settings” icon.

- Go to the “General” tab.
- Toggle off “Only allow trusted skins” or “Only show trusted skins”.
- Close and reopen Minecraft to apply the changes.
4. Convert It into a Skin Pack
Packaging your custom skin into a skin pack uses Minecraft’s official resource format, making it easier for the game to recognize your skin as valid content. This often helps bypass upload restrictions.
Note: This method works only for Bedrock Edition.
- Open your browser.
- Go to MCBuild Skin Pack Generator.

- Upload your skin file (ensure it is in PNG format and under 40KB in size).

- Name your skin pack and click “Make Skin Pack”.

- Download the generated file and upload it through the Minecraft Launcher.
If none of these steps resolve the issue, consider reaching out to Mojang Support or visiting the official Minecraft bug tracker to check for any ongoing issues related to skin uploads.
The post Fix: “Skin Images Must Be 64×64 or 64×32 PNG Files” Error in Minecraft appeared first on Appuals.
]]>The post Fix: ‘Ready or Not Has Encountered A Critical Error and Could Not Recover’ appeared first on Appuals.
]]>
What Causes This Error in Ready or Not?
Some of the most common causes include:
- Outdated or conflicting mod files: Mods located in the Paks folder that are incompatible with the latest game version can cause instability.
- DirectX 12 compatibility issues: Running the game with DirectX 12 may lead to crashes on systems with limited driver or hardware support.
- Corrupted configuration files: Damaged or improperly configured game settings can also trigger critical errors.
In the following sections, we’ll outline proven solutions to remove problematic mods, switch to a more stable DirectX version, and reset configuration files. We’ll also cover additional steps to ensure your system is properly configured for stable gameplay.
1. Delete Mod Files in the Paks Folder
When the game launches, it loads all the essential game and engine files, including any mod files in the Paks folder. Outdated or incompatible mods can cause instability when launching or playing the game, resulting in abrupt crashes. Removing these mods often resolves the problem.
Important: Back up your mods before deleting them. Also, do not delete files ending with _Windows.pak or _Windows.sig, as they are core game files.- Open File Explorer and navigate to the Ready or Not game directory, typically located at:
C:\SteamLibrary\steamapps\common\Ready Or Not\ReadyOrNot\Content\Paks
- Right-click on the mod files in the folder and select Delete. Mod files typically have names such as ‘Swaggered.pak’ and ‘SimpleModMenu.pak’.

- After deleting the modded files, open Steam and go to the Library section.
- Right-click on the game and select Properties.

- Navigate to ‘Installed Files’ and select ‘Verify integrity of game files’.

2. Switch to DirectX 11
While DirectX 12 offers enhanced visuals, it can lead to crashes on some systems due to limited driver or hardware compatibility. Switching to DirectX 11, which is more stable and widely supported, often resolves these errors.
- Open Steam and go to the Library. Right-click on Ready or Not and select Properties.
- Click on the Launch options drop-down menu and select ‘Play Ready or Not DirectX11’.

- Launch the game and verify if the issue is resolved.
3. Delete the Configuration File
The configuration file stores user-specific game settings. Corruption or misconfigured preferences in this file can lead to crashes. Deleting it forces the game to create a fresh configuration file with default settings, often resolving the issue.
Important: Deleting this folder will reset all your in-game settings. Renaming the folder (step 5) will also remove saved progress, so back up the data first.- Open File Explorer and navigate to the Config folder, typically located at:
C:\Users\<YourUsername>\AppData\Local\ReadyOrNot\Saved
- Right-click on the Config folder and select Delete.

- Launch the game. A new configuration file with default settings will be created automatically.
- If the issue persists, back up the ReadyOrNot folder by copying it from:
C:\Users\<YourUsername>\AppData\Local\
and saving it to another location (e.g., another drive).
- Rename the original ReadyOrNot folder to ReadyOrNotOld. (Important: This step will recreate all game data from scratch and remove saved progress.)

- Launch the game again to verify if the problem has been resolved.
Additional Fixes:
If the above methods do not resolve the issue, try the following:
- Disable in-game overlays: Overlays from Steam, Discord, or other apps can interfere with game performance. Follow this guide to disable in-game overlays on Windows.
- Clean install GPU drivers: Corrupted or outdated drivers can lead to DirectX-related crashes. Perform a clean installation of NVIDIA drivers (or reinstall drivers for AMD/Intel accordingly).
- Reinstall the game: If all else fails, a clean reinstall can replace any corrupted or missing game files.
The post Fix: ‘Ready or Not Has Encountered A Critical Error and Could Not Recover’ appeared first on Appuals.
]]>The post Fix: Rockstar Games Launcher “Authentication Failed” Error appeared first on Appuals.
]]>“An error occurred while authenticating with Rockstar Games services.”

The most common cause of this problem is a server outage or maintenance. Other potential causes include local network misconfigurations, incorrect DNS settings, VPN conflicts, wrong login details, or tools like GoodbyeDPI interfering with the connection.
Before applying the solutions below, restart your router several times and check Rockstar Games’ server status. If there is a server outage, these solutions will not work until Rockstar’s servers are back online. Once you have confirmed the servers are up, proceed with the following fixes.
1. Restart Your PC to Clear Temporary Glitches
Restarting your PC can quickly resolve temporary glitches in the Rockstar Games Launcher. A restart clears background processes, refreshes your system’s network components like TCP/IP, DNS, and cache, and closes any conflicting applications that might block the connection to Rockstar’s servers.
To restart your PC immediately, press Windows + X > U > R.
Once the PC restarts, open the Rockstar Games Launcher and attempt to log in again.
2. Use a VPN or Mobile Hotspot to Bypass Network Issues
If your ISP is blocking Rockstar servers or your current network has issues, using a VPN or switching to a mobile hotspot can help. These methods assign your system a new IP address and bypass potential ISP-level restrictions.
Using a VPN:
A VPN can help you bypass restrictions or blocks set by your ISP and provide a fresh connection route to Rockstar servers.
- Install a reliable VPN, such as Proton VPN.

- Select a server location and connect.

- Once connected, open the Rockstar Games Launcher and log in again.
Using a Mobile Hotspot:
If the issue is tied to your current network’s IP address, switching to mobile data can provide a new IP and potentially fix the problem.
- Enable mobile data on your phone and turn on the Hotspot feature.

- Disconnect your PC from your Wi-Fi and connect it to your mobile hotspot.

- Log in to the Rockstar Games Launcher.
- Once logged in successfully, switch back to your Wi-Fi connection.
3. Change Your Password for a Fresh Login Session
Resetting your Rockstar Games password can fix issues caused by expired authentication sessions or temporary account freezes due to multiple failed login attempts or suspicious activity. This provides a fresh login session and resolves potential cached credential problems.
- Visit the Rockstar Social Club website.
- Click on Sign In.

- On the sign-in page, select Forgot your password?

- Enter the email address associated with your account.

- Check your inbox for the password reset email.

- Click Reset Password in the email.

- Set a new, strong password and click Password Reset.

- Log in to the launcher using your new password.
4. Reinstall the Launcher for a Fresh Start
Reinstalling the Rockstar Games Launcher can fix corrupted files, outdated configurations, and cached data that may be interfering with authentication. This ensures you’re using the latest version of the launcher with fresh settings.
- Uninstall the launcher via Settings > Apps > Rockstar Games Launcher > Uninstall.

- Press Win + R, type %LocalAppData%, and delete the Rockstar Games folder.

- Download the latest Rockstar Games Launcher.

- Install the launcher and try logging in again.
5. Disable Real-Time Protection to Prevent Interference
Sometimes, Windows Defender can interfere with the launcher’s authentication process by flagging it as suspicious or blocking necessary file changes. Temporarily disabling real-time protection can help bypass these restrictions.
- Type Windows Security in the search bar and open it.

- Click Virus & threat protection > Manage settings under Virus & threat protection settings.

- Turn off Real-time protection and attempt to log in again.

6. Change DNS Settings for a More Reliable Connection
If your DNS server is misconfigured or outdated, it can prevent the launcher from connecting to Rockstar’s servers. Switching to a reliable public DNS like Google or Cloudflare can improve connection stability and resolve this issue.
Changing IPv4 Settings:
- Right-click the Internet icon in the taskbar and select Open Network & Internet settings.
- Click on Ethernet or Wi-Fi.

- Under Related Settings, select Change adapter options.

- Right-click your active connection, select Properties, choose Internet Protocol Version 4 (TCP/IPv4), and click Properties.

- Select Use the following DNS server addresses and enter: Preferred: 8.8.8.8 Alternate: 8.8.4.4


Changing IPv6 Settings:
- Select Internet Protocol Version 6 (TCP/IPv6) and click Properties.

- Enter the following DNS addresses: Preferred DNS server: 2001:4860:4860::8888 Alternate DNS server: 2001:4860:4860::8844

- Check Validate settings upon exit and click OK.
- Reopen the Rockstar Games Launcher and try logging in again.
The post Fix: Rockstar Games Launcher “Authentication Failed” Error appeared first on Appuals.
]]>