The post Fix: “GPS Signal Lost” or “Searching for GPS” Alerts in Google Maps appeared first on Appuals.
]]>
These alerts are commonly triggered by:
- Buggy Google Maps updates
- Corrupted cache or app data
- Restricted app permissions
- Background process failures
- Aggressive battery optimization
Now that you’re aware of the problem and its possible causes, follow the steps below to fix it.
1. Restart Your Phone
Restarting your phone can reset the GPS sensors, clear temporary glitches that may block signal acquisition, and terminate any failed background processes interfering with location tracking. It also refreshes mobile data or Wi-Fi connectivity, which can help restore proper GPS function.

2. Enable “Allow All the Time” Location Access for Google Maps
Google Maps requires continuous GPS access for accurate navigation. If it’s set to “While using the app”, Android may restrict its access when the screen turns off or when you switch apps, causing location issues. Allowing location access at all times helps ensure uninterrupted tracking and prevents battery optimization from interfering with GPS.
- Go to Settings > Search for Google Maps > Maps.

- Tap Permissions.

- Select Location and choose Allow all the time.

- Reopen Google Maps and start navigation to check if the issue is resolved.
3. Clear App Cache and Data for Google Maps and Android Auto
Outdated or corrupted cached data in Google Maps and Android Auto can interfere with GPS functionality. Clearing this data removes old GPS logs, corrupted files, and temporary glitches without needing to reinstall the app. Since Android Auto relies on Google Maps, clearing both is necessary.
- Go to Settings > Search Google Maps > Maps.
- Tap Storage & Cache.

- Select Clear cache.

- Then select Clear data.

- Now go to Settings > Apps > Android Auto.

- Tap Storage.

- Select Clear cache.

- Then tap Clear data.

- Restart your phone to apply the changes.
4. Enable Background Activity for Google Maps
Android may limit background activity to save battery, which can interfere with Google Maps when the screen is off. Setting it to Unrestricted prevents Android from cutting off GPS access in the background.
- Open Settings > Apps > Google Maps.
- Tap Battery.

- Select Unrestricted.

- Restart Google Maps and test the navigation.
5. Uninstall Recent Updates for Google Maps
Sometimes, a recent Google Maps update may include bugs or incompatibilities that break GPS functionality. Rolling back the app can resolve this by restoring the previous stable version.
- Open Settings and go to Google Maps.
- Tap the three dots in the top-right corner > Uninstall updates > Confirm.


- Reopen Google Maps and test if GPS navigation works correctly.
The post Fix: “GPS Signal Lost” or “Searching for GPS” Alerts in Google Maps appeared first on Appuals.
]]>The post Fix: Telegram API Application Submission Errors (Invalid App Title or Short Name) appeared first on Appuals.
]]>
In most cases, this occurs because the App title or Short name you entered does not comply with Telegram’s input rules. However, VPN usage, ad blockers, browser conflicts, or account issues (like unverified or restricted accounts) can also cause this error.
The good news is that these problems are easy to fix. This guide will walk you through the most effective solutions to successfully register your application.
Before You Begin
Before applying the fixes, make sure to check these important points:
- App Title: Must not exceed 64 characters. Avoid using reserved words like telegram or adding @, #, or other symbols.
- Short Name: Only lowercase letters and numbers are allowed, with a length between 5–32 characters. No spaces or hyphens.
- Account Status: Ensure your Telegram account is verified and not restricted or banned.
- Browser: Use an updated browser (preferably Chrome or Firefox). If possible, try using Incognito/Private mode to avoid extension conflicts.
- Cache: Clear your browser cache and cookies before attempting again.
1. Ensure You Enter a Valid App Title and Short Name
An incorrect App title or Short name can trigger a syntax validation error, causing Telegram’s backend to reject the registration request.
The App title must not include reserved words like telegram, nor should it contain spaces or special symbols such as @ or #. Keep it under 64 characters.
For the Short name, only lowercase alphabets and numbers are allowed. It must be between 5–32 characters long. Avoid using special characters like hyphens or underscores.
By following these input rules, you can prevent your registration request from being rejected.
2. Disable VPN and Ad Blockers
VPNs change your network IP address, which may trigger Telegram’s security protocols. If your IP address does not match your account’s registered region, Telegram can block the request.
Additionally, Ad blockers can block critical web scripts and authentication tokens, leading to submission failures.
Here’s how to disable them:
- For Proton VPN and Chrome
- Click on the System tray button on the taskbar and double-click the VPN icon.

- Click on the Disconnect button to terminate the VPN connection.

- Open your browser and click the vertical ellipsis (three dots) in the top-right corner.

- Hover over the Extensions option, then select Manage Extensions.

- Click the toggle button to disable the AdBlock extension.

- Return to the API Development tool page and try registering your application again.
The post Fix: Telegram API Application Submission Errors (Invalid App Title or Short Name) appeared first on Appuals.
]]>The post How to Remove Telegram Limits Quickly (Messaging, Groups & Content) appeared first on Appuals.
]]>
Telegram applies different types of restrictions, such as messaging limits, channel/group restrictions, and NSFW content restrictions, to ensure community safety. However, sometimes these restrictions are applied by mistake. In such cases, you can submit an appeal using @SpamBot if you are eligible.
@SpamBot is an official Telegram bot that helps users verify if their accounts are restricted due to spamming and provides steps to appeal. Let’s go through the common types of restrictions and how to remove them.
1. Messaging Restrictions
Messaging restrictions are applied when Telegram detects spamming or abusive behavior, such as:
- Sending unsolicited messages to unknown people
- Sharing random links in groups
- Being reported as spam by other users

These restrictions prevent you from messaging people who are not in your mutual contacts or who have not saved your number. Typically, these limits are temporary and are lifted within 24 to 72 hours. However, you can also appeal to Telegram to have them removed sooner.
Here’s how to appeal:
- Open the Telegram app and search for @SpamBot.

- Click on Start.

 If you do not see the message confirming that no restrictions are applied, it likely means your account has been flagged for violating Telegram’s terms and conditions.If you acknowledge the violation, you can click on “I was wrong, please release me” and provide an explanation. If you believe the restriction was applied by mistake, continue with the following steps:
 - Click on “Start”.

- Select “This is a mistake” to proceed.

- Click on “Yes” to submit your complaint.

- Choose “No! Never did that!” if you believe the action was wrongly flagged.

- Provide additional details about your case. The bot will forward your request to Telegram’s support team for review.
- Wait for a few hours and check if the restriction has been lifted.
2. Channel/Group Restrictions
Channel and group restrictions prevent you from sending messages in a particular channel or group. These restrictions usually occur when:
- Your account is limited due to spamming or suspicious activity.
- You violated group or channel rules set by admins.
- The group is set to “Admins Only”, where only admins can send messages.

If the restriction is specific to a group or channel, contact the admin and request them to lift the ban. If it affects multiple groups or channels, submit an appeal using @SpamBot.
3. Sensitive Content Restrictions
Telegram applies NSFW (18+ content) restrictions by default to hide adult or explicit content, especially on iOS devices due to Apple’s App Store rules. In some countries, such content is blocked entirely for all users. These restrictions prevent you from viewing adult content on Telegram.
- Go to Telegram’s Web App.
- Log in to your Telegram account.
- Open Settings and navigate to Privacy & Security.

- Find “Sensitive Content” and enable the “Disable Filtering” option.

- Restart the Telegram app for changes to take effect.
By following these steps, you can appeal unfair restrictions, regain access to features, and customize your content settings according to your preferences.
The post How to Remove Telegram Limits Quickly (Messaging, Groups & Content) appeared first on Appuals.
]]>The post Fix: Google Translate ‘You’re Offline’ Error (Android & iOS) appeared first on Appuals.
]]>![]()
Now that you understand the error and its potential causes, let’s explore the solutions to fix it effectively.
Basic Troubleshooting
- Check your Internet: Ensure your internet connection is working properly. A weak or unstable connection can prevent the app from reaching Google Translate servers. Use SpeedTest or Fast to check your internet speed.
- Restart your Wi-Fi router: Restarting your router can refresh your network and may resolve hidden connection issues. This also assigns a new IP address to your device, which can help bypass network restrictions or DNS problems.
- Restart your device: A simple restart can close incomplete background processes that may interfere with the app’s internet access. (Tip: You only need to restart after major fixes, like clearing cache, reinstalling, or changing network settings, not after every small adjustment.)
Check Google Translate Server Status
Sometimes, the issue is not on your end. Visit the Google Workspace Status Dashboard or use Is It Down Right Now to check if Google Translate servers are down. If there’s an outage, you’ll need to wait until Google resolves it.
If these quick checks don’t help, move on to the solutions below.
Why Does Google Translate Say I’m Offline Even When Connected?
This error can happen even with a working internet connection if:
- Your current Wi-Fi network blocks Google servers or uses misconfigured DNS settings.
- Airplane mode is enabled, or background data usage is disabled for Google Translate.
- The app’s cache or stored session data is corrupted, preventing it from properly connecting to Google servers.
- Your network permissions are disabled, stopping the app from using Wi-Fi or mobile data.
1. Switch to Mobile Data or Use a Hotspot
If the issue is caused by your current Wi-Fi network, switching to mobile data or using a hotspot can resolve it. Some networks may block Google servers or use incorrect DNS settings. Changing to another network bypasses these restrictions.
- Close the Google Translate app and turn off Wi-Fi.
- Enable mobile data to connect directly to your carrier’s network.

- Reopen Google Translate and try translating again.
For Hotspot:
- Enable mobile data and turn on your phone’s hotspot feature.

- Disconnect your device from the current Wi-Fi and connect it to the hotspot.
- Once connected, try using Google Translate again.
2. Clear App Cache
Corrupted or outdated cache files can block Google Translate from connecting to its servers. Clearing the cache removes invalid session data, forcing the app to create fresh, functional files.
- Close the Google Translate app.
- Go to Settings > Apps > Translate.

- Tap on Storage.

- Select “Clear cache”.

- Restart your device before reopening Google Translate.
3. Enable Google Translate’s Network Settings
If Google Translate’s network permissions are disabled, it cannot use Wi-Fi or mobile data. Ensure both Wi-Fi and mobile data access are enabled, and background data usage is allowed.
(On Android 13 and later: Go to Settings > Apps > All Apps > Google Translate > Mobile data & Wi-Fi.)
- Go to Settings > Apps > Translate.
- Tap on Data usage and ensure the following are ON:
- Wi-Fi access
- Mobile data access
- Background data usage

- Restart your device to apply changes.
4. Reinstall Google Translate
If clearing cache and adjusting permissions does not work, reinstalling Google Translate can help. This removes any deeply corrupted files or settings.
Note: Reinstalling will delete downloaded offline language packs, which you’ll need to redownload.
- Uninstall Google Translate from your device.
- Restart your device.
- Reinstall Google Translate from the Google Play Store or App Store.

- Open the app and set up again.
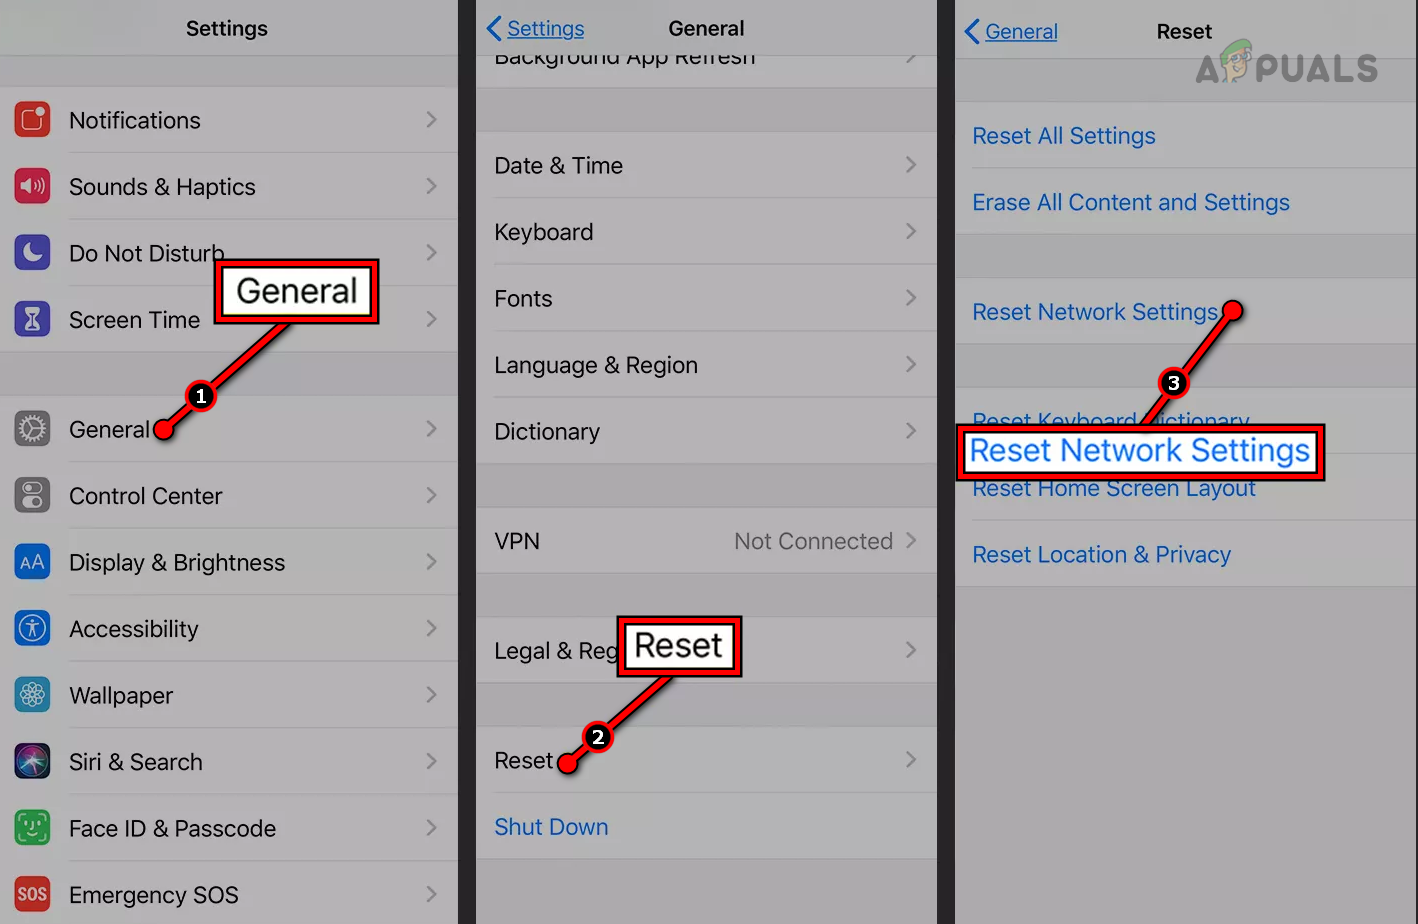
5. Reset Network Settings (Advanced)
If none of the above works, resetting your network settings may help. This will remove all saved Wi-Fi networks, Bluetooth pairings, and VPN configurations.
Warning: You’ll need to reconnect to Wi-Fi manually after this step.
- Go to Settings > System > Reset options.
- Select Reset network settings.

- Confirm and restart your device.
iOS Users
On iOS, if you see this error:
- Check Settings > Translate to ensure Cellular Data is allowed.
- If the issue persists, go to Settings > General > Transfer or Reset iPhone > Reset > Reset Network Settings. Warning: This will erase saved Wi-Fi passwords.
The post Fix: Google Translate ‘You’re Offline’ Error (Android & iOS) appeared first on Appuals.
]]>The post How to Fix ‘This Phone Number is Banned’ on Telegram? appeared first on Appuals.
]]>
Why Does Telegram Ban Phone Numbers?
Before resolving the issue, it’s important to understand why Telegram bans numbers. These bans are mostly triggered by automated moderation systems designed to protect users and the platform from abuse. The most common reasons include:
- Using Virtual or VoIP Numbers: Numbers from Google Voice, Skype, and similar services are often flagged because they are commonly linked to spam or fraudulent accounts.
- Spamming and Violating Terms of Service: Sending too many unsolicited messages, sharing harmful links, or mass-inviting strangers to groups can get you flagged.
- Suspicious Login Behavior: Frequent logins from different IP addresses, public networks, or VPNs may appear as unauthorized access attempts.
- Using Bots or Automation Tools: Third-party clients or automation scripts that mimic spammers can lead to an instant ban.
- Involvement in Banned Groups: Joining or interacting with groups that share illegal or harmful content (piracy, scams, adult content) can get your number blacklisted.

How to Fix “This Phone Number is Banned” on Telegram
Once you know the possible reason for your ban, you can try the following solutions. Start with the simple ones and move to the advanced steps if needed.
1. Wait for Temporary Bans to Expire
If your account is flagged for unusual activity (multiple logins, code requests, or spam-like behavior), Telegram may temporarily ban you.
- Wait at least 24 to 72 hours before trying to log in again.
- During this time, avoid repeated login attempts to prevent extending the ban.
2. Use a Real SIM Card Number
If you registered using a virtual or VoIP number, Telegram may block it permanently.
- Use a physical SIM card number to create or recover your account.
- Re-register with this new number to continue using Telegram.
3. Stop Any Spam-Like Activity
Over-messaging or sharing unwanted links violates Telegram’s policies.
- Review Telegram’s terms of service to ensure your activity complies.
- Refrain from sending bulk messages or joining random groups after recovery.
4. Remove Automation Tools or Unofficial Clients
Telegram bans accounts using bots or unauthorized clients that perform mass actions.
- Uninstall any unofficial Telegram apps or scripts.
- Only use the official Telegram app from trusted sources.
5. Avoid Suspicious Login Patterns
Frequent logins from new locations or networks may trigger a ban.
- Stick to one trusted network for logins.
- If you need a VPN, use a reputable one like Nord, Express, or Surfshark.
6. Exit Banned or Suspicious Groups
Joining groups involved in scams, piracy, or other illegal content can cause bans. Solution:
- Leave any group or channel containing illegal or harmful content.
- If you were unaware of the group’s content, submit an appeal to Telegram explaining your case.
 > Telegram’s privacy policy confirms that even passive membership in illegal groups can result in bans.
How to Appeal a Telegram Ban
If you believe your number was banned by mistake, you can request a review:
In-app
- Open the Telegram app while banned and tap “Help.”
- Follow the instructions and provide detailed information about your situation.
- Write to recover@telegram.org and abuse@telegram.org, explaining your case clearly.

- Reach out to @smstelegram on Twitter.
- Provide them with the full context of your issue.
How to Avoid Future Bans
- Always use a real SIM number for registration.
- Follow Telegram’s terms of service to avoid automated flags.
- Refrain from mass messaging or joining suspicious groups.
- Stick to the official Telegram app to prevent security triggers.
The post How to Fix ‘This Phone Number is Banned’ on Telegram? appeared first on Appuals.
]]>The post Fix: “Transaction was declined [OR-FGEMF-20]” in Google Play appeared first on Appuals.
]]>This issue is most commonly caused by problems with the selected payment method, such as invalid card details, region mismatches, or temporary card restrictions.
Other potential causes may include account-level purchase restrictions (e.g., spending limits or flagged activity) or delays in verifying your payment method due to banking or network issues.
Now that you know what can trigger this error, follow the steps below to resolve it.
1. Wait a Few Minutes and Try Again
Before applying any fixes, wait a few minutes and try the purchase again. Temporary issues with Google’s payment servers can often trigger this error.
Giving it a little time allows the system to reset and process your transaction successfully without any manual changes.
2. Clear Play Store Cache
Corrupted cache files may interfere with payment processing. Clearing the Play Store cache removes stored data that could be stopping the app from communicating correctly with Google’s servers.
- Long-press the Play Store app.
- Tap the info icon.

- Go to Storage.

- Tap Clear Cache.

- Return to the Play Store and try your purchase again.
3. Purchase Directly from the Developer’s Website
If possible, try purchasing directly from the app or developer’s official website. Some apps and services offer direct purchase options, which can avoid issues with Google Play altogether especially when Google temporarily blocks or delays payments.
4. Use a Different Payment Method
If your current card or payment account continues to fail, switch to another supported payment method. Google may reject certain cards due to regional restrictions or flagged activity.
- Open the Play Store app.
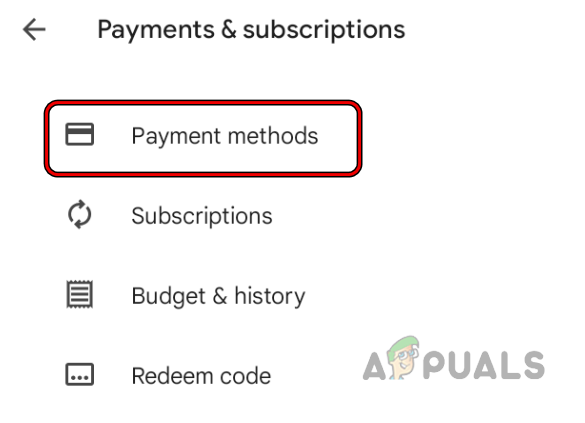
- Tap your profile icon (top right) and go to Payments & subscriptions.
- Select Payment methods.
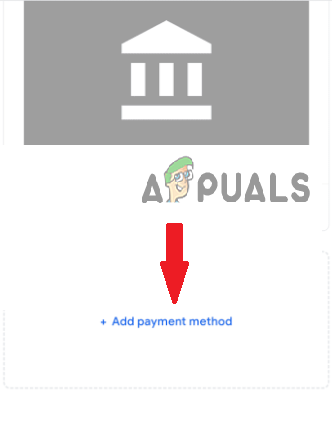
- Tap Add payment method and enter new card details, or use a different service like PayPal or mobile billing (if available).
- Set it as default, then return and try your purchase again.
5. Remove and Re-Add Your Google Account
If the issue is linked to your account’s sync or billing settings, removing and re-adding your Google account can reset background services and clear any corrupted payment data.
 Note: Removing your account will temporarily sign you out of Google services. Ensure you remember your credentials before proceeding.
- Go to your device’s Settings > Accounts (or Passwords & Accounts).
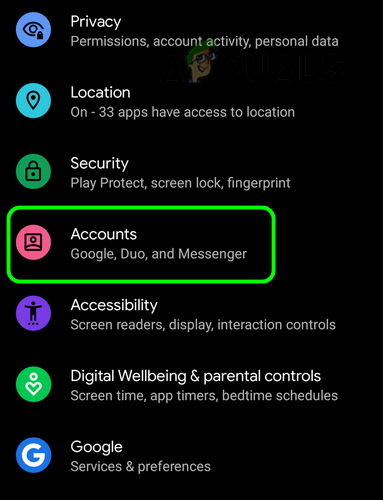
- Select your Google account linked to the Play Store.
- Tap Remove Account.

- Restart your device.
- Go back to Accounts and tap Add Account to sign in again.
- Open the Play Store and try the transaction again.
6. Contact Google Support
If none of the above solutions resolve the issue, contact Google Support. There might be a restriction or flag on your account preventing the payment from going through. Their team can investigate and assist in removing the block or correcting the issue.
- Visit Google Play support here.
- Submit the form with the required details, and the relevant support team will contact you.
The post Fix: “Transaction was declined [OR-FGEMF-20]” in Google Play appeared first on Appuals.
]]>The post How to Fix CapCut No Internet Connection Issue appeared first on Appuals.
]]>
Aside from this, the error can also occur due to corrupted cache, misconfigured app data, or an outdated version of the app that fails to communicate properly with CapCut’s servers.
Now that we have identified the possible causes, let’s explore the solutions to this issue.
1. Verify and Stabilize Your Internet Connection
Start by confirming that your device has a working and stable internet connection. CapCut requires uninterrupted access to its servers, and even brief connectivity drops or DNS issues can trigger the error. Before proceeding with other fixes, make sure your network is functional across multiple apps.
2. Create a New Account with a VPN
If you’re accessing CapCut from a restricted region, simply using a VPN may not be enough. Your existing account may still be tied to a blocked location, causing the error to persist. To bypass this, first connect to a VPN server in a supported country (like the USA or UK), then create a new CapCut account while the VPN is active. This ensures the account is region-linked correctly and avoids the connection issue from recurring.
- Download a reliable VPN app from the App Store or Google Play Store.

- Open the VPN app and connect to a server in a region where CapCut is fully supported (e.g., the USA, UK, or Singapore).

- Now, launch the CapCut app while the VPN is connected. Tap on Sign Up or Create New Account, and follow the prompts to create a new account.

- After creating the new account, try using the app normally.
3. Clear CapCut’s Cache and Data
Corrupted or outdated cache files can prevent CapCut from syncing properly with its servers, resulting in a false “No Internet Connection” error. Like most apps, CapCut stores temporary cache data to improve performance and load times. However, when this data becomes faulty, it can interfere with network operations. Clearing both the cache and app data can often resolve the issue by forcing CapCut to start fresh.
- Open the Settings app on your mobile device.
- Navigate to Apps or Applications.

- Look for the CapCut app and tap on it.
- Tap on Storage & Cache.

- Tap Clear Cache to delete temporary files.

- Now, tap Clear Data or Clear Storage to reset the app completely.
Note: This may erase saved preferences and log you out of your account.

- Relaunch the CapCut app and see if the issue persists.
4. Update or Reinstall CapCut
If the issue persists and you’re not in a restricted region, the problem may lie within the app installation itself. First, check for any pending updates on the Play Store or App Store, as newer versions often include network-related fixes.
- Open the Google Play Store or App Store.
- Type CapCut in the search bar and open its app page.

- If an Update button is available, tap on it to install the latest version.

- If updating doesn’t solve the problem, uninstall the CapCut app by pressing and holding the CapCut icon, then selecting Uninstall.

- Now, go back to the App Store or Google Play Store, search for CapCut again, and tap the Install button to download it.

- Launch the CapCut app and check if the internet connection error has been resolved.
If no updates are available or updating doesn’t help, completely uninstall and reinstall CapCut to remove any corrupted files or misconfigured components that may be causing the error.
The post How to Fix CapCut No Internet Connection Issue appeared first on Appuals.
]]>The post How to Fix “Something Went Wrong” Error on Google Pay appeared first on Appuals.
]]>- Adding a card to Google Pay/Wallet
- Making a purchase using Google Pay
This error means the action you’re attempting was interrupted, often due to issues with Google’s servers or your bank’s systems. In many cases, it’s triggered by incorrect account settings, such as mismatched billing address details.

Additionally, expired or already-used payment tokens, corrupted app cache, or a device that is not Google-certified (common with rooted devices or custom firmware) can also lead to this error. In this guide, we’ll walk you through various methods to resolve it.
1. Clear Cache
Corrupted cache files may prevent transactions from completing or block new card additions. Clearing the cache removes outdated data and forces Google Pay to retrieve updated information from both Google’s and your bank’s servers, potentially resolving the issue.
- Long-press the Google Play Store app.
- Tap the info icon.

- Select Storage.

- Tap Clear Cache.

- Repeat the same steps for the Google Pay/Wallet app.
2. Use Mobile Data
Switching from Wi-Fi to mobile data can provide a fresh connection and bypass any restrictions set by your internet provider. This also gives your device a new IP address, which may help resolve temporary DNS conflicts and improve communication between Google Pay and your bank.
- Disable your Wi-Fi connection and enable Mobile Data.

3. Use a Different Payment Method
If the issue occurs with your primary payment method, try switching to another card or a Google Play gift card. This can help bypass token-related issues, as each payment method uses its own unique token. Using an alternative method generates a new token, which may eliminate the error.
4. Recreate Your Payment Profile
A corrupted or mismatched payment profile may prevent Google Pay from verifying your identity or linking your card. This often occurs when the stored billing address or identity information doesn’t match what’s registered with your bank. Recreating your payment profile clears the old data and starts a fresh configuration.
- Visit your Google Pay settings.
- Scroll down to the Payment Profile Status section and click on Close Payment Profile.

- After closing the profile, follow the on-screen prompts to create a new payment profile for your correct country or region.
5. Contact Support
If none of the above solutions work, the issue may lie with your card or account configuration. Contact Google Pay support or your bank’s customer service to report the error. Provide all relevant details so they can assist in resolving the issue from their end.
The post How to Fix “Something Went Wrong” Error on Google Pay appeared first on Appuals.
]]>The post Fix: “Invalid Debit Card Information (XN)” Error in Google Pay or Wallet appeared first on Appuals.
]]>“Invalid debit card information. Please try again. (XN)”
This error typically indicates that the card details entered are invalid, outdated, or not verified, which prevents the card from being added successfully.

The most common causes of this issue include incorrect card numbers, expired cards, mismatched cardholder names, or outdated CVC codes. It may also result from using inconsistent personal information (such as a nickname instead of your full legal name) or from corrupted or outdated versions of the Google Wallet or Google Pay app. Now that you understand the possible reasons, let’s walk through the most effective solutions.
1. Verify Cardholder Information
Before attempting any other fix, double-check the cardholder’s name entered in Google Pay. The name must exactly match the one registered with your bank. Even small variations, like omitting a middle name or using a nickname, can trigger this error.
Carefully compare the name you enter with the one printed on your physical card and ensure it matches the records your bank has on file.
2. Add Card Using Your Banking App
If you’re facing this error while adding a card through the Google Pay or Wallet app, it might be due to a temporary issue within the app. A more reliable approach is to use your bank’s mobile application if it supports Google Pay or Wallet integration, to add the card directly.
- Open your banking app and navigate to the Cards section.
- Tap the “Add to Google Pay/Wallet” button.

3. Reinstall the Google Wallet App
Sometimes, app files may become corrupted, causing functionality issues like the XN error. Reinstalling the Google Wallet app ensures that any broken data is cleared and replaced with a fresh, updated version.
- Tap and hold the Google Wallet app icon.
- Select Uninstall.

- Confirm by tapping OK.

- Go to the Play Store, search for Google Wallet, and reinstall the app.

4. Ask Your Bank to Reset the Card Token
If you’ve previously added this card to Google Pay or Wallet, the error might occur because the card’s authorization token is already in use and cannot be reused. In such cases, contact your bank and request a token reset. Once the token is reset, try adding the card again through Google Pay or Wallet.
The post Fix: “Invalid Debit Card Information (XN)” Error in Google Pay or Wallet appeared first on Appuals.
]]>The post Fix: Google Play Gift Card Error OR-RGCA-04 (Payment Profile Issue) appeared first on Appuals.
]]> The most common reason behind this error is that your payment profile was created in a different country than the region your gift code is intended for. It can also happen due to network-related issues or an incomplete Google Pay setup, such as missing or incorrect address details.
 1. Use Mobile Data
A quick and effective solution is to switch from WiFi to mobile data. This change gives you a new IP address, which may bypass regional restrictions applied by your internet provider and resolve the error.
- Turn off your WiFi connection and enable Mobile Data.

2. Create a New Profile
If you’ve moved to another country or your gift card is from a different region, currency conflicts can trigger this error. In this case, deleting the existing payment profile and creating a new one aligned with the gift card’s region can help resolve the problem.
- Go to your Google Pay settings.
- Scroll down to the Payment Profile Status section and select Close Payment Profile.

- After closing the profile, follow the on-screen instructions to create a new payment profile for the correct country or region.
3. Use Mobile to Redeem the Code
Using a mobile device instead of a computer can resolve problems linked to browser cache, VPN settings, or autofill errors. The Google Play app automatically detects your location, making it easier to process redemptions without region mismatches.
- Open the Google Play Store app on your mobile device.
- Tap your profile icon in the top-right corner.

- Select Payments & subscriptions from the menu.

- Choose Redeem code.

- Enter your gift card code and tap Redeem.
4. Fill the “We Need More Info” Form
If none of the previous steps work, you can complete the “We need more info” form that appears during the redemption process. This form allows you to verify your payment profile by providing personal details, helping to resolve account-related issues that trigger the error.
- Try redeeming your gift card through Google Play.
- When the error appears, click on the blue link or button labeled “Send us details.”

- Fill in the following required information:
Full name Email address linked to your Google account Country of residence A government-issued ID (if requested) A brief description of the issue
- Submit the form and wait for a response, which usually arrives within 48 to 72 hours.
The post Fix: Google Play Gift Card Error OR-RGCA-04 (Payment Profile Issue) appeared first on Appuals.
]]>